# Welcome

## ins-pi Product Documentation

Welcome to the ins-pi product documentation. Here you'll find guides, configuration references, and best practices for all our products.

## The YouDesign Enterprise Transformation Suite

Everything you need to design, govern, and transform your enterprise — all natively built on ServiceNow. The YouDesign suite consists of five products, each designed to solve a specific challenge in enterprise transformation.

<table data-column-title-hidden data-view="cards" data-full-width="false"><thead><tr><th align="center"></th><th></th><th data-hidden></th><th data-hidden data-card-cover data-type="image">Cover image</th><th data-hidden></th><th data-hidden data-card-target data-type="content-ref"></th></tr></thead><tbody><tr><td align="center"><h3><strong>Freelucy</strong></h3></td><td>Drag. Drop. Relationships Done.</td><td><h4><i class="fa-bolt">:bolt:</i></h4></td><td data-object-fit="contain"><a href="/files/rDgGStz2Vn6PfYJc2Lbt">/files/rDgGStz2Vn6PfYJc2Lbt</a></td><td></td><td><a href="/spaces/JwX0HDB6chAHkVR797eQ">/spaces/JwX0HDB6chAHkVR797eQ</a></td></tr><tr><td align="center"><h3><strong>Blueprints</strong></h3></td><td>See it. Fix it. Govern it.</td><td><h4><i class="fa-leaf">:leaf:</i></h4></td><td data-object-fit="contain"><a href="/files/ONRNWUejaWRrQtKSbzGU">/files/ONRNWUejaWRrQtKSbzGU</a></td><td></td><td><a href="/spaces/7Niz7ZIas3sIVJn9fA4q">/spaces/7Niz7ZIas3sIVJn9fA4q</a></td></tr><tr><td align="center"><h3><strong>Models</strong></h3></td><td>Live diagrams. Always current. Always yours.</td><td><h4><i class="fa-globe-pointer">:globe-pointer:</i></h4></td><td data-object-fit="contain"><a href="/files/jdFLnFwfygKzFFzj6Xir">/files/jdFLnFwfygKzFFzj6Xir</a></td><td></td><td><a href="/spaces/OS5XKTz5WlrX4s5rESlH">/spaces/OS5XKTz5WlrX4s5rESlH</a></td></tr><tr><td align="center"><h3><strong>Processes</strong></h3></td><td>Design it. Wire it. To everything.</td><td></td><td data-object-fit="contain"><a href="/files/5Cg842fiaB6Zl9I4hvAz">/files/5Cg842fiaB6Zl9I4hvAz</a></td><td></td><td><a href="/spaces/kkKlx0WOuze8Nz3VX3dN">/spaces/kkKlx0WOuze8Nz3VX3dN</a></td></tr><tr><td align="center"><h3><strong>Command (UPMX)</strong></h3></td><td>The Transformation OS™ for your enterprise.</td><td></td><td data-object-fit="contain"><a href="/files/26FARdIXiju1PsTHwJrt">/files/26FARdIXiju1PsTHwJrt</a></td><td></td><td><a href="/spaces/x4mE784snR9Eb8oVrk4e">/spaces/x4mE784snR9Eb8oVrk4e</a></td></tr></tbody></table>

***

## Standalone Products

Designer is a powerful diagramming and modeling application that runs natively on ServiceNow. Create real-time diagrams, hierarchy maps, stack views, and future-state models — all based on live ServiceNow data.

<table data-view="cards"><thead><tr><th></th><th></th><th data-hidden data-card-cover data-type="image">Cover image</th></tr></thead><tbody><tr><td><h3><strong>Designer</strong></h3></td><td>Visual Diagramming and Modeling</td><td data-object-fit="contain"><a href="/files/XKihIHWy8obXFTq0U6UF">/files/XKihIHWy8obXFTq0U6UF</a></td></tr></tbody></table>

***

## Need help?

If you can't find what you're looking for, reach out to us at [ins-pi.com/support](https://www.ins-pi.com/support).


# Installation & Setup

This guide walks ServiceNow administrators through getting the ins-pi applications from the ServiceNow Store, installing it on an instance, and assigning the right roles to users.

## Before you begin

You need:

* a **Now Support (HI) account** linked to your organization
* the **admin** role on the target ServiceNow instance
* network access to `store.servicenow.com` from your browser

> If you do not have a Now Support account, ask your organization's **Customer Administrator** to add your email address to the company's Now Support profile.

## Step 1 -- Find the app on the ServiceNow Store

1. Go to [store.servicenow.com](https://store.servicenow.com)
2. Use the search bar to search for for any ins-pi application e.g. **YouDesign Blueprints**
3. Select the app from the results to open the product page

> **Tip:** You can also filter the Store by provider, release version, category, or price using the left-side filter panel.

## Step 2 -- Request the app

On the product page:

1. Click the **Request App** button on the right side of the page
2. The request is sent to the app vendor for review
3. You receive an approval notification email, typically within one business day

> **What happens behind the scenes:** The vendor reviews the request and confirms your organization's access. This is a one-time step per organization.

## Step 3 -- Get the app entitlement

After your request is approved:

1. Return to the application e.g. YouDesign Blueprints product page on the ServiceNow Store
2. The button now shows **Get** instead of Request App
3. Click **Get**
4. A dialog appears asking you to choose an entitlement scope:
   * **All instances** -- entitles every ServiceNow instance in your organization (recommended)
   * **Selected instances** -- entitles only the instances you choose
5. Click **OK** to confirm
6. Accept the ServiceNow Store agreement if prompted

## Step 4 -- Install on your ServiceNow instance

1. Log in to your target ServiceNow instance with **admin** credentials
2. Navigate to **System Applications > All Available Applications > All**
3. Search for the application e.g. **YouDesign Blueprints**
4. Click **Install**

The app installs automatically. Once complete, it is ready to configure.

> **Tip for newer instances (Vancouver+):** You can also use the **Application Manager** inside Admin Center for a consolidated view of all available and installed apps.

## Step 5 -- Verify the installation

After installation, confirm that:

* [ ] The application module is accessible under its scoped route
* [ ] The scoped application tables are present (e.g. `x_inpi_ydbp_templates`, `x_inpi_ydbp_blueprints`)
* [ ] The Scripted REST API endpoints are active under e.g. `/api/x_inpi_ydbp/`

## Step 6 -- Assign roles to users

### Assign roles to a group (recommended)

Assigning roles to groups is more scalable and easier to audit than assigning to individual users.

1. Navigate to **User Administration > Groups**
2. Select the target group or create a new one
3. Open the group record
4. Scroll to the **Roles** related list tab
5. Click **Edit**
6. In the Collection list, search for the application scope e.g.  `x_inpi_ydbp`
7. Select the appropriate role and move it to the Roles list using the arrow button
8. Click **Save**, then **Update** the group record

Any user added to this group automatically inherits the assigned roles.

### Assign a role to an individual user

1. Navigate to **User Administration > Users**
2. Search for and open the user record
3. Scroll to the **Roles** related list tab
4. Click **Edit**
5. Search for roles starting with the application scope e.g. `x_inpi_ydbp`
6. Select the role and move it to the Roles list
7. Click **Save**, then **Update** the user record

## Updating the app

When a new version of ins-pi applications e.g. YouDesign Blueprints is available:

1. You receive a notification email from the ServiceNow Store
2. Log in to your instance as admin
3. Navigate to **System Applications > All Available Applications > All**
4. Find YouDesign Blueprints and click **Update**

> **Tip:** Always test updates on a sub-production instance before applying them to production.

## Troubleshooting

| Issue                                         | What to check                                                                             |
| --------------------------------------------- | ----------------------------------------------------------------------------------------- |
| App not visible in All Available Applications | Confirm the entitlement was completed on the Store and that you are logged in as admin    |
| Users cannot see the app                      | Confirm at least one `x_inpi_ydbp` role is assigned to the user or their group            |
| Install button is greyed out                  | Check that you have the admin role and that your instance is entitled                     |
| Users see wrong actions                       | Review the role assignment -- missing or extra permissions usually explain UI differences |


# 30-Day Free Trial

All ins-pi applications offers a 30-day free trial through the ServiceNow Store, except [YouDesign Freelucy](https://docs.ins-pi.com/freelucy/), which is free. This lets you explore the full app on a sub-production instance before committing to a purchase.

## What the trial includes

* Full access to all application features on a non-productive instance
* 30 calendar days from the date you activate the trial

## What the trial does not include

* Installation on **production** instances -- trials are limited to sub-production (development or test) instances
* Automatic renewal -- the trial ends after 30 days unless you purchase the app

## Who can start a trial

You need:

* a **Now Support (HI) account** linked to your organization
* access to at least one **sub-production** ServiceNow instance
* the **admin** role on the instance where you plan to install

> If you do not have a Now Support account, ask your organization's Customer Administrator to add you.

***

## How to activate the trial

### Step 1 -- Find ins-pi Application on the Store

1. Go to [store.servicenow.com](https://store.servicenow.com)
2. Search for the ins-pi application e.g. **YouDesign Blueprints**
3. Open the product page from the search results

### Step 2 -- Start the trial

1. On the product page, click the **Try** button on the right side
2. Sign in with your **Now Support (HI) credentials** when prompted
3. A notice screen appears with information about the app
4. Click **Continue**
5. Check the box to accept the **Terms of Use** and **App Subscription Terms and Conditions**
6. Click **Try**
7. Click **OK** to confirm

> **That's it.** The app is now available for installation on your sub-production instances.

### Step 3 -- Install on your sub-production instance

1. Log in to your **development or test** ServiceNow instance with admin credentials
2. Navigate to **System Applications > All Available Applications > All**
3. Search for ins-pi application e.g. **YouDesign Blueprints**
4. Click **Install**

The app deploys automatically and is ready to use immediately.

### Step 4 -- Set up roles and start exploring

After installation:

1. Assign yourself the highest application role e.g. application admin role so you have full access during the trial.
2. Follow the Application specific instructions.
3. Invite colleagues and assign them the appropriate roles

> For detailed role assignment steps, see Installation and Setup for the specific application.

***

## Tracking your trial status

* The ServiceNow Store shows a **green indicator** on the app with your trial expiration date
* You can check the trial status anytime by returning to the ins-pi application e.g. YouDesign Blueprints product page on the Store

## What happens when the trial ends

When the 30-day trial period expires:

* The app **remains installed** on your instance but access may be restricted
* No data is lost -- your data content within the applications are preserved
* To continue using the app, you need to complete a purchase through the ServiceNow Store

## How to purchase after the trial

1. Return to the ins-pi application e.g. YouDesign Blueprints product page on [store.servicenow.com](https://store.servicenow.com)
2. Click the **Buy** button
3. Choose your payment method:

<table><thead><tr><th width="211.92578125">Method</th><th>How it works</th></tr></thead><tbody><tr><td><strong>Credit card</strong></td><td>Enter card details, billed monthly. Minimum subscription is 12 months.</td></tr><tr><td><strong>Purchase order</strong></td><td>Request a quote via email, generate a PO, return to the product page, click <strong>Purchase with PO</strong>, and upload your PO document.</td></tr></tbody></table>

4. After purchase, click **Get** to entitle your production instances
5. Install on production following the steps in Installation and Setup of the specific application.

> **Moving to production:** For paid apps, you may need to click **Request license** and work with your ServiceNow account manager to add the app to your service contract before the production entitlement becomes available.

***

## Frequently asked questions

### Can I extend the trial?

The standard trial is 30 days. Contact the app vendor through the ServiceNow Store product page if you need additional evaluation time.

### Can I install the trial on production?

No. Trials are restricted to sub-production instances only. You need to purchase the app for production use.

### What happens to my data after the trial?

Your data and configurations are preserved on the instance. If you purchase the app, you can continue working with everything you created during the trial.

### Can multiple people in my organization use the trial?

Yes. Once the trial is activated, any admin can install it on sub-production instances. You can assign all four roles to different users for a realistic evaluation.

### Do I need to uninstall before purchasing?

No. The purchase upgrades your entitlement. The app and all your data stay in place.


# No integration

The ins-pi products are native solutions designed and built entirely on the ServiceNow platform. This means that unlike other solutions, complex integrations or extensive interface administration are not required.

## Navigating the Costs of Integration

In an era where digital transformation reigns supreme, the selection of your solutions holds the power to either propel or hinder your transformative journey. While the allure of integrating with ServiceNow is undeniable, it conceals a labyrinth of uncertainties and risks.

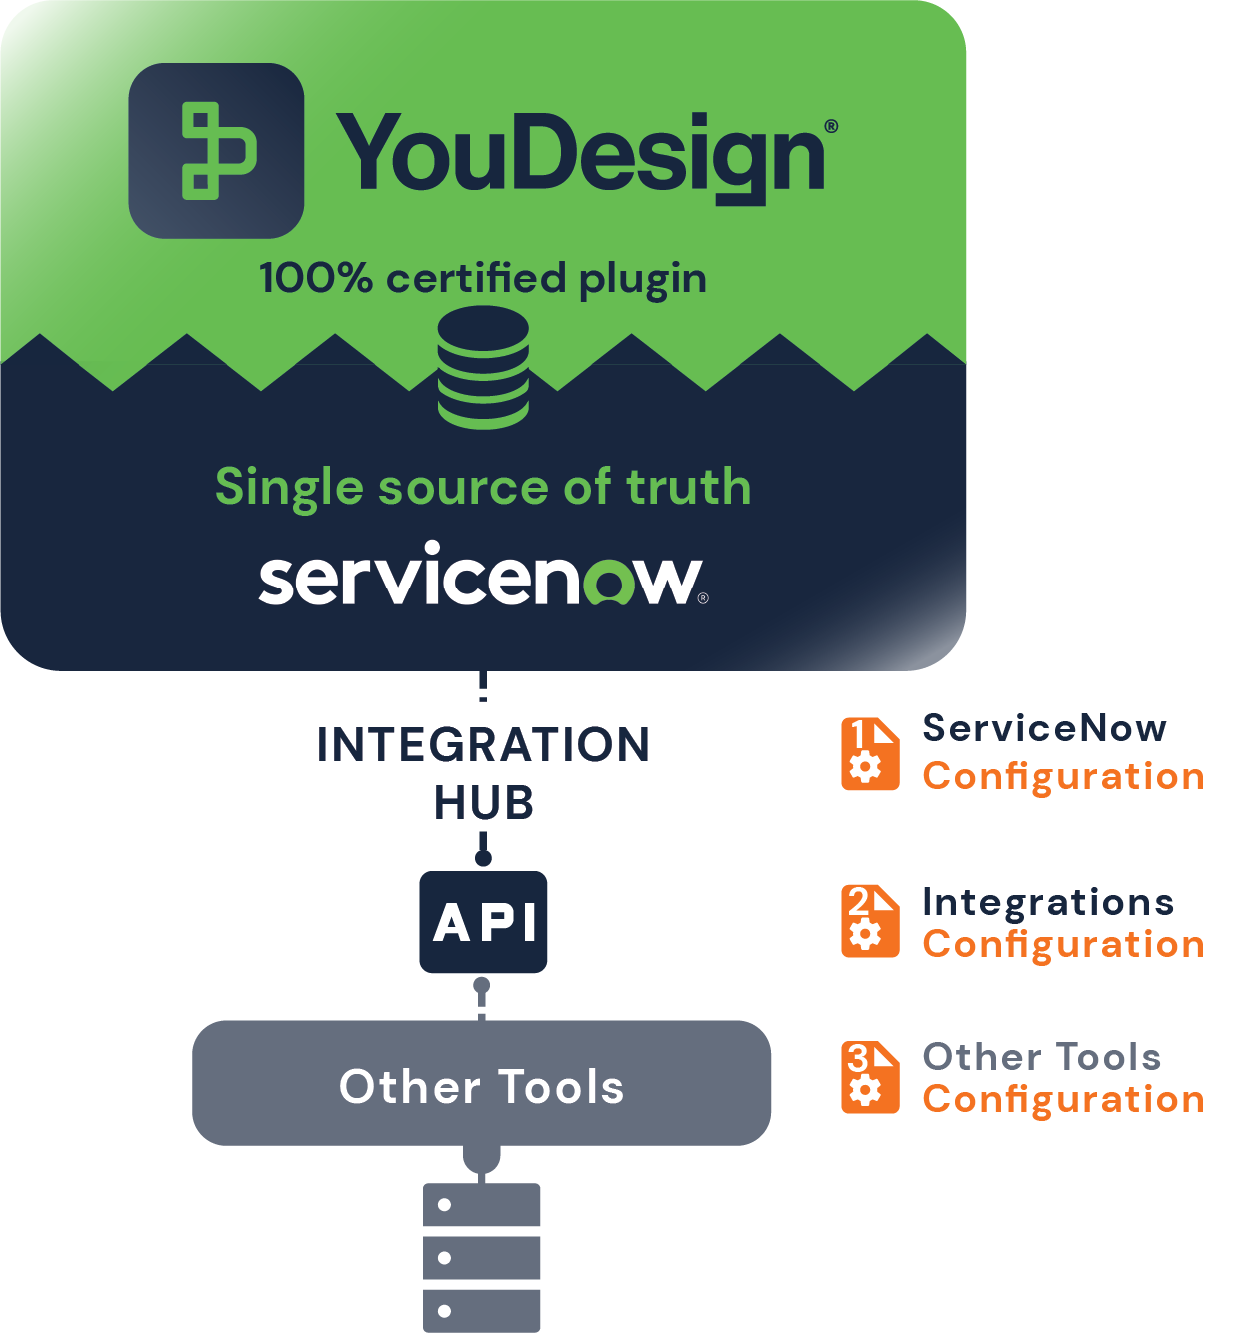
Integrating external tools with ServiceNow demands a repetitive cycle of adjustments and configurations, culminating in amplified complexity, escalated administrative burdens, heightened expenses, and a significant peril to data consistency. Additionally, staying current with updates and other alterations mandates frequent reconfiguration, compounding the challenge.

<figure><img src="https://files.readme.io/f1df98064e9719385a2cc028c3ef356daaa02efb21f32ecd5c3690e645f452b5-Integration.png" alt=""><figcaption></figcaption></figure>

The diagram illustrates how YouDesign is natively built on ServiceNow as the "single source of truth." Through the Integration Hub, other tools can be connected via an API. However, to successfully integrate these tools, configurations must be done three times: within ServiceNow, for integrations, and within the external tool themselves.

***

## Effort Comparison

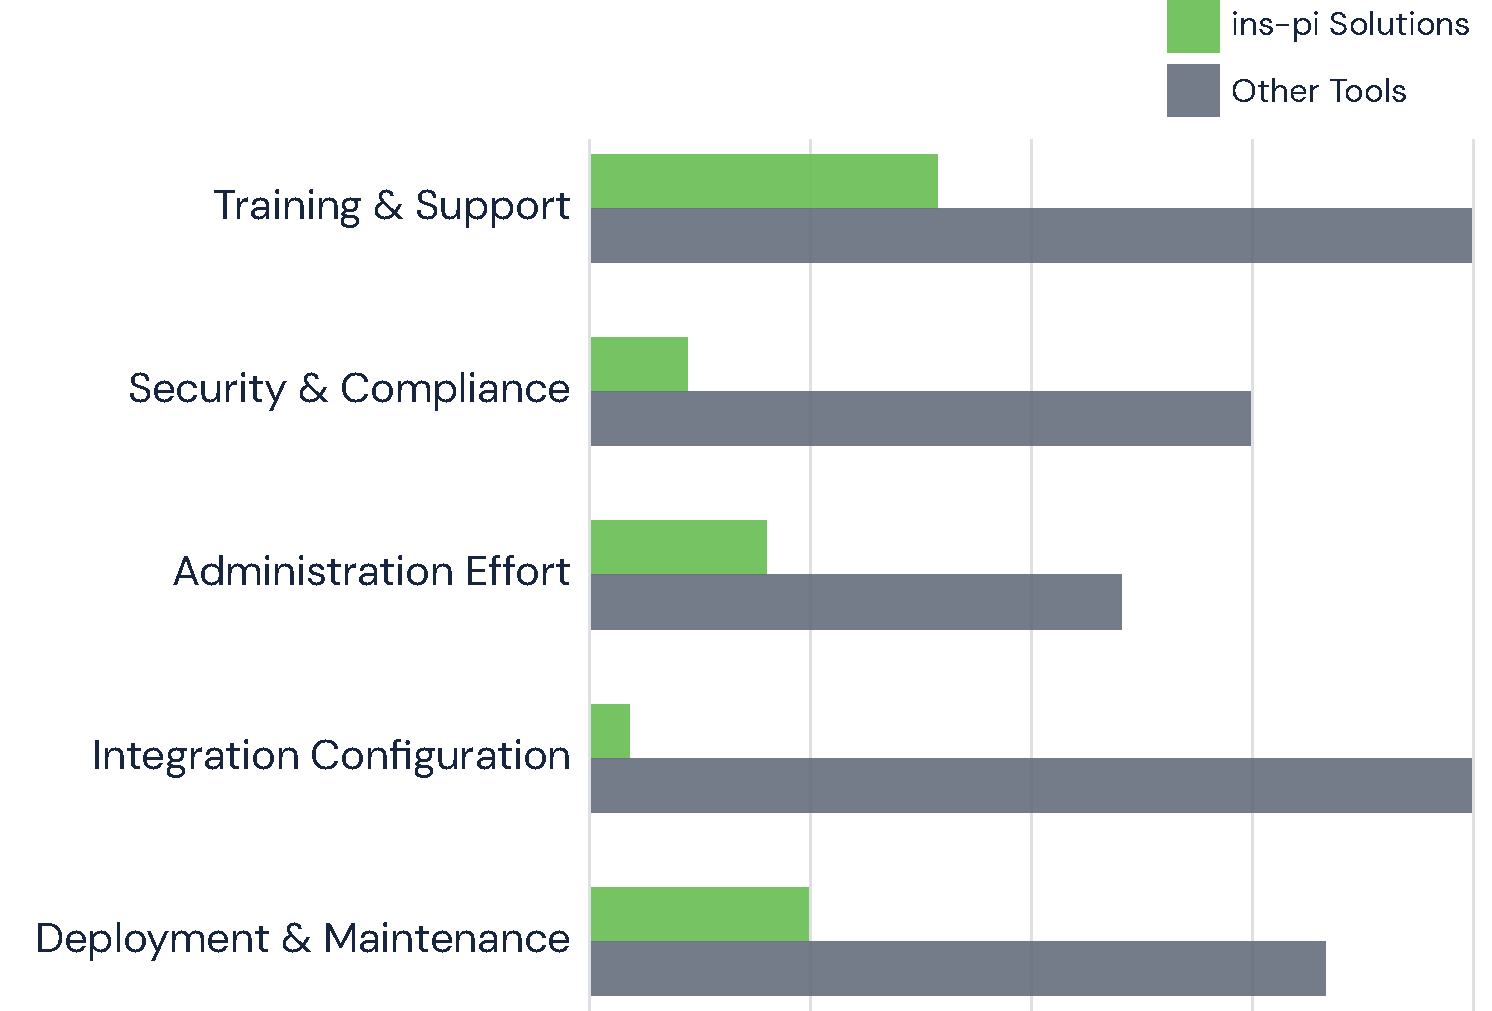
This chart illustrates the contrast in effort between integrated tools and ins-pi solutions, which are exclusively built on the ServiceNow platform.

<br>

<figure><img src="https://files.readme.io/2191569-image.png" alt=""><figcaption></figcaption></figure>

***

## 100% Built on ServiceNow

Natively built on the ServiceNow platform, YouDesign transcends these integration woes. Say goodbye to complexity, resource drain, and maintenance nightmares. Enjoy data security, compatibility assurance, and a superior user experience, all without the shackles of vendor lock-in.

<figure><img src="https://files.readme.io/a205e66-image.png" alt=""><figcaption></figcaption></figure>


# App Privacy Policy

This page outlines the App Privacy Policy for all ins-pi applications available through the ServiceNow Store. It explains what data is collected, how it's used, and how it's protected.

### YouDesign Transformation Suite — for ServiceNow Store Applications

#### 1. Introduction

This App Privacy Policy ("Policy") describes how ins-pi Inc. (Miami, FL, USA) and ins-pi GmbH (Cologne, Germany) handle data in connection with the YouDesign Transformation Suite applications ("Applications" or "Apps") available through the ServiceNow Store. ins-pi Inc. and ins-pi GmbH are referred to collectively as "ins-pi," "Supplier," "we," "our," or "us" throughout this Policy. Each Application is offered by a specific ins-pi entity as identified in Section 2.

This Policy applies specifically to the Applications as installed and operated on the Customer's ServiceNow Platform instance. It is separate from and supplementary to the [ins-pi corporate Privacy Policy](https://www.ins-pi.com/privacy), which governs data collected through the ins-pi website and marketing activities.

This Policy should be read in conjunction with the applicable ins-pi Software License Agreement (Terms & Conditions) governing the Customer's use of the Applications.

***

#### 2. Applications Covered

This Policy covers the following Applications within the YouDesign Transformation Suite:

| Application                                                 | Supplier    | License | AI Features | Data Masking | Privacy Tier |
| ----------------------------------------------------------- | ----------- | ------- | ----------- | ------------ | ------------ |
| [YouDesign Freelucy](https://docs.ins-pi.com/freelucy/)     | ins-pi GmbH | Free    | None        | None         | Tier 1       |
| [YouDesign Blueprints](https://docs.ins-pi.com/blueprints/) | ins-pi Inc. | Paid    | None        | None         | Tier 1       |
| [YouDesign Models](https://docs.ins-pi.com/models/)         | ins-pi Inc. | Paid    | Optional    | Yes          | Tier 2       |
| [YouDesign Processes](https://docs.ins-pi.com/processes/)   | ins-pi Inc. | Paid    | None        | None         | Tier 1       |
| [YouDesign Command](https://docs.ins-pi.com/command/)       | ins-pi GmbH | Paid    | Optional    | Yes          | Tier 2       |

The Applications are classified into two privacy tiers based on their data handling characteristics. Tier 1 applications operate entirely within the Customer's ServiceNow instance with no external data transmission. Tier 2 applications include optional AI features that, when enabled and configured by the Customer, may transmit data to an external AI provider as described in Section 6.

YouDesign Freelucy and YouDesign Command are developed and offered by ins-pi GmbH (Cologne, Germany). YouDesign Blueprints, YouDesign Models, and YouDesign Processes are developed and offered by ins-pi Inc. (Miami, FL, USA). The Supplier entity identified for each Application is the contracting party under the applicable Software License Agreement. Regardless of which entity is the Supplier, the data handling principles and commitments in this Policy apply uniformly to all Applications.

YouDesign Blueprints is a Tier 1 application. It operates with a zero external data footprint — no data is transmitted outside your ServiceNow instance.

***

#### 3. Fundamental Data Handling Principles

The following principles apply to all Applications in the YouDesign Transformation Suite:

* **No Data Collection by ins-pi.** The Applications do not collect, transmit, store, or send any data to ins-pi. ins-pi does not operate any servers, endpoints, or infrastructure that receive data from the Applications.
* **No Telemetry or Analytics.** The Applications do not contain telemetry, usage analytics, tracking pixels, or any mechanism that reports information back to ins-pi or any third party. Note: The ServiceNow Platform and ServiceNow Store may independently collect platform-level usage or installation data in accordance with the Customer's agreement with ServiceNow. Such collection, if any, is performed by ServiceNow and is outside ins-pi's control.
* **No Access to Customer Instances.** ins-pi personnel do not have access to the Customer's ServiceNow instance or any data therein, unless the Customer explicitly grants such access for consulting or technical support purposes.
* **ServiceNow Platform Security Inheritance.** The Applications are certified by ServiceNow and run entirely within the ServiceNow Platform's security perimeter. All platform security controls, access management, encryption, and audit capabilities apply to data managed by the Applications.
* **No Standalone Operation.** The Applications are installed as certified plugins from the ServiceNow Store and cannot operate outside of the ServiceNow Platform.
* **No Personal Data Processing by ins-pi.** ins-pi does not host, store, manage, or process any personal data as part of the Applications. All data remains within the Customer's ServiceNow instance under the Customer's control.

***

#### 4. Data Within the Customer's Instance

**4.1 Data Created and Managed by the Applications**

The Applications enable Customers to create, manage, and visualize enterprise architecture and transformation data within their ServiceNow instance. This may include, depending on the Application, information about applications, business capabilities, business services, processes, relationships between enterprise objects, diagrams, models, and associated metadata.

All such data is stored exclusively within the Customer's ServiceNow instance, governed by the Customer's own data management policies, and subject to the ServiceNow Platform's security and access controls.

**4.2 Personal Data Considerations**

The Applications are designed for enterprise architecture and transformation management. They are not designed to collect or process personal data. However, if a Customer chooses to store personal data within fields managed by the Applications (for example, naming individuals as application owners or business capability contacts), such data remains entirely within the Customer's ServiceNow instance and is subject to the Customer's own data protection policies and procedures.

Given that ins-pi does not access, receive, or process any data within the Customer's ServiceNow instance under normal operating conditions, ins-pi does not act as a data controller or data processor with respect to such data. The Customer retains sole control over the data within its instance, including any personal data that may be stored in fields managed by the Applications.

***

#### 5. Tier 1 Applications (No AI Features)

The following Applications are classified as Tier 1: YouDesign Freelucy (offered by ins-pi GmbH), YouDesign Blueprints (offered by ins-pi Inc.), and YouDesign Processes (offered by ins-pi Inc.).

Tier 1 Applications operate with a zero external data footprint:

* No data is transmitted outside the Customer's ServiceNow instance.
* No external APIs, services, or endpoints are called by the Application.
* No AI, machine learning, or generative AI features are included.
* All processing occurs entirely within the ServiceNow Platform's security perimeter.
* The Applications inherit all ServiceNow Platform security, encryption, and access control mechanisms.

For Tier 1 Applications, ins-pi's data handling obligation is limited to ensuring the Application code itself does not introduce vulnerabilities or unauthorized data transmission pathways, which is verified through the ServiceNow certification process for each release.

***

#### 6. Tier 2 Applications (Optional AI Features)

The following Applications are classified as Tier 2: YouDesign Models (offered by ins-pi Inc.) and YouDesign Command (offered by ins-pi GmbH).

Tier 2 Applications include all the data handling characteristics of Tier 1 Applications as their baseline. In addition, they offer optional AI-assisted features that, when enabled and configured by the Customer, involve communication with an external AI provider API. These AI features are entirely optional. When AI features are not enabled, Tier 2 Applications operate identically to Tier 1 Applications.

**6.1 AI Feature Data Flow**

When AI features are enabled, the following data flow applies:

<table><thead><tr><th width="186.76953125">Step</th><th>Description</th></tr></thead><tbody><tr><td>API Configuration</td><td>The Customer configures the AI provider API connection (e.g., endpoint URL, API key) directly within their ServiceNow instance. ins-pi does not provide, manage, or have access to these credentials.</td></tr><tr><td>Data Selection</td><td>The Application identifies data within the Customer's instance that is relevant to the AI-assisted operation requested by the end user.</td></tr><tr><td>Data Masking</td><td>Before any data is transmitted, the Application's built-in masking engine processes the selected data within the Customer's instance. The Customer may configure masking rules. An option is available to not share real data; data content is masked before any external API call.</td></tr><tr><td>API Transmission</td><td>The masked (or unmasked, per Customer configuration) data is transmitted directly from the Customer's ServiceNow instance to the Customer's configured AI provider. No data passes through any ins-pi infrastructure.</td></tr><tr><td>Response Handling</td><td>The AI provider's response is received directly by the Customer's ServiceNow instance and processed by the Application within that instance.</td></tr></tbody></table>

**6.2 Data Masking**

The Applications provide a built-in data masking capability that operates within the Customer's ServiceNow instance. When enabled, this feature replaces sensitive data content with masked values before any data is transmitted to the AI provider API. The masking is performed locally within the Customer's instance; no unmasked data leaves the instance when masking is active.

The Customer has the option to configure whether data masking is applied and may customize masking rules according to their data protection requirements. ins-pi provides the masking capability as a tool; the Customer is solely responsible for enabling, configuring, testing, and validating masking rules in accordance with their own data governance and compliance requirements. ins-pi does not warrant that the masking capability will satisfy any particular regulatory, contractual, or organizational requirement of the Customer. The Customer should independently verify that the masking configuration meets their needs before enabling AI features with production data.

**6.3 Customer Responsibility for AI Provider Relationships**

The Customer is solely responsible for:

* Selecting and contracting with their chosen AI provider.
* Configuring the API connection within their ServiceNow instance.
* Managing API credentials and access controls.
* Evaluating the AI provider's privacy and data handling practices.
* Determining whether the data transmitted (masked or unmasked) meets their compliance and data protection requirements.
* Ensuring compliance with any applicable regulations regarding the use of AI services and the transfer of data to the AI provider.

ins-pi does not recommend, endorse, certify, or assume any responsibility for any third-party AI provider. The Customer's agreement with their AI provider governs the AI provider's handling of any data received.

**6.4 ins-pi's Role in the AI Data Flow**

ins-pi's role is strictly limited to providing the Application code that enables the AI feature functionality. ins-pi does not:

* Act as an intermediary, proxy, or relay for any data transmitted to AI providers.
* Have access to, intercept, log, or store any data transmitted between the Customer's instance and the AI provider.
* Provide, host, or operate the AI provider service.
* Process any data as a data processor or sub-processor in connection with the AI features.
* Have access to the Customer's API credentials or AI provider account.

***

#### 7. Support and Consulting Access

When the Customer grants ins-pi personnel access to their ServiceNow instance for technical support or consulting purposes, ins-pi will handle any data encountered in accordance with the confidentiality provisions of the applicable ins-pi Software License Agreement (Terms & Conditions).

Such access is granted solely at the Customer's discretion, is limited to the scope and duration required for the support or consulting engagement, and is subject to the Customer's own access management controls within their ServiceNow instance. ins-pi personnel will not extract, copy, or retain Customer data beyond what is strictly necessary to perform the support or consulting task.

***

#### 8. Sub-Processors

ins-pi does not engage any sub-processors in connection with the Applications. As stated in this Policy, ins-pi does not receive, process, or store any Customer data through the Applications.

For Tier 2 Applications with AI features enabled, the Customer's chosen AI provider is not a sub-processor of ins-pi. The AI provider relationship is directly between the Customer and the AI provider, and is governed by the Customer's own agreement with that provider.

***

#### 9. International Data Transfers

The Applications themselves do not transfer data internationally. All Application data resides within the Customer's ServiceNow instance, hosted in the data center region selected by the Customer under their agreement with ServiceNow.

For Tier 2 Applications, if the Customer configures an AI provider API endpoint located in a different jurisdiction, the Customer is responsible for ensuring that any resulting data transfer complies with applicable data protection regulations, including GDPR, the EU-U.S. Data Privacy Framework, Standard Contractual Clauses, or other applicable transfer mechanisms.

***

#### 10. Data Retention and Deletion

All data created or managed by the Applications is stored within the Customer's ServiceNow instance and is subject to the Customer's own data retention and deletion policies.

Upon termination or expiration of the Application subscription, the Customer is responsible for removing the Application from their ServiceNow instance in accordance with the applicable Terms & Conditions. Any data created by the Application remains within the Customer's instance and under the Customer's control. ins-pi does not retain any copy of Customer data, as ins-pi never receives such data in the first instance.

***

#### 11. Security

The Applications are certified by ServiceNow for each release, including hot fixes and patches. This certification process includes security review. The Applications inherit all security capabilities of the ServiceNow Platform, including but not limited to:

* Role-based access control (RBAC) and access control lists (ACLs).
* Platform-level encryption for data at rest and in transit.
* Audit logging and monitoring.
* Multi-factor authentication support.
* Session management and timeout controls.

ins-pi warrants that the Applications do not contain malicious code, backdoors, or unauthorized data transmission mechanisms, as stated in the applicable Terms & Conditions.

***

#### 12. Open-Source Components

The Applications incorporate certain open-source software components as described in the applicable Terms & Conditions. These components operate entirely within the Customer's ServiceNow instance and do not independently collect, transmit, or process data outside of the instance. A list of open-source components is available upon request.

***

#### 13. Children's Privacy

The Applications are enterprise software tools intended for business use. They are not directed at or intended for use by individuals under the age of 16. ins-pi does not knowingly collect or process personal data of children through the Applications.

***

#### 14. Data Protection and Regulatory Compliance

**14.1 ins-pi's Role Under Data Protection Law**

The Applications are software tools that run entirely within the Customer's ServiceNow instance. ins-pi provides the Application code; it does not access, receive, store, or process any data within the Customer's instance under normal operating conditions. On this basis, ins-pi does not act as a data controller or data processor with respect to data within the Customer's instance for purposes of the General Data Protection Regulation (GDPR), the California Consumer Privacy Act (CCPA), or other applicable data protection legislation.

For Tier 2 Applications with AI features enabled, ins-pi's role remains limited to providing the Application code. ins-pi does not determine the purposes or means of any data processing that occurs when data is transmitted to the Customer's configured AI provider. The Customer determines whether to enable AI features, which data to transmit, whether to apply masking, and which AI provider to use.

For Applications offered by ins-pi GmbH (YouDesign Freelucy, YouDesign Command), the governing law and venue provisions of the ins-pi GmbH Software License Agreement apply, with jurisdiction in Cologne, Germany. For Applications offered by ins-pi Inc. (YouDesign Blueprints, YouDesign Models, YouDesign Processes), the governing law and venue provisions of the ins-pi Inc. Software License Agreement apply, with jurisdiction in Florida, USA. Regardless of the governing jurisdiction, the data handling commitments in this Policy apply uniformly.

In the limited circumstance where the Customer grants ins-pi personnel access to the Customer's instance for support or consulting purposes, and such access involves exposure to personal data, ins-pi acknowledges that it may be considered a data processor for the duration and scope of that access. In such cases, the applicable data processing arrangements are governed by the Terms & Conditions and any supplementary data processing agreement between the parties.

**14.2 Customer Responsibilities**

The Customer is the data controller for all data within their ServiceNow instance, including any data managed through the Applications. The Customer is responsible for:

* Determining the lawful basis for processing any personal data stored within the Applications.
* Implementing appropriate technical and organizational measures for data protection.
* Responding to data subject access requests related to data managed by the Applications.
* Conducting Data Protection Impact Assessments (DPIAs) where required, including for the use of AI features in Tier 2 Applications.
* Ensuring compliance with applicable data protection regulations for any data transmitted to AI providers through Tier 2 Application features.

**14.3 Data Subject Rights**

As ins-pi does not have access to or control over data within the Customer's ServiceNow instance, data subject requests (including access, rectification, erasure, restriction, portability, and objection requests) must be directed to the Customer. ins-pi will cooperate with the Customer as reasonably necessary to fulfill such requests, to the extent ins-pi is involved (e.g., during a support engagement).

***

#### 15. Incident Notification

If ins-pi becomes aware of any security vulnerability in the Application code that could affect the privacy or security of data within Customer instances, ins-pi will notify affected Customers without undue delay (and in any event within 72 hours of becoming aware of the vulnerability, where such vulnerability may involve personal data) and will provide a remediation plan, including expedited patches through the ServiceNow certification process where applicable. Notification timelines are subject to the constraints of the ServiceNow certification process, which may affect the availability of a certified fix.

Any security incidents related to the Customer's ServiceNow Platform instance, the Customer's AI provider, or the Customer's own systems are outside the scope of ins-pi's incident notification obligations under this Policy.

***

#### 16. Changes to This Policy

ins-pi may update this Policy from time to time to reflect changes in the Applications, legal requirements, or best practices. Material changes will be communicated to Customers through the ServiceNow Store listing and/or the ins-pi website. The effective date at the top of this Policy indicates when the most recent revision took effect.

***

#### 17. Scope and Limitations

**17.1 Relationship to Terms & Conditions**

This Policy is informational and describes ins-pi's data handling practices in connection with the Applications. It does not create contractual obligations beyond those set forth in the applicable ins-pi Software License Agreement (Terms & Conditions). In the event of any conflict between this Policy and the Terms & Conditions, the Terms & Conditions shall prevail. All limitations of liability, warranty disclaimers, and indemnification provisions in the Terms & Conditions apply to the subject matter of this Policy.

**17.2 No Third-Party Beneficiary Rights**

This Policy is intended solely for the benefit of ins-pi and the Customer as defined in the applicable Terms & Conditions. Nothing in this Policy confers any rights, remedies, or claims upon any third party, including end users of the Customer's ServiceNow instance, data subjects, or any other individual or entity.

**17.3 Disclaimer**

This Policy does not constitute legal advice. Customers are responsible for conducting their own legal and compliance assessments with respect to their use of the Applications, including any use of AI features and the transmission of data to third-party AI providers. ins-pi recommends that Customers consult with their own legal counsel regarding their obligations under applicable data protection laws.

***

#### 18. Contact Information

For questions, concerns, or requests regarding this App Privacy Policy, please contact:

<table><thead><tr><th width="134.44140625">Company</th><th>ins-pi Inc.</th><th>ins-pi GmbH</th></tr></thead><tbody><tr><td><strong>Address</strong></td><td><p>444 Brickell Avenue </p><p>Suite 700 Miami</p><p>FL 33131, USA</p></td><td><p>Im Zollhafen 18 </p><p>50678 Köln</p><p>Germany</p></td></tr><tr><td><strong>Supplier for</strong></td><td><ul><li>YouDesign Blueprints</li><li>YouDesign Models</li><li>YouDesign Processes</li></ul></td><td><ul><li>YouDesign Freelucy</li><li>YouDesign Command</li></ul></td></tr></tbody></table>

**Email:** <legal@ins-pi.com>&#x20;

**Support:** <https://www.ins-pi.com/support>


# Software License Agreement

## Software License Agreement

**ins-pi YouDesign Transformation Suite — Terms & Conditions**

|                       |                                                               |
| --------------------- | ------------------------------------------------------------- |
| **Document Version**  | 1.0                                                           |
| **Effective Date**    | \[DATE]                                                       |
| **Last Updated**      | March 2026                                                    |
| **Supplier Entities** | ins-pi Inc. (Miami, FL, USA) · ins-pi GmbH (Cologne, Germany) |
| **Contact**           | <legal@ins-pi.com>                                            |

ins-pi Inc. and ins-pi GmbH (each, a "Supplier" as applicable per the Product Table) provide a license for the use of the YouDesign Transformation Suite applications to Customers on the condition that Customers accept all of the terms contained in this Agreement and any applicable Statement of Work.

This Agreement is entered into by and between the applicable Supplier entity and Customer including its Affiliates ("Customer") and Customer's Service Providers. Supplier and Customer are each a "Party" and collectively the "Parties" to this Agreement.

**ANY CHANGES TO THESE STANDARD TERMS AND CONDITIONS MAY CAUSE A PRICE INCREASE.**

### Recitals

1. Customer desires to obtain from Supplier, and Supplier desires to provide to Customer, a license for the use of one or more Applications within the YouDesign Transformation Suite ("App" or "Apps") through a subscription.
2. Customer and Supplier have agreed upon certain standard provisions that will govern the Apps contemplated by this Agreement.
3. This Agreement, including its schedules and any amendments thereto executed by the Parties, documents the terms and conditions under which Customer agrees to access and use the Apps and Supplier agrees to license the Apps.
4. This Agreement supersedes any prior electronic version accepted by the Customer in the ServiceNow Store for any of the Applications listed herein.

The Parties agree as follows:

**ANY CHANGES TO THE STANDARD TERMS AND CONDITIONS CONTAINED HEREIN MAY CAUSE A PRICE INCREASE.**

### Definitions

For the purposes of this Agreement, the capitalized terms below shall have the following meanings:

**"Affiliate"** of a Party shall mean an entity: (i) which is directly controlling such Party; (ii) which is under the same direct ownership or control as such Party; or (iii) which is directly owned or controlled by such Party. For these purposes, an entity shall be treated as being controlled by another if that other entity has fifty-one percent (51%) or more of votes in such entity, is able to direct its affairs and/or to control the composition of its boards of directors or equivalent body.

**"Agreement"** shall mean this executed Agreement and all schedules, addendums, and Statements of Work hereto, which are hereby incorporated by reference in their entirety, as any of the foregoing may be amended from time to time in accordance with the terms and conditions hereof.

**"AI Features"** means the optional artificial intelligence-assisted capabilities available in certain Applications (as identified in the Product Table), which, when enabled and configured by the Customer, transmit data from the Customer's ServiceNow instance to an external AI provider API selected and contracted by the Customer. AI Features are entirely optional and are not required for the core operation of any Application.

**"AI Provider"** means the third-party provider of artificial intelligence services selected and contracted by the Customer for use with the AI Features. The AI Provider relationship is directly between the Customer and the AI Provider; Supplier is not a party to that relationship.

**"App License"** refers to the license provided by Supplier to Customer for the subscription to an App, allowing Customer the right to: (i) install the Application on a single authorized production instance of the ServiceNow Platform; (ii) install the Application on any number of non-production instances associated with the ServiceNow production instance; (iii) receive full product features, updates, support, and online Documentation within the subscription Term; and (iv) access the Application through an Embedded Platform Runtime User License (EPRL) to perform read, create, write, update, and delete data required for each End User. No license under this Agreement includes any ServiceNow Platform licenses. A ServiceNow Platform license must be purchased separately from ServiceNow.

**"Application" or "App"** shall mean one or more of the software applications within the YouDesign Transformation Suite offered by Supplier, as identified in the Product Table below.

**"Business Day"** means any day that is not a weekend or public holiday in either the United States of America or the Federal Republic of Germany, as applicable based on the Supplier entity for the relevant Application.

**"Confidential Information"** is defined in the Confidential Information section of this Agreement.

**"Contractor"** means any subcontractor(s), supplier(s), service provider(s), licensor(s), contract manufacturer(s), or contractor(s) of any Party and its Affiliates.

**"Customer"** means any person, company, corporation, or other entity who obtains or intends to obtain a Subscription and License to use any of the Applications and/or Services as set out in this Agreement. For purposes of this Agreement, "Customer" shall include Customer's Affiliates, agents, and Contractors.

**"Data Masking"** means the built-in capability in certain Applications (as identified in the Product Table) that replaces sensitive data content with masked values within the Customer's ServiceNow instance before data is transmitted to an AI Provider API, when enabled and configured by the Customer.

**"Disclosing Party"** is defined in the Confidential Information section of this Agreement.

**"Documentation"** means any and all technical documentation, user manuals, and other materials regarding the Applications located solely online as set out in the Documentation section below.

**"Editor"** refers to a named user of the App authorized to create, update, write, and delete content. An EPRL is required for each Editor (except for YouDesign Freelucy) and includes Viewer access.

**"Embedded Platform Runtime User License" or "EPRL"** refers to the ServiceNow Embedded Platform Runtime User licenses required by each named End User to access certain Applications (as identified in the Product Table). The EPRL provides the rights through the Applications to use the ServiceNow core platform functionalities, e.g., reporting, workflow, etc. Each End User requires a single EPRL per Application that requires it.

**"End User"** refers to the EPRL Editors and/or Viewers that will utilize the App on the ServiceNow Platform, who may be employees or contractors in the ordinary course of business of the Customer.

**"Entitlement"** means the technical assignment of Customer's purchased App licenses to its ServiceNow instance(s). After receiving the Customer's Purchase Order, the Supplier will inform ServiceNow to entitle the licenses on the Customer's instance(s). Supplier has no influence or responsibility for the entitlement process.

**"Force Majeure Event"** means any event or circumstance beyond a Party's reasonable control, including acts or omissions of the other Party or third parties, natural disasters, health crises such as epidemics and pandemics, riots, war, terrorism, civil disorder, court orders, acts or regulations of governmental bodies, labor disputes (other than those limited to the affected Party's own workforce), or failures or fluctuations in electrical power, heat, light, air conditioning or telecommunications equipment or lines, or other equipment failures, which it could not have prevented by reasonable precautions or could not have remedied by the exercise of reasonable efforts, provided that the exercise of such reasonable precautions or efforts would not require the incurrence of any additional cost or expense.

**"Intellectual Property"** means any materials, know-how, methodologies, processes, techniques, tools, forms, templates, software (whether written or machine-readable), and Intellectual Property Rights (collectively, "Materials") that are: (i) owned or licensed by a Party, its Contractors, or their respective Affiliates; (ii) developed by a Party, its Contractors, or their respective Affiliates independently of the Services; and (iii) modifications, enhancements, and derivative works of the Materials described in the preceding clauses (i) and (ii).

**"Intellectual Property Rights"** means all registered and unregistered rights in respect of copyright, industrial and other designs, databases, circuit layouts, trademarks, know-how, confidential information and trade secrets, patents, inventions, discoveries, and domain names.

**"License"** refers to an App License.

**"Party" or "Parties"** in this Agreement, Supplier and Customer including Affiliates, Service Providers, agents, and Contractors may be referred to individually as a "Party" and together as the "Parties."

**"Product Table"** means the table in the Applications Covered section of this Agreement identifying each Application, its Supplier entity, license type, EPRL requirement, AI Feature availability, and governing law.

**"Purchase Order" or "PO"** means a document issued by Customer in an electronic format containing the unique purchase order number, and in which Customer requests Supplier to deliver Applications and/or Services in accordance with the terms and conditions of this Agreement. Such Applications and/or Services are itemized with the corresponding price, ordered quantity, item identification, and time schedule. Any pre-printed general terms and conditions in any such PO shall not apply.

**"Receiving Party"** is defined in the Confidential Information section of this Agreement.

**"ServiceNow"** refers to ServiceNow, Inc.

**"ServiceNow Platform"** means ServiceNow® hosted software and services.

**"Service Provider"** means a company or entity that offers information technology (IT) services and solutions to businesses or individuals, specializing in delivering comprehensive information technology solutions to clients.

**"Subscription"** refers to Customer's right to have access to the App and related Services identified herein, upon acceptance of this Agreement, an applicable SOW or PO, and payment of the Subscription Fees (if applicable) for the Term of the Subscription and any renewal terms. The minimum subscription term is 12 months. No Subscription Fee is required for YouDesign Freelucy.

**"Supplier"** refers to ins-pi Inc. or ins-pi GmbH, as applicable. The Supplier entity for each Application is identified in the Product Table. ins-pi Inc. is the Supplier for YouDesign Blueprints, YouDesign Models, and YouDesign Processes. ins-pi GmbH is the Supplier for YouDesign Freelucy and YouDesign Command.

**"Viewer"** is a user who has read-only access to the Application and can read content, e.g., boards, board content, diagrams, and models but cannot edit or change content. All Applications include unlimited Viewer licenses.

**"YouDesign Transformation Suite"** means the suite of Applications offered by Supplier under the YouDesign brand, comprising YouDesign Freelucy, YouDesign Blueprints, YouDesign Models, YouDesign Processes, and YouDesign Command.

### Applications Covered

This Agreement covers the following Applications within the YouDesign Transformation Suite:

| Application | Supplier    | License   | EPRL | AI Features | Governing Law |
| ----------- | ----------- | --------- | ---- | ----------- | ------------- |
| Freelucy    | ins-pi GmbH | Free      | No   | No          | Germany       |
| Blueprints  | ins-pi Inc. | Paid      | Yes  | No          | Florida       |
| Models      | ins-pi Inc. | Paid      | Yes  | Optional    | Florida       |
| Processes   | ins-pi Inc. | Bundled\* | No   | No          | Florida       |
| Command     | ins-pi GmbH | Paid      | Yes  | Optional    | Germany       |

*\* YouDesign Processes is a shape library that complements YouDesign Models and is included in the YouDesign Models subscription at no additional charge. YouDesign Processes does not require a separate EPRL or Subscription Fee.*

These Applications are solely intended and licensed for use on the ServiceNow Platform provided by ServiceNow. The Applications are installed as certified plugins from the ServiceNow Store on the ServiceNow Platform and cannot run standalone. ServiceNow is not responsible for (and will have no liability to the Customer in connection with) any Application or this Agreement.

### §1 Ownership of Software

The Apps are protected by copyrights and other Intellectual Property Rights. Customer acknowledges and agrees that all worldwide copyright and other Intellectual Property Rights in the Apps, and all copies of the Apps however made, are the exclusive property of Supplier. All rights in and to the Apps not expressly granted to Customer in this Agreement are reserved by Supplier. There are no implied licenses under this Agreement.

### §2 Subscription

Upon payment by Customer of the applicable Subscription Fees (or, in the case of YouDesign Freelucy, upon acceptance of this Agreement), the App will be enabled for Customer's own internal use and use by Customer's employees, Affiliates, Contractors, and Service Providers to perform Customer's internal work and support Customer's processes, during the Term (defined below), through a single authorized production instance of the ServiceNow Platform, and any number of non-production instances associated with the production instance (the App License).

For Applications identified in the Product Table as requiring EPRL, each End User performing editing, creation, or deletion tasks requires one Embedded Platform Runtime User License per App, which must be purchased through the Supplier as part of the App Subscription. YouDesign Freelucy and YouDesign Processes do not require EPRL licenses.

Neither the App Subscription, App License, nor the EPRL includes a ServiceNow Platform license or subscription, or access to other billable ServiceNow add-ons, or a license to administrate the ServiceNow Platform. The App License and EPRLs allowing access to Customer's ServiceNow Platform instances of the Licensed App will be entitled by ServiceNow after execution of the PO. Access to the Now™ Platform must be separately purchased from ServiceNow. Customer is not entitled to delivery of a copy of the App apart from its deployment on Customer's authorized instance(s) of the ServiceNow Platform.

### §3 Restrictions on Use of the Software

Customer may not do (or permit others to do) any of the following:

(a) modify, adapt, alter, translate, or create derivative works of the App, except that Customer may configure and customize the App solely to the extent that it is possible to do so using the features and functionalities of the ServiceNow Platform in their ordinary and intended manner;

(b) merge or otherwise integrate the App with external components or other software, i.e., making the App part of another application, except for components of the ServiceNow Platform, e.g., REST API;

(c) sub-license, lease, rent, loan, assign, or otherwise transfer the App or any license hereunder to any third party;

(d) host, upload, use, or access the App via a time-sharing, service bureau, virtualization, hosting, or other remote access arrangement, except for Customer's authorized instance(s) of the ServiceNow Platform as hosted by ServiceNow or a Managed Service Provider ("MSP");

(e) reverse engineer, decompile, or disassemble the App or otherwise attempt to derive the source code of the App, except and only to the limited extent that Supplier provides such source code or that such activities are expressly permitted by applicable law notwithstanding this limitation;

(f) remove, alter, or obscure any confidentiality or proprietary notices (including copyright or trademark notices) of Supplier or its suppliers on, in, or displayed by the App;

(g) reproduce or use the App except as expressly authorized under §2 and for backup purposes (without limiting the foregoing, Customer may not use the App apart from the ServiceNow Platform); or

(h) circumvent, or provide or use a program intended to circumvent, technological measures provided by the Supplier to control access to or use of the App.

### §4 Application Scope

For the avoidance of doubt, the Customer acknowledges the following:

1. Supplier does not host or provide a platform as part of this Agreement.
2. The Apps require a separate ServiceNow Platform subscription.
3. The Applications are installed as certified plugins from the ServiceNow Store on the ServiceNow Platform and cannot run standalone.
4. The Supplier Apps are certified by ServiceNow and run fully within the ServiceNow Platform's security perimeter.
5. Each App release, including hot fixes and patches, is certified by ServiceNow and exclusively distributed through the ServiceNow Store.
6. The Apps inherit all ServiceNow Platform features and security through the EPRL license.
7. Supplier is not responsible for Customer's ServiceNow instance.
8. Supplier cannot access Customer's instance(s) or data unless Customer grants access to the Supplier.
9. Supplier does not store or host any Customer data.
10. The Apps do not provide features allowing Supplier access to Customer's instance or data.
11. The Apps do not store or send information to Supplier.
12. Supplier does not host, store, or manage personal data as part of the Apps.
13. The Apps are not business critical.
14. Certain Applications offer optional AI Features as identified in the Product Table. When AI Features are enabled by the Customer, data may be transmitted from the Customer's ServiceNow instance to an external AI Provider as described in §4a (AI Features) of this Agreement. No data is transmitted to or through any Supplier infrastructure.

### §4a AI Features

This section applies only to Applications identified in the Product Table as having optional AI Features (currently YouDesign Models and YouDesign Command). When AI Features are not enabled, these Applications operate identically to Applications without AI Features.

#### AI Provider Configuration

The Customer is solely responsible for selecting, contracting with, and configuring the connection to their chosen AI Provider. The Customer configures the AI Provider API connection (including endpoint URL, API key, and authentication credentials) directly within their ServiceNow instance. Supplier does not provide, manage, host, or have access to the AI Provider service, the Customer's AI Provider credentials, or the Customer's AI Provider account.

#### Data Flow

When AI Features are invoked, data is transmitted directly from the Customer's ServiceNow instance to the Customer's configured AI Provider. No data passes through any Supplier infrastructure. The AI Provider's response is received directly by the Customer's ServiceNow instance and processed by the Application within that instance.

#### Data Masking

Applications with AI Features include a built-in Data Masking capability that operates within the Customer's ServiceNow instance. When enabled, Data Masking replaces sensitive data content with masked values before any data is transmitted to the AI Provider API. The Customer has the option to configure whether Data Masking is applied and may customize masking rules. Supplier provides the Data Masking capability as a tool; the Customer is solely responsible for enabling, configuring, testing, and validating masking rules in accordance with their own data governance and compliance requirements. Supplier does not warrant that the Data Masking capability will satisfy any particular regulatory, contractual, or organizational requirement of the Customer.

#### AI Usage Costs and Assists

Supplier does not charge any fees for the use of AI Features. The Customer is solely responsible for any costs associated with their AI Provider subscription, API usage, and any ServiceNow Assists consumed through the use of AI Features. The Customer is responsible for monitoring and managing their own AI API usage, rate limits, and associated costs. Supplier has no visibility into, control over, or responsibility for the Customer's AI Provider costs or ServiceNow Assists consumption.

#### Customer Responsibilities for AI Features

The Customer is solely responsible for:

(a) selecting and contracting with an AI Provider, including evaluation of the AI Provider's privacy, security, and data handling practices;

(b) configuring and managing the AI Provider API connection, including credentials and access controls;

(c) determining whether the data transmitted (masked or unmasked) meets the Customer's compliance and data protection requirements;

(d) ensuring compliance with applicable laws and regulations regarding the use of AI services, including any requirements related to automated decision-making;

(e) ensuring adequate ServiceNow Assists entitlement and AI Provider subscription capacity for the Customer's intended usage; and

(f) conducting Data Protection Impact Assessments (DPIAs) where required by applicable data protection law in connection with the use of AI Features.

Supplier does not recommend, endorse, certify, or assume any responsibility for any third-party AI Provider. The Customer's agreement with their AI Provider governs the AI Provider's handling of any data received.

#### Supplier's Role in AI Features

Supplier's role is strictly limited to providing the Application code that enables the AI Feature functionality. Supplier does not: (i) act as an intermediary, proxy, or relay for any data transmitted to AI Providers; (ii) access, intercept, log, or store any data transmitted between the Customer's instance and the AI Provider; (iii) provide, host, or operate the AI Provider service; (iv) process any data as a data processor or sub-processor in connection with the AI Features; or (v) have access to the Customer's API credentials or AI Provider account.

### §5 Technical Support

The Apps' availability is dependent on the ServiceNow Platform availability. Supplier does not provide Technical Support for the ServiceNow Platform. Limited Technical Support for the Apps is available during the support hours indicated below. Customer may notify Supplier if the App is not performing in accordance with the App Documentation. Contact your internal Information Technology (IT) support in case of issues not directly related to the App. ServiceNow will notify Supplier if the problem lies with the App, and in that event, the Supplier shall comply with the response and resolution times below.

|                                    |                                                                                                                     |
| ---------------------------------- | ------------------------------------------------------------------------------------------------------------------- |
| **Support Hours of Operation**     | 08:00–17:00 CET                                                                                                     |
| **Support Days of Operation**      | Monday–Friday                                                                                                       |
| **Promised Issue Response Time**   | Next Business Day                                                                                                   |
| **Promised Issue Resolution Time** | Within 5–10 Business Days of response (may extend up to 3 additional weeks if ServiceNow certification is required) |
| **Primary Contact**                | ins-pi Service Desk                                                                                                 |
| **Support Portal**                 | <https://www.ins-pi.com/support>                                                                                    |
| **Support Email**                  | <support@ins-pi.com>                                                                                                |

#### Obtaining Technical Support ("Logging a Case")

To obtain Technical Support from Supplier, the Customer is responsible for complying with the following procedure:

1. App user finds an Application-related problem and reports it to Customer's IT support.
2. Customer's IT contact takes ownership of the problem and attempts to find a timely solution, identifying the nature of the problem, including eliminating Customer network, ServiceNow Platform issues, and non-Supplier Application plugins and configurations outside of the Application scope as possible problem causes.
3. Customer's IT contact reproduces the error if possible and documents the steps needed to do so.
4. Customer's IT contact is unable to resolve the problem; the contact activates Technical Support by logging a case, providing the Application handle, events that led up to the problem, the problem description, and Customer's assessment of the business impact.
5. Customer's IT contact describes to Supplier the parameters, procedures, and conditions resulting from the problem in sufficient detail to permit Supplier to isolate the cause of the problem.
6. Customer's IT contact provides Supplier with all data files, configuration, and system access and sufficient rights, together with remote access, reasonably believed necessary by Supplier to reproduce and analyze the problem. If the problem cannot be reproduced, no further action will be taken by Supplier.

Supplier will record delays. The following delays will not be counted in elapsed time: (i) excessive delay in testing or deploying a proposed solution due to Customer or Customer's resource constraints; (ii) Customer delay in supplying sufficient information to commence or continue problem resolution; (iii) inability to remotely access Customer's system to resolve a problem; (iv) if, with Customer's agreement, a fix is deferred to a later patch release, or a temporary fix is in place, then the time to deliver the permanent fix is not included.

#### Technical Support Exclusions

App Subscription and Technical Support do not include installation, program development, coding, isolation of coding problems, training, assistance to or consulting or implementation of Customer's App on the system, customization of Supplier tools, or integration of Supplier tools with Customer's system. Data recovery services are not included. Technical Support does not include on-site assistance. Decommissioning and disposal of App configuration is not included.

Supplier shall not be obligated to provide Technical Support if defects are caused by or related to: (i) Customer's mishandling, abuse, misuse, or use of the App other than in accordance with Supplier's operating instructions; (ii) use of the App with other software or ServiceNow releases not expressly specified by Supplier; (iii) changes to Customer's environment; (iv) actions or omissions of persons other than Supplier; (v) repair of the App by someone other than Supplier; (vi) failure to implement all App updates, releases, and configuration changes in the correct sequence; (vii) modifications by someone other than Supplier unless directed or approved by Supplier in writing; (viii) modifications by Supplier in accordance with Customer's request; (ix) third-party products; or (x) a Force Majeure Event.

Supplier shall not be obligated to provide Technical Support except for the most recent (Major or Minor) App Release and supported App Releases published on the App Roadmap, only when used with Supplier-specified configurations and recommended ServiceNow releases and internet browser versions. Supplier shall have no obligation to provide Technical Support if Customer is using any third-party software that has been superseded by a current release more than twelve (12) months prior to the then-current date.

### §6 Documentation

The App Documentation is only available online on the Supplier's website. Supplier has the right to update and remove articles and functionality without notifying Customer. Documentation URLs:

* YouDesign Transformation Suite: <https://docs.youdesign.app>

### §7 App License

Upon acceptance of this Agreement, Supplier hereby grants to the Customer an App License for the use of the subscribed Application(s) within the specified Term as outlined in the SOW/PO. Such App License includes the right to:

(a) install and run the Application on a single authorized production instance of the ServiceNow Platform;

(b) install and run the Application on any number of non-production instances associated with the ServiceNow production instance;

(c) receive full product features, updates, Technical Support, and online Documentation within the subscription Term; and

(d) access the Application through an Embedded Platform Runtime User License to perform read, create, write, update, and delete data required for each End User (EPRL not required for YouDesign Freelucy and YouDesign Processes).

Supplier acknowledges that the App License also allows Customer's Service Providers and Contractors access to the Application as necessary to enable their provision of services to Customer, provided that Customer shall be responsible for ensuring compliance with this Agreement by such Service Providers and Contractors. The App License shall include unlimited Viewer access to Customer End Users.

Should there be a need for additional production instances of the ServiceNow Platform, each additional instance necessitates an additional App Subscription and corresponding App License.

### §8 Software Dependencies

**ServiceNow Requirements:** The Apps necessitate a compatible version of the ServiceNow Platform, including at least the basic ServiceNow Platform installation. No additional paid ServiceNow modules are required for the Apps' core operation.

**ServiceNow and Open-Source Components:** The ServiceNow Platform incorporates various open-source software components. While the Apps may rely on these components, Supplier does not offer warranties and explicitly disclaims any liability for damages arising from the use of the ServiceNow Platform or its embedded open-source software components.

**Apps' Open-Source Software Components:** The Apps incorporate specific open-source software components. A comprehensive list of all open-source software used is available upon request.

**Source Code Accessibility:** Access to the Apps' source code by the Customer is strictly prohibited. Supplier does not permit source code escrow or any similar services involving the source code.

### §9 Fees and Payment

Customer's rights under §2 (Subscription) are conditioned upon payment by Customer of the applicable Subscription Fees to Supplier (either directly or through the ServiceNow Store). Subscription Fees are payable annually in advance. Fees are payable within 30 days of receipt by Customer of a valid invoice unless otherwise specified in the Agreement. Such invoice may include a buyer code, if one is provided by Customer to Supplier. No Subscription Fees are required for YouDesign Freelucy or YouDesign Processes.

**ALL FEES ARE NON-REFUNDABLE AND NON-CANCELABLE, except as expressly provided in this Agreement, and do not include sales and use taxes, value-added taxes, goods and services taxes, excise, business, service, withholding tax, shipping, or customs duties and similar transactional taxes and fees, all of which Customer is responsible for paying above and beyond the Subscription Fees due to Supplier.**

Failure to pay Fees when due may result in the withdrawal of Customer's App from Customer's ServiceNow instance(s).

For the avoidance of doubt, Supplier does not charge any fees in connection with the use of AI Features. Any costs associated with the Customer's AI Provider subscription, API usage, or ServiceNow Assists consumption are the sole responsibility of the Customer.

### §10 Warranty, Indemnity, and Disclaimer of Warranty

Supplier warrants that:

(a) the Apps and Supplier-developed App components (excluding third-party open-source software components referenced in §8) will perform in accordance with the App Documentation and the ServiceNow certification results alongside the ServiceNow Platform;

(b) the Apps do not contain any device (including any software, code, file, program, worm, Trojan horse, virus, or other similar things) which may (i) prevent, impair, or otherwise adversely affect the operation of any of Customer's computer software, hardware, or network, any telecommunications service, equipment or network, or any other service or device; or (ii) prevent, impair, or otherwise adversely affect access to or the operation of any program or data;

(c) use of the Apps by Customer in accordance with this Agreement will not adversely affect the performance of the ServiceNow Platform; and

(d) the provision and use of the Apps in accordance with this Agreement will not infringe or contribute to the infringement of any third-party Intellectual Property Rights. Supplier agrees to indemnify Customer and hold harmless Customer and its Affiliates against any loss, liability, damage, cost, or expense, including reasonable legal fees, arising from any claim that the provision and use of the Apps in accordance with this Agreement infringes the Intellectual Property Rights of a third party.

**EXCEPT AS SET OUT ABOVE, THE APPS ARE PROVIDED "AS IS" AND WITHOUT WARRANTY OF ANY KIND. SUPPLIER EXCLUDES AND DISCLAIMS ALL IMPLIED OR STATUTORY WARRANTIES, INCLUDING (WITHOUT LIMITATION) ANY WARRANTIES OF MERCHANTABILITY, FITNESS FOR A PARTICULAR PURPOSE, QUALITY, NON-INFRINGEMENT, TITLE, RESULTS, EFFORTS, OR QUIET ENJOYMENT. THERE IS NO WARRANTY THAT THE APPS ARE ERROR-FREE OR WILL FUNCTION WITHOUT INTERRUPTION. CUSTOMER ASSUMES THE ENTIRE RISK ARISING OUT OF THE PERFORMANCE OR USE OF THE APPS. TO THE EXTENT THAT SUPPLIER MAY NOT DISCLAIM ANY WARRANTY AS A MATTER OF APPLICABLE LAW, THE SCOPE AND DURATION OF SUCH WARRANTY WILL BE THE MINIMUM PERMITTED UNDER SUCH LAW.**

**WITHOUT LIMITING THE FOREGOING, SUPPLIER MAKES NO WARRANTY REGARDING THE ACCURACY, COMPLETENESS, OR FITNESS FOR PURPOSE OF ANY OUTPUT GENERATED BY AI FEATURES, OR THE SUITABILITY OF ANY DATA MASKING CONFIGURATION FOR THE CUSTOMER'S SPECIFIC REGULATORY OR COMPLIANCE REQUIREMENTS. AI FEATURE OUTPUTS ARE PROVIDED FOR INFORMATIONAL PURPOSES AND SHOULD NOT BE RELIED UPON AS A SUBSTITUTE FOR PROFESSIONAL JUDGMENT.**

### §11 Limitations of Liability

**EXCEPT TO THE EXTENT THAT DISCLAIMER OF LIABILITY IS PROHIBITED UNDER APPLICABLE LAW, IN NO EVENT WILL SUPPLIER, SERVICENOW, OR ANY OF THEIR RESPECTIVE AFFILIATES, LICENSORS, SERVICE PROVIDERS, CONTRACTORS, EMPLOYEES, AGENTS, OFFICERS, OR DIRECTORS BE LIABLE TO CUSTOMER FOR INDIRECT, SPECIAL, INCIDENTAL, CONSEQUENTIAL, OR PUNITIVE DAMAGES (INCLUDING DAMAGES ARISING FROM LOSS OF REVENUE, USE, DATA, OR PROFITS, INJURY TO REPUTATION OR GOODWILL, OR THE COST OF SUBSTITUTE GOODS OR SERVICES) WHETHER SUCH DAMAGES ARISE UNDER CONTRACT, TORT (INCLUDING NEGLIGENCE OR STRICT LIABILITY), OR ANY OTHER LEGAL THEORY, AND EVEN IF SUCH DAMAGES ARE FORESEEABLE.**

**IF, UNDER APPLICABLE LAW, LIABILITY FOR DIRECT DAMAGES CANNOT BE EXCLUDED (NOTWITHSTANDING THE FOREGOING), THEN THE TOTAL CUMULATIVE LIABILITY OF EITHER PARTY IN CONNECTION WITH THIS AGREEMENT AND THE APPS, WHETHER IN CONTRACT, IN TORT (INCLUDING NEGLIGENCE) OR OTHERWISE, WILL NOT EXCEED THE AMOUNT OF FEES (IF ANY) THAT CUSTOMER PAID TO SUPPLIER IN THE PREVIOUS 12-MONTH PERIOD. FOR FREE APPLICATIONS (YOUDESIGN FREELUCY), SUPPLIER'S TOTAL CUMULATIVE LIABILITY SHALL NOT EXCEED US$100.00. THE EXISTENCE OF MULTIPLE CLAIMS WILL NOT EXPAND THIS LIMIT.**

**EITHER PARTY ACKNOWLEDGES THAT THE FEES REFLECT THE ALLOCATION OF RISK SET FORTH IN THIS AGREEMENT AND THAT NEITHER PARTY WOULD ENTER INTO THIS AGREEMENT WITHOUT THESE LIMITATIONS ON ITS LIABILITY. TO THE EXTENT PERMITTED BY APPLICABLE LAW, SERVICENOW WILL HAVE NO LIABILITY TO CUSTOMER UNDER THIS AGREEMENT OR IN RELATION TO THE APPS. THE LIMITATIONS AND EXCLUSIONS OF LIABILITY IN THIS SECTION WILL APPLY EVEN IF AN EXCLUSIVE REMEDY UNDER THIS AGREEMENT HAS FAILED OF ITS ESSENTIAL PURPOSE.**

**WITHOUT LIMITING THE FOREGOING, SUPPLIER SHALL HAVE NO LIABILITY FOR: (I) ANY ACTS, OMISSIONS, OR DATA HANDLING PRACTICES OF ANY AI PROVIDER SELECTED BY THE CUSTOMER; (II) ANY COSTS, CHARGES, OR FEES INCURRED BY THE CUSTOMER WITH ANY AI PROVIDER OR IN CONNECTION WITH SERVICENOW ASSISTS CONSUMPTION; (III) THE ACCURACY, COMPLETENESS, OR LEGALITY OF ANY AI FEATURE OUTPUT; OR (IV) ANY LOSS OR DAMAGE ARISING FROM THE CUSTOMER'S CONFIGURATION OR USE OF DATA MASKING.**

### §12 Term and Termination

The term of this Agreement ("Term") will commence on the Effective Date and will remain in effect for a period of one (1) year; thereafter the Term shall automatically terminate unless actively renewed by Customer. Unless Supplier notifies Customer in writing of its intention not to renew at least 60 days prior to expiration of the then-current Term, Supplier shall, not less than 30 days before the expiration of any renewal term, provide Customer with a quotation detailing the pricing for the subsequent renewal term. The Parties shall negotiate the pricing for any renewal term in good faith.

Where the Parties are not able to agree on pricing for a renewal term, the pricing during any renewal term shall be aligned with: (i) for Applications offered by ins-pi Inc., the prior year's subscription fee plus the percentage change over the prior year's U.S. Consumer Price Index for Urban Consumers, All U.S. Cities Average, published by the Bureau of Labor Statistics; (ii) for Applications offered by ins-pi GmbH, the prior year's subscription fee adjusted by the inflation rate index published at <https://www.destatis.de>; in either case, not to exceed 10% above the applicable pricing in the prior term.

Customer may terminate this Agreement at any time and for any reason by giving written notice to Supplier at least 30 days before the intended date of termination; provided, however, that Customer will not be entitled to a refund of any fees paid hereunder except as set out below.

Either Party may terminate this Agreement, effective immediately upon written notice to the other Party: (a) for Supplier, if Customer fails to pay any portion of the Subscription Fees when due and fails to cure such non-payment within thirty (30) days after receipt of notice; or (b) if either Party otherwise breaches any provision of this Agreement and fails to remedy such breach within 30 days after receipt of notice.

Upon expiration or termination of this Agreement, Customer's License and right to use or access the Apps terminate, and the Apps must be removed from the Customer's instance of the ServiceNow Platform. In the event Customer terminates this Agreement for Supplier's uncured breach, Supplier shall refund to Customer a pro-rata share of any fees paid in advance from the termination date to the end of the Term.

Sections §1, §7, §8, §10–§11, §13–§24, and the logo license in §16 will survive expiration or termination of this Agreement for any reason.

### §13 Confidential Information

Supplier will not have access to Customer's data during the term of this Agreement unless Customer grants Supplier such access. Should Customer grant Supplier access to Customer's data, all data processed or accessed by Supplier in connection with this Agreement shall be treated as Confidential Information.

The Parties acknowledge that either Party's Confidential Information may be disclosed to the other Party under or in connection with this Agreement. For the purposes of this Agreement, "Confidential Information" means all information, in whatever form transmitted, referring or relating to a Party, including without limitation technical drawings, algorithms, know-how, formulas, tools, methodologies, processes, ideas, inventions, schematics and other technical information, computer programs (including source code and object code), business, financial, customer and product development plans, quotes, forecasts, strategies, client lists, pricing, revenue, overhead, and profit margins, which is disclosed by such Party (in such circumstances, "Disclosing Party") to the other Party (in such circumstances, "Receiving Party"). Confidential Information includes but is not limited to (i) information belonging to, provided by, or pertaining to Customer or any of Customer's Affiliates; (ii) information belonging to, provided by, or pertaining to any of Customer's clients; and (iii) personal information.

Confidential Information shall not include any information that: (a) is already known by the Receiving Party without an obligation of confidentiality; (b) is publicly known or becomes publicly known without breach by the Receiving Party; (c) is rightfully received from a third party having no obligation not to disclose; or (d) is independently developed without use of the Disclosing Party's Confidential Information.

The Receiving Party agrees that it and its Affiliates will maintain all Confidential Information in confidence and not disclose it to any person or entity, except employees and advisors who have a need to know, who have been informed of the confidential nature of the information, and who agree to be bound by corresponding obligations. The Receiving Party will use at least the same degree of care as it uses for its own confidential information and in any event no less than a reasonable degree of care.

**Without the prior written consent of the Disclosing Party, neither the Receiving Party nor any of its Affiliates will use any Confidential Information for any purpose whatsoever, except for the purpose of carrying out this Agreement. Receiving Party and its Affiliates shall be strictly liable for any disclosure or use of the Confidential Information in violation of the Agreement, including any disclosure or use of the Confidential Information made by any employee or advisor of Receiving Party and its Affiliates.**

Confidential Information may be disclosed if required by law, rule, regulation, or valid court order, provided that the Disclosing Party is given reasonable notice and the Receiving Party makes a reasonable effort to obtain a protective order.

Upon the Disclosing Party's written request or the termination of this Agreement, all Confidential Information in tangible form shall be immediately returned or destroyed, with written verification provided. The Receiving Party will not be obligated to return or destroy Confidential Information to the extent of archival requirements for e-mail or electronic data backup.

### §14 Data Protection and Privacy

The Applications are subject to the ins-pi App Privacy Policy (available at ins-pi.com or through the ServiceNow Store listing), which describes in detail how data is handled in connection with the Applications. The App Privacy Policy is incorporated herein by reference.

Supplier does not access, receive, store, or process any data within the Customer's ServiceNow instance under normal operating conditions. The Applications do not contain telemetry, usage analytics, or any mechanism that reports information back to Supplier. All data created or managed by the Applications remains within the Customer's ServiceNow instance under the Customer's sole control. On this basis, Supplier does not act as a data controller or data processor with respect to data within the Customer's instance for purposes of the General Data Protection Regulation (GDPR), the California Consumer Privacy Act (CCPA), or other applicable data protection legislation.

In the limited circumstance where the Customer grants Supplier personnel access to the Customer's instance for support or consulting purposes, and such access involves exposure to personal data, Supplier acknowledges that it may be considered a data processor for the duration and scope of that access. In such cases, the confidentiality provisions of §13 apply, and the Parties may enter into a supplementary data processing agreement as required.

The Customer is the data controller for all data within its ServiceNow instance, including data managed through the Applications. The Customer is responsible for compliance with all applicable data protection laws in connection with such data, including the use of AI Features.

### §15 Compliance with Laws

Customer will comply with all applicable export and import control laws and regulations in Customer's use of the Apps and will not export or re-export the Apps without all required government licenses. Customer will defend, indemnify, and hold harmless Supplier and its licensors, suppliers, and resellers from and against any violation of such laws or regulations by Customer.

### §16 Trademark and Logo License

#### 16.1 License to Supplier

Subject to the terms of this section, Customer hereby grants to Supplier a non-exclusive, non-transferable, royalty-free, revocable license to use Customer's name, logo, and trademarks ("Customer Marks") solely for the purpose of identifying Customer as a user of the YouDesign Transformation Suite in Supplier's marketing materials, website, case studies, presentations, and collateral ("Permitted Marketing Use"). Supplier shall:

(a) use Customer Marks only in a manner that is factual, accurate, and not misleading;

(b) not alter, modify, or distort Customer Marks in any way, except for proportional resizing;

(c) not imply any endorsement, sponsorship, or affiliation beyond the factual customer relationship;

(d) comply with any brand guidelines provided by Customer in writing; and

(e) promptly cease use of Customer Marks upon written request from Customer.

Customer may revoke this license at any time by providing written notice to Supplier. Upon receipt of such notice, Supplier shall cease all new use of Customer Marks within thirty (30) days. Existing published materials (e.g., printed collateral, archived web pages) may be exhausted or replaced in the ordinary course of business within ninety (90) days.

#### 16.2 License to Customer

Supplier hereby grants to Customer a non-exclusive, non-transferable, royalty-free license to use the Supplier's name, the YouDesign name, the YouDesign Transformation Suite name, and associated logos and trademarks ("Supplier Marks") solely for the purpose of identifying Supplier and the Applications in Customer's internal and external communications, including internal presentations, vendor registers, architecture documentation, and published case studies. Customer shall:

(a) use Supplier Marks only in a manner that is factual, accurate, and not misleading;

(b) not alter, modify, or distort Supplier Marks in any way, except for proportional resizing;

(c) not imply any endorsement, sponsorship, or affiliation beyond the factual supplier relationship;

(d) comply with any brand guidelines provided by Supplier in writing; and

(e) promptly cease use of Supplier Marks upon written request from Supplier.

This license to Customer survives termination of this Agreement solely to the extent necessary for Customer to complete the transition away from the Applications in the ordinary course of business, for a period not to exceed ninety (90) days following termination.

#### 16.3 General Trademark Provisions

Neither Party acquires any right, title, or interest in the other Party's marks by virtue of this Agreement. All goodwill arising from the use of a Party's marks shall inure to the benefit of the Party that owns such marks. Each Party shall promptly notify the other of any unauthorized use of its marks of which it becomes aware.

### §17 U.S. Government Rights

If Customer is a branch or agency of the U.S. Government, then Customer acknowledges that the Apps are a "commercial item" as defined at FAR 2.101, consisting of "commercial computer software" and "commercial computer software documentation" as such terms are defined and used in FAR 2.101 and 12.212. Consistent with FAR 12.211 through 12.212 and, if applicable, DFARS 227.7202-1 through 227.7202-4 and DFARS 252.227-7015, all U.S. Government end users acquire the Apps with only those rights set forth in this Agreement.

### §18 Relationships Between the Parties

The Parties are independent contractors. Neither Party is the agent, partner, employee, fiduciary, or joint venturer of the other Party under this Agreement. Neither Party shall have any authority to enter into, incur, make, change, enlarge, or modify any contract, liability, agreement, obligation, representation, guarantee, warranty, or commitment on behalf of the other Party unless expressly requested in writing by a duly authorized representative of the other Party.

### §19 Assignments

Neither Customer nor Supplier may assign or transfer, by operation of law or otherwise, any of its rights under this Agreement (including licenses with respect to the Apps) to any third party without the other Party's prior written consent, which will not be unreasonably withheld. Any attempted assignment or transfer in violation of the foregoing will be void.

### §20 Language

This Agreement is in the English language and its English-language version will be controlling over any translation, except and to the extent required by applicable law.

### §21 Remedies

Except as otherwise provided herein, the Parties' rights and remedies under this Agreement are cumulative. Customer acknowledges that the Apps contain valuable trade secrets and proprietary information of Supplier, that any actual or threatened breach of this Agreement by Customer will constitute immediate, irreparable harm for which monetary damages would be an inadequate remedy, and that injunctive relief is an appropriate remedy for such breach. If any legal action is brought to enforce this Agreement, the prevailing Party will be entitled to receive its attorneys' fees, court costs, and other collection expenses, in addition to any other relief it may receive.

### §22 Waivers

All waivers must be in writing. Any waiver or failure to enforce any provision of this Agreement on one occasion will not be deemed a waiver of any other provision or of such provision on any other occasion.

### §23 Choice of Law, Venue, and Severability

The governing law and venue for disputes arising under this Agreement are determined by the Supplier entity for the relevant Application, as identified in the Product Table:

**For Applications offered by ins-pi Inc.** (YouDesign Blueprints, YouDesign Models, YouDesign Processes): The substantive laws of the State of Florida shall govern this Agreement. The exclusive legal jurisdiction and venue shall be any court of competent jurisdiction within the State of Florida. The Parties expressly disclaim the applicability of the Uniform Computer Information Transactions Act, the United Nations Convention on the Sale of Goods, and the Convention on the Use of Electronic Communications in International Contracts.

**For Applications offered by ins-pi GmbH** (YouDesign Freelucy, YouDesign Command): This Agreement is governed by the laws of the Federal Republic of Germany under the exclusion of the UN Convention on Contracts for the International Sale of Goods of 11 April 1980 (CISG) and the German conflict rules. The exclusive legal jurisdiction is Cologne, Germany. The Uniform Computer Information Transactions Act (USA) does not apply.

Where a Customer subscribes to Applications offered by both ins-pi Inc. and ins-pi GmbH, any dispute shall be governed by the law applicable to the Application that is the subject of the dispute. If a dispute involves multiple Applications offered by different Supplier entities, the Parties shall first attempt to resolve the matter through good-faith negotiation before initiating proceedings.

If any provision of this Agreement is held unenforceable by a court, such provision may be changed and interpreted to accomplish its objectives to the greatest extent possible under applicable law, and the remaining provisions will continue in full force and effect. Without limiting the generality of the foregoing, Customer agrees that §10 and §11 will remain in effect notwithstanding the unenforceability of any other provision.

### §24 No Third-Party Beneficiary Rights

This Agreement is intended solely for the benefit of the Parties and their respective Affiliates, successors, and permitted assigns. Nothing in this Agreement confers any rights, remedies, or claims upon any third party, including end users of the Customer's ServiceNow instance, data subjects, or any other individual or entity.

### §25 Entire Agreement

This Agreement, including the Product Table, the App Privacy Policy incorporated by reference, and any Statements of Work issued hereunder, constitutes the final and entire agreement between the Parties regarding the subject of this Agreement and supersedes all prior or contemporaneous agreements, understandings, and communications, whether written or oral, including any prior terms and conditions accepted through the ServiceNow Store for any of the Applications listed herein. This Agreement may be amended only by a written document signed by both Parties. The terms of any purchase order or similar document submitted by Customer to Supplier will be considered for negotiation purposes and will not be effective to alter the terms of this Agreement unless specifically incorporated therein.


# Welcome

Drag. Drop. Relationships Done.

YouDesign Freelucy is the visual relationship editor for ServiceNow. Create, update, and delete CI relationships with a click or a drag, across three views, with no metamodel expertise required.

Freelucy is part of the **YouDesign Enterprise Transformation Suite** by ins-pi, and it is **free forever** on the ServiceNow Store.

<figure><img src="/files/azXlHSCGVSD6wKWcH0yx" alt=""><figcaption></figcaption></figure>

***

## What you can do with Freelucy

* **Create relationships** between ServiceNow CIs with a click or a drag
* **Update relationships** in a single gesture when something changes
* **Delete relationships** the same way, with no form digging and no scripting
* **Work the way you think** in three views: Classic, Flow, and List
* **Stay compliant** with your CSDM. Freelucy only allows relationships your metamodel permits
* **Review before commit** so nothing touches your CMDB until you say so

***

## Why Freelucy exists

Accurate CI relationships are the backbone of impact analysis, change planning, service mapping, and CMDB health. But editing them in standard ServiceNow takes time and expertise. Relationship pickers, related lists, and reference fields are powerful but unforgiving.

Freelucy turns that work into a visual gesture. It respects your CSDM and metamodel governance, suggests only relationships that are actually allowed, and gives you a review step before anything is persisted.

## Three ways to see the same record

Every view edits the same record and shares the same staged changes. Switch anytime, and your work comes with you.

* **Classic** is the original canvas: your primary element in the center with relationships radiating out.
* **Flow** lays upstream and downstream out in two columns, with search, grouping, and filters.
* **List** shows every relationship in a single scannable table — the same data as Classic and Flow, laid out as one list you can search, sort, and bulk-edit.

{% hint style="info" %}
**Free forever, no end-user licenses.** Freelucy is a scoped application that uses core ServiceNow functionality. It introduces no custom tables and requires no additional ServiceNow end-user licenses.
{% endhint %}

## Get Freelucy

ServiceNow administrators with a HI account can install Freelucy from the [ServiceNow Store](https://ins-pi.com/getfreelucy) at no cost.

Next: [Install Freelucy](/freelucy/get-the-app/install)

## Start here

<table data-view="cards"><thead><tr><th></th><th></th><th data-hidden data-card-target data-type="content-ref"></th></tr></thead><tbody><tr><td><strong>Install Freelucy</strong></td><td>Get it from the ServiceNow Store and install it on your instance.</td><td><a href="/pages/hw8Kv2cqb0EITrFijtKn">/pages/hw8Kv2cqb0EITrFijtKn</a></td></tr><tr><td><strong>Pick a record</strong></td><td>Open the editor and choose the CI you want to map.</td><td><a href="/pages/264XfVSNDqRw4Ih2IvtB">/pages/264XfVSNDqRw4Ih2IvtB</a></td></tr><tr><td><strong>Configure Freelucy</strong></td><td>Set up access, scope privileges, and suggested relationships.</td><td><a href="/pages/S3rlEijsEUTA9iNkNw7H">/pages/S3rlEijsEUTA9iNkNw7H</a></td></tr></tbody></table>

***

## Need help?

If you can't find what you're looking for, reach out at [ins-pi.com/support](https://www.ins-pi.com/support).


# Release notes

Every Freelucy version, newest first.

YouDesign Freelucy versions are listed below in reverse chronological order. Each release builds on the previous. To use the newest features and stay supported on current ServiceNow releases, run the latest version.

***

## Version 26.0 — Major

The largest release since launch. A full redesign and a much bigger app.

**New look and name**

* Freelucy is now **YouDesign Freelucy**, part of the YouDesign Enterprise Transformation Suite, with refreshed branding throughout.
* New **light and dark themes**, applied across every view and reflected in exports.

**Three views of the same record**

* **Classic**, the original canvas, alongside two new views: **Flow** (two-column upstream and downstream with search, filters, and grouping) and **List** (a direction-grouped relationship table with search and bulk editing).
* Staged edits are **shared across all views**. Switch views anytime without losing work.
* Switch views with the tabs or the `Alt/Option` plus number shortcut.

**A new way to add records**

* The **Data Hub** replaces the old picker: search suggested tables, browse a record tree, multi-select, and add to upstream or downstream by click or drag.

**Rebuilt commit experience**

* A new **review dialog** lists every staged change by row, with per-row undo and a single commit or discard for the whole batch.

**Accessibility and languages**

* Built to **WCAG 2.2 AA**, with reduce motion, high-contrast palette, precise selection cursor, a single-character shortcut toggle, and full keyboard navigation.
* The interface is **fully translated into 6 languages** (English US and UK, German, French, Spanish, Portuguese), auto-detected from your browser, with more in progress.

**More**

* **Read-only mode** for users with the Reader role, and an embedded viewer with a fullscreen toggle for forms.

## Version 3.1 — Improved

Minor release. Adds the capability to globally define tables that Freelucy filters out in the UI, rolls up essential library updates, and fixes outstanding bugs.

## Version 3.0.1 — Fixed

Bug fixes addressing loading issues on the ServiceNow Rome release.

## Version 3.0 — Major

Major interface overhaul. Introduces:

* The floating action bar.
* The redesigned side panel.
* Read-only mode for users with the Reader role.
* General improvements to relationship management and UI.

## Version 2.3

Adds relationship tooltips on hover and pre-commit removal of staged changes. Visual updates to popups and tooltip elements.

## Version 2.2

Adds the **Jump to** feature for switching the primary element from any connected element. Improvements to search.

## Version 2.1

UI color theme update, ACL adjustments, and bug fixes for browser-related issues.

## Version 2.0

Transition to the Freelucy brand and updates to the SweetAlert library.

## Version 1.1

Browser hierarchy view and multi-selection with drag-and-drop. Fixes for form and search-related issues.

## Version 1.0

Initial release with core relationship-editing functionality.

***

## What's next

* See [Update Freelucy](/freelucy/get-the-app/update) for how to move to a newer version.


# Installation & Setup

Get Freelucy from the ServiceNow Store and install it on your instance.

YouDesign Freelucy is free on the ServiceNow Store. Installation is a two-step flow: get it from the Store with a HI account, then install it on each ServiceNow instance where you need it.

{% hint style="warning" %}
**HI account required.** The initial purchase from the ServiceNow Store must be done by a ServiceNow administrator with HI account access.
{% endhint %}

## Step 1 — Get Freelucy from the ServiceNow Store

1. Go to the [ServiceNow Store](https://ins-pi.com/getfreelucy).
2. Search for **YouDesign Freelucy**.
3. Open the YouDesign Freelucy listing under Apps and Solutions.
4. Click **Get**.
5. Sign in with your HI account credentials and complete the request.

Freelucy is now linked to your company and available for installation on every instance through System Applications.

## Step 2 — Install Freelucy on a ServiceNow instance

Repeat this step on each instance (production and sub-prod) where you want Freelucy to run.

1. Log in to the instance as an administrator.
2. Open **All** and filter for **System Applications**.
3. Open **All Available Applications > All**.
4. Search for **YouDesign Freelucy**.
5. Click **Install**.

When the install finishes, Freelucy is active on the instance.

{% hint style="info" %}
**No demo data, no default tables.** Freelucy installs clean. Your administrator must configure cross-scope privileges and suggested relationships to expose the tables your users actually work with. See [Configuration](/freelucy/configuration/configuration).
{% endhint %}

***

## What's next

You have Freelucy installed. Before users can edit relationships, do two things:

1. **Configure access and scope.** See [Configuration overview](/freelucy/configuration/configuration).
2. **Walk through your first relationship edit.** See [How relationships work in Freelucy](/freelucy/work-in-the-app/usage).


# Update Freelucy

Move to a newer Freelucy version.

When a new YouDesign Freelucy version is published to the ServiceNow Store, you can update each instance from System Applications.

{% hint style="warning" %}
**Admin only.** Only ServiceNow administrators can update Freelucy.
{% endhint %}

## Update on an instance

1. Open **System Applications > All Available Applications > All**.
2. Search for **YouDesign Freelucy**.
3. Choose the version you want and click **Update**.

***

## What's next

* Check what's new in [Release notes](/freelucy/get-the-app/release-notes).


# Pick a record to edit

Open Freelucy and choose the CI you want to map.

YouDesign Freelucy opens on a home page where you pick the record to work on. Choose a table on the left, pick a record on the right, and Freelucy opens the editor on that record.

{% hint style="info" %}
Now you can find the access module from the ServiceNow navigation, YouDesign Freelucy > YouDesign Freelucy
{% endhint %}

<figure><img src="/files/K0fxym5XVWORyR81DTe0" alt="" width="375"><figcaption></figcaption></figure>

<figure><img src="/files/yBRwAPoWU3ddUXrc8OHE" alt=""><figcaption></figcaption></figure>

## Choose a table

The left panel lists the ServiceNow tables Freelucy can open.

1. Search by label or name to narrow the list.
2. Use the **family filter** to focus on a CMDB family, such as the CMDB base or the `cmdb_ci_*` classes.
3. Sort by label or name, ascending or descending.

Your table selection is remembered for the session, so returning to the home page keeps your last table in place.

## Choose a record

The right panel shows the records in the selected table.

1. Filter or sort the entries by title, subtitle, or sys ID.
2. Find the record you want to map relationships from.
3. Click **Edit** to open it in the editor.

<figure><img src="/files/IERx0HOiQlIRvjKTiY3z" alt=""><figcaption></figcaption></figure>

Freelucy opens the editor with your record as the **primary element**. The address bar carries the table and record so you can bookmark or share the exact record you are editing.

## Open straight from a record

You do not have to start from the home page. If your administrator has added Freelucy to a form, you can open the editor directly from any record with the **Edit Relationships** button or an embedded viewer. See [Add Freelucy to a form view](/freelucy/configuration/form-view).

***

## What's next

* [Tour the editor](/freelucy/get-started/tour-the-editor)
* [Choose a view](/freelucy/get-started/choose-a-view)
* [How relationships work in Freelucy](/freelucy/work-in-the-app/usage)


# Tour the editor

Find your way around the Freelucy editor.

The editor is where you stage relationship changes. Whatever view you are in, the same parts are always within reach: the header, the view tabs, the Data Hub, and the commit bar.

{% hint style="info" %}
The first time openning YouDesign Freelucy will show you a tutorial where you can have a overview in realtime of the app, if you want to see it again you can click on Show tutorial from the top-left icon
{% endhint %}

## The header

<figure><img src="/files/sZRrffjo5x7Cve6ssd9k" alt="" width="166"><figcaption><p>Top-left icons</p></figcaption></figure>

The header sits across the top on every page.

* **Home and branding** take you back to record selection.
* **Page name and tag** show the record you are editing.

<figure><img src="/files/ZZZoOxvf5DoIaNRHaxa3" alt="Hamburger icon shows the left panel" width="188"><figcaption><p>Top-left hamburger icon shows the left panel</p></figcaption></figure>

* **Theme toggle** switches between light and dark. See [Themes and language](/freelucy/personalize-and-accessibility/themes-and-language).
* **Language switcher** changes the interface language. See [Themes and language](/freelucy/personalize-and-accessibility/themes-and-language).
* **User menu** shows the signed-in user and their roles.

## The view tabs

Switch how you see the record with the view tabs. Freelucy has three views: **Classic**, **Flow**, and **List**. Switch with the tabs or with the `Alt/Option` plus number shortcut for the view.

Your staged edits are shared across every view. Add a relationship in Flow, switch to Classic, and it is already there. See [Choose a view](/freelucy/get-started/choose-a-view).

<figure><img src="/files/c6cO3aGs0y8rdCfBtaMn" alt="" width="338"><figcaption></figcaption></figure>

## The Data Hub

The **Data Hub** is the drawer you pull records from. Open it to search suggested tables, browse a record tree, and add one or many records to your primary element. See [Find records with the Data Hub](/freelucy/work-in-the-app/data-hub).

<figure><img src="/files/dtcoeyR75WPeMCX93wP3" alt="" width="375"><figcaption><p>Data hub -- after selecting a table</p></figcaption></figure>

## The commit bar

Every change you make is staged first, never written straight to ServiceNow.

* The **pending-change count** shows how many edits are waiting.
* **Commit** opens a review dialog where you confirm each change.
* **Discard** drops every staged edit and refetches the record.

<figure><img src="/files/ZmsNpB6baPGBz45uqQmk" alt="" width="375"><figcaption></figcaption></figure>

{% hint style="info" %}
**Leaving with unsaved changes?** If you try to navigate to a different record while edits are staged, Freelucy asks first so you do not lose work.
{% endhint %}

***

## What's next

* [Choose a view](/freelucy/get-started/choose-a-view)
* [Find records with the Data Hub](/freelucy/work-in-the-app/data-hub)
* [Commit your changes](/freelucy/work-in-the-app/commit-changes)


# Choose a view

Three views of the same record. Pick the one that fits the task.

YouDesign Freelucy shows the same record three ways. Every view edits the same record and shares the same staged changes, so you can switch whenever one fits the task better. Use the view tabs or the `Alt/Option` + (1-3 number) shortcut for the view.

<figure><img src="/files/XA6YI79tAJfHDmrtezOx" alt="" width="318"><figcaption></figcaption></figure>

## Classic

The original canvas. Your primary element sits in the center with its relationships radiating out as connected nodes. Best for a spatial sense of a record's immediate neighborhood and for users who already know the Classic editor.

[Open the Classic view guide](/freelucy/views-in-depth/classic)

## Flow

A two-column layout: upstream on one side, downstream on the other, with the primary element between them. Each column has search, and grouping, sorting, and type filters come from the shared View Controls drawer. Best for working through long relationship lists quickly and for precise add, update, and remove actions.

[Open the Flow view guide](/freelucy/views-in-depth/flow)

## List

A fast, scannable table of the record's relationships, grouped into upstream and downstream, with search and bulk editing. Best for working through a long relationship set and editing several at once.

[Open the List view guide](/freelucy/views-in-depth/list)

{% hint style="info" %}
**Your last view is remembered.** Freelucy keeps your view choice per table, so the next record you open in that table starts where you left off.
{% endhint %}

***

## What's next

* [How relationships work in Freelucy](/freelucy/work-in-the-app/usage)
* [Find records with the Data Hub](/freelucy/work-in-the-app/data-hub)


# How relationships work in Freelucy

Open Freelucy from any CI and start mapping.

YouDesign Freelucy opens on a single CI, your **primary element**. From there you add other records as upstream or downstream relationships, update them between sides, and remove them. You do this in whichever view fits the task, and nothing is written to your CMDB until you click **Commit**.

## The mental model

* **Primary element.** The record you opened Freelucy from. Every view centers on it.
* **Upstream and downstream.** Relationships have a direction. Freelucy keeps the two sides separate so you always know which way a relationship points.
* **Data Hub.** The drawer you pull records from to relate to your primary element. See [Find records with the Data Hub](/freelucy/work-in-the-app/data-hub).
* **Views.** Three ways to see and edit the same record: Classic, Flow, and List. Staged edits are shared across all of them. See [Choose a view](/freelucy/get-started/choose-a-view).
* **Stage, then commit.** Every edit is staged first. You review the full batch before anything reaches ServiceNow.

{% hint style="info" %}
**You can only map allowed relationships.** Freelucy shows tables and relationship types that are defined as suggested relationships or approved by your administrator. If you need a relationship that is not available, ask your administrator to add it. See [Manage suggested relationships](/freelucy/configuration/suggested-relationships).
{% endhint %}

## Two ways to add a relationship

Every view supports the same two gestures:

1. **Click to add.** Find a record in the Data Hub and use its **Add to Upstream** or **Add to Downstream** action. This is the most forgiving path and works the same in every view.
2. **Drag to add.** Drag a record from the Data Hub onto a valid drop target. Freelucy lights up only the sides your metamodel allows.

## Stage, review, commit

Until you commit, every edit is a stage. You can keep adding, updating, and removing for as long as you like. When you are ready, [commit your changes](/freelucy/work-in-the-app/commit-changes) and Freelucy writes the whole batch to ServiceNow at once. Discard instead, and everything staged is dropped.

***

## What's next

* [Find records with the Data Hub](/freelucy/work-in-the-app/data-hub)
* [Create a relationship](/freelucy/work-in-the-app/create-relationship)
* [Create multiple relationships at once](/freelucy/work-in-the-app/create-multiple)
* [Update a relationship](/freelucy/work-in-the-app/update-relationship)
* [Delete a relationship](/freelucy/work-in-the-app/delete-relationship)
* [Commit your changes](/freelucy/work-in-the-app/commit-changes)


# Find records with the Data Hub

Search, browse, and pull records in to relate to your primary element.

The Data Hub is the drawer you source records from. Open it to search the tables that make sense for your primary element, browse a record tree, and add one or many records as relationships.

<figure><img src="/files/InKq6ecqWs3lOlodpeAL" alt="" width="375"><figcaption></figcaption></figure>

## Open the Data Hub

Open the Data Hub from the editor. It opens as a drawer alongside your current view and stays out of the way of the canvas.

## Find a record

1. The Data Hub suggests tables based on your primary element. Search to narrow them.
2. Expand a table to browse its records as a tree, or search within it.
3. Records that are valid to relate to your primary element are the ones YouDesign Freelucy lets you add.

## Add records

Once you have found the record or records you want:

* **Add to a side directly.** Use a record's **Add to Upstream** or **Add to Downstream** action. Freelucy resolves the relationship type, asking you only when more than one type applies.
* **Drag onto a drop target.** Drag a record out of the Data Hub. Valid drop targets light up in your current view. Where those targets are depends on the view, so see the [view guides](/freelucy/views-in-depth/classic) for specifics.

## Add many at once

You do not have to add records one by one.

1. Hold **Ctrl** or **Cmd** and click each record you want. Selected records highlight.
2. Add them all with the **Add to Upstream** or **Add to Downstream** action, or drag the whole selection onto a valid drop target.

<figure><img src="/files/doxSpHG0RBicTiBUeiX8" alt="" width="375"><figcaption></figcaption></figure>

See [Create multiple relationships at once](/freelucy/work-in-the-app/create-multiple) for the full walkthrough.

{% hint style="info" %}
**Valid sides light up as you drag.** While you drag from the Data Hub, every view highlights the sides and drop zones your metamodel allows. If a side does not light up, that relationship is not permitted for the records you picked.
{% endhint %}

***

## What's next

* [Filter and sort with View Controls](/freelucy/work-in-the-app/view-controls)
* [Create a relationship](/freelucy/work-in-the-app/create-relationship)
* [Create multiple relationships at once](/freelucy/work-in-the-app/create-multiple)
* [Choose a view](/freelucy/get-started/choose-a-view)


# Filter and sort with View Controls

Filter, group, and sort the relationships shown in Flow and List.

View Controls is the drawer for shaping what you see: hide relationships by type or table, group them, and sort them. It applies to [Flow](/freelucy/views-in-depth/flow) and [List](/freelucy/views-in-depth/list); [Classic](/freelucy/views-in-depth/classic) shows relationships spatially on the canvas instead.

<figure><img src="/files/2wA0wFeP0zN6QQLmH8bo" alt="" width="188"><figcaption></figcaption></figure>

## Open View Controls

Open the drawer from the sliders icon pinned to the edge of the editor, opposite the Data Hub. A dot on the icon means a filter is active even while the drawer is closed. On narrow screens, View Controls opens as a full overlay and closes the Data Hub if it was open, since only one drawer can be open at a time there.

## Group and sort

* **Group by** collects relationships under collapsible headers. Flow groups by **Type** or **Class**; List adds **Direction**.
* **Sort by** orders relationships by **Name**, **Type**, or **Class**; List adds sorting by **recently added**.

Both apply to every column or section in the view at once.

## Filter by relationship type or table

* **Relationship types** are shown as chips, one per type present in your current relationships. A filled chip is visible; an outlined chip is hidden. Click a chip to toggle it — you can hide as many types as you like.
* **All tables** lists every table represented, each with a checkbox and a count of how many relationships belong to it. Uncheck a table to hide its relationships. **Select all** restores every table regardless of its current state.

Type and table filters combine: a relationship stays visible only if both its type and its table are checked. The count next to each table is the total for that table in the view, not a live count of what is currently visible.

{% hint style="info" %}
The counts shown next to each table don't shrink as you filter — they always reflect how many relationships exist for that table, so you can tell what a filter is hiding.
{% endhint %}

## Reset

Once you have any filter active, or grouping or sorting off their defaults, a **Show all** option appears to clear the type and table filters in one click. The **reset** icon in the drawer's header goes further: it also returns grouping to **None** and sorting to **Name**. Reset is disabled when there is nothing to reset.

***

## What's next

* [Flow view](/freelucy/views-in-depth/flow)
* [List view](/freelucy/views-in-depth/list)
* [Find records with the Data Hub](/freelucy/work-in-the-app/data-hub)


# Create a relationship

Add a record from the Data Hub as an upstream or downstream relationship.

Adding a relationship means bringing a record in from the Data Hub and attaching it to your primary element on the upstream or downstream side. You can do this with a click or with a drag, in any editing view.

## Click to add

This is the quickest and most forgiving path, and it works the same in every view.

1. Open the [Data Hub](/freelucy/work-in-the-app/data-hub) and find the record you want to relate.
2. On that record, choose **Add to Upstream** or **Add to Downstream**.
3. If more than one relationship type is valid, pick the one you want. If only one applies, YouDesign Freelucy uses it automatically.

<figure><img src="/files/l3LrFTOxz44BoFDAAcG9" alt="" width="375"><figcaption></figcaption></figure>

The relationship is now staged on the chosen side.

## Drag to add

You can also drag a record out of the Data Hub onto a valid drop target. Freelucy lights up only the sides your metamodel allows.

* In **Flow**, drop the record into the upstream or downstream column.
* In **Classic**, drop the record onto the circular drop indicator that appears next to the primary element on the allowed side. Releasing anywhere else cancels the add.

If more than one relationship type is valid, pick one when prompted.

<figure><img src="/files/CgvYV3KhbJ290js7TQAF" alt="" width="375"><figcaption></figcaption></figure>

## How a staged add looks

A new relationship is staged, not yet committed. Freelucy marks staged additions so you can tell them apart from relationships that already exist. In Flow, a staged add shows a green accent and a plus badge.

<figure><img src="/files/kPI1BxETL0GOkYnVNd5t" alt="" width="375"><figcaption></figcaption></figure>

The relationship is not written to ServiceNow until you [commit](/freelucy/work-in-the-app/commit-changes).

***

## What's next

* [Create multiple relationships at once](/freelucy/work-in-the-app/create-multiple)
* [Commit your changes](/freelucy/work-in-the-app/commit-changes)


# Create multiple relationships at once

Map several records to the same primary element in one gesture.

When you need to attach several records to the same primary element, you do not have to add them one by one. Select them all in the Data Hub and add them as a batch.

## Step by step

1. Open the [Data Hub](/freelucy/work-in-the-app/data-hub).
2. Hold **Ctrl** or **Cmd** and click each record you want to map. Selected records highlight.

   <figure><img src="/files/SpSbOjMukvNhOEINkenc" alt="" width="375"><figcaption></figcaption></figure>
3. Add the whole selection at once, either way:
   * **Click to add.** Choose **Add to Upstream** or **Add to Downstream** for the selection.
   * **Drag to add.** Drag the selection onto a valid drop target in your current view.
4. If the records support more than one relationship type, YouDesign Freelucy prompts you. You can:

   * **Pick a type for each record**, or
   * **Apply one type to the whole batch.**

   <figure><img src="/files/MT508b59KeXSFJvca1Ff" alt="" width="375"><figcaption></figcaption></figure>

Every record in the selection is staged on the chosen side, ready to commit.

***

## What's next

* [Commit your changes](/freelucy/work-in-the-app/commit-changes)
* [Update a relationship](/freelucy/work-in-the-app/update-relationship) if you need to fix one


# Update a relationship

Move a relationship to the other side, or change its type.

When a relationship is on the wrong side, upstream when it should be downstream or the other way around, you do not delete and recreate it. You move it. You can also change a relationship's type without moving it.

## Move a relationship to the other side

### In Flow

1. Find the relationship row in the upstream or downstream column.
2. Use the row's **move control** or just drag and drop to send it to the opposite side. If more than one relationship type applies on the new side, pick one when prompted.

<figure><img src="/files/a6HX8e0nfjagK7DApJ9T" alt="" width="375"><figcaption></figcaption></figure>

### In Classic

1. Drag the connected element from its current connection point to the one on the other side.
2. Pick the relationship type for the new direction if you are prompted.

## Change the relationship type

If the side is right but the type is wrong, change just the type. In Flow, open the row's overflow menu and choose **Change relationship type**, then pick the new one. YouDesign Freelucy offers only the types your metamodel allows for that pair of records.

The update is staged until you [commit](/freelucy/work-in-the-app/commit-changes).

***

## What's next

* [Delete a relationship](/freelucy/work-in-the-app/delete-relationship)
* [Commit your changes](/freelucy/work-in-the-app/commit-changes)


# Delete a relationship

Remove a relationship from your primary element.

Removing a relationship stages it for deletion. Like every other edit, it is not removed from ServiceNow until you commit.

{% hint style="warning" %}
**Deletion must be enabled.** If your administrator has not authorized YouDesign Freelucy to delete relationships, the remove action has no effect on commit. See [Enable relationship deletion](/freelucy/configuration/enable-relationship-deletion).
{% endhint %}

## In Flow

1. Find the relationship row in the upstream or downstream column.
2. Use the **remove** action button on the row.

The row is marked for removal with a strikethrough. It stays visible so you can change your mind, with an **Undo** action right there on the row.

<figure><img src="/files/OF1yUJSRS8v6dtLxzgS3" alt="" width="375"><figcaption></figcaption></figure>

## In Classic

1. Grab the connection point next to the element you want to remove.
2. Drag it away from the primary element and release.
3. Confirm the removal if you are prompted.

<figure><img src="/files/BWzOe0vUcBO66OfF4tb3" alt="" width="375"><figcaption></figcaption></figure>

The relationship is staged for deletion. It is not removed from ServiceNow until you [commit](/freelucy/work-in-the-app/commit-changes). Until then you can undo the removal and keep the relationship.

***

## What's next

* [Commit your changes](/freelucy/work-in-the-app/commit-changes)


# Commit your changes

Review every staged change, then write them to ServiceNow as one batch.

Every edit you make in YouDesign Freelucy, whether you add, update, or remove, is staged first. None of it touches ServiceNow until you commit. Commit is a gate: review the full list, then confirm.

<figure><img src="/files/XPtVEuCjMwg6IaIQfmRU" alt="" width="563"><figcaption><p>Review pending changes dialog</p></figcaption></figure>

## Step by step

1. The commit bar shows how many changes are staged. When you are ready, click **Commit**.
2. The **Review pending changes** dialog lists every staged change, grouped by what it does — **New**, **Update**, and **Delete**. Each row shows the record, its relationship type, and which side it sits on, with an **Undo** button to drop just that change.
3. Check the list. To drop a single change, use its **Undo**. To start over, choose **Discard all**.
4. When the list is right, choose **Commit**. The button shows the number of changes it will write, for example **Commit (7)**.

Freelucy writes the changes to ServiceNow in a single batch. The staged styling clears, and the relationships are now live.

## Discard instead

To drop everything staged without committing, **Discard**. Freelucy refetches the record from ServiceNow, so the editor returns to exactly what is stored. Discard cannot be undone.

{% hint style="info" %}
**Leaving with unsaved changes?** If you try to open a different record while edits are staged, Freelucy asks first so you do not lose work.
{% endhint %}

***

## What's next

* [Inspect, navigate, and share](/freelucy/work-in-the-app/inspect-navigate-share)


# Inspect, navigate, and share

Inspect a relationship, jump to a connected record, open its form, and share the view.

Beyond add, update, and remove, YouDesign Freelucy gives you a set of utilities for understanding what is on screen, moving between connected records, and sharing the result. These work across views, with small differences in where the controls live.

## Inspect a relationship

To see what a relationship is, look at the relationship type Freelucy shows for it. In Classic, it will appear near of the connection between two elements. In Flow, the type is shown on each row, and you can filter a column by type.

<figure><img src="/files/g4xq94RQXCIfGw5tg5TD" alt="" width="375"><figcaption><p>Flow view — Relationship types</p></figcaption></figure>

## Open the ServiceNow form

To open the underlying ServiceNow record form for any element, use the open-record action. In Flow it is **Open record**, on the row overflow menu and the central record card. In List it is **Open form**, on the row menu. In Classic it is on the element's context menu. The form opens in a new browser tab.

<figure><img src="/files/E2M59NiEHtKURLuOcQfc" alt="" width="239"><figcaption><p>Open ServiceNow Form record</p></figcaption></figure>

## Jump to a connected record

To move the editor onto one of the connected records, making it the new primary element so you can map its relationships, use **Jump to**. The connected record becomes the center, and you can edit its upstream and downstream from there.

<figure><img src="/files/og8hogIpVwYfn3VqoPk0" alt="" width="208"><figcaption><p>Jump to option</p></figcaption></figure>

{% hint style="info" %}
**Staged edits travel with you.** Jumping to another record keeps your staged changes. Freelucy warns you before you leave the editor entirely with uncommitted edits.
{% endhint %}

## Export and share

You can export what you see as an image. The export reflects the current view and includes staged edits, so it is a faithful picture of your work in progress.

<figure><img src="/files/nFGynUWE0gPLiTnaDu0c" alt="" width="148"><figcaption><p>Share button</p></figcaption></figure>

<figure><img src="/files/gRNgJreDgzIH0nttzk2D" alt="" width="174"><figcaption><p>Export options</p></figcaption></figure>

{% hint style="info" %}
**Exports honor your theme.** Export in dark mode and the image comes out dark. See [Themes and language](/freelucy/personalize-and-accessibility/themes-and-language).
{% endhint %}

For view-specific controls, such as Classic's layout and canvas filters or Flow's grouping and search, see the [view guides](/freelucy/views-in-depth/classic).

***

## What's next

* [Classic view](/freelucy/views-in-depth/classic)
* [Flow view](/freelucy/views-in-depth/flow)
* [List view](/freelucy/views-in-depth/list)


# Classic view

The original canvas. Your primary element in the center, relationships radiating out.

Classic is the original YouDesign Freelucy editor. Your primary element sits in the center of a canvas, with its relationships drawn as connected nodes around it. If you have used earlier versions of Freelucy, this is the view you know.

<figure><img src="/files/v0OjM7HtNEotQ0zczTaW" alt=""><figcaption></figcaption></figure>

## Add a relationship

You can add records from the [Data Hub](/freelucy/work-in-the-app/data-hub) two ways:

* **Click to add.** Use a record's **Add to Upstream** or **Add to Downstream** action. This is the most forgiving path.
* **Drag to add.** Drag a record onto the circular drop indicator that appears next to the primary element on the allowed side. This indicator is the only valid drop target in Classic. If you release the record anywhere else on the canvas, it snaps back and nothing is added. That is expected, not a bug.

You can also add from a node's context menu with **Add to Upstream** or **Add to Downstream**.

## Update and remove

* **Update** by dragging a connected element from its current connection point to the one on the other side.
* **Remove** by dragging a connection point away from the primary element and releasing.

See [Update a relationship](/freelucy/work-in-the-app/update-relationship) and [Delete a relationship](/freelucy/work-in-the-app/delete-relationship).

## Navigate and inspect

* **Jump to** a connected record from its context menu to recenter the canvas on it.
* **Open form** to open the underlying ServiceNow record in a new tab.
* **Hover a connection** to see its relationship type and direction.

The whole canvas is also keyboard navigable — pan, zoom, and walk the graph without the mouse. See [Keyboard shortcuts](/freelucy/personalize-and-accessibility/keyboard-shortcuts).

## Layout and canvas controls

Classic gives you controls for arranging and focusing the canvas:

* **Switch layout** between horizontal and vertical.
* **Filter the canvas by table** to hide or show the records from a given table. Filtering changes only what you see, not what is committed.

<figure><img src="/files/Ua0NYMRgHekkPrmOC9Jg" alt="" width="375"><figcaption></figcaption></figure>

## Export

Export the canvas as an image to share or attach elsewhere. The export includes staged edits and honors your current theme, so a dark-mode export comes out dark. See [Inspect, navigate, and share](/freelucy/work-in-the-app/inspect-navigate-share).

***

## What's next

* [Flow view](/freelucy/views-in-depth/flow)
* [Create a relationship](/freelucy/work-in-the-app/create-relationship)


# Flow view

Upstream and downstream in two columns, with search, filters, and grouping.

Flow lays your relationships out in two columns: upstream on one side, downstream on the other, with your primary element between them. It is the fastest view for working through long relationship lists and for precise add, update, and remove actions.

<figure><img src="/files/y5gH3vKleeP7NxRV1hE6" alt=""><figcaption></figcaption></figure>

## The record card

The card in the center shows your primary element: its icon, name, table, class, and description. **Open record** opens the ServiceNow record in a new tab.

## The columns

Each column lists the relationships on that side. **Search** at the top of a column matches across name, table, and class to narrow a long list. Filtering by relationship type, grouping (by type or class), and sorting live in the shared [View Controls](/freelucy/work-in-the-app/view-controls) drawer and apply to both columns; grouped relationships show as collapsible groups.

## Work with a row

Each relationship is a row with the actions you need:

* **Move to opposite side** with the move control on the row, to update which side it sits on.
* **Undo** a staged change, or remove the relationship, with the action button on the row.
* The row's overflow menu (**⋯**) adds **Jump to** to recenter the editor on the record, **Open record** in ServiceNow, **Change relationship type**, and **Copy sys\_id**.

## How staged edits look

Flow makes staged edits easy to read at a glance:

* A **staged add** shows a green accent and a plus badge.
* A **staged removal** shows a strikethrough, with an **Undo** action on the row.

<figure><img src="/files/1sHNUB5NTiD7NF6Y6u0N" alt="" width="375"><figcaption></figcaption></figure>

## Add records

Drag a record from the [Data Hub](/freelucy/work-in-the-app/data-hub) into the upstream or downstream column, or use a record's **Add to Upstream** or **Add to Downstream** action. Both gestures stage the relationship on that side.

***

## What's next

* [List view](/freelucy/views-in-depth/list)
* [Create a relationship](/freelucy/work-in-the-app/create-relationship)


# List view

A fast, scannable table of the current record's relationships, grouped by direction.

List lays the current record's relationships out as a single table, grouped into **Upstream** and **Downstream**. It is the fastest view for working through a long relationship set, scanning it, and editing in bulk. Like every view, List edits the same record and shares the same staged changes, so the adds, removes, and updates you make here travel with you to Classic and Flow.

<figure><img src="/files/ECknv4qsdflnDVvdjWX3" alt=""><figcaption></figcaption></figure>

## What it shows

The table lists every relationship on the current record, grouped under collapsible **Upstream** and **Downstream** headers with a count on each. Each row shows the related record, its relationship type, and which side it sits on.

## Search, group, and sort

* **Search** matches relationships by name, table, and class to narrow a long list.
* **Grouping** (by direction, type, or class) and **sorting** (by name, type, class, or recently added) come from the shared [View Controls](/freelucy/work-in-the-app/view-controls) drawer and apply to the table.

## Work with a row

Each relationship is a row with the actions you need:

* **Move to opposite side** with the move control on the row, to update which side it sits on.
* **Remove** the relationship, or **Undo** a staged change, with the action button on the row.
* The row's overflow menu (**⋯**) adds **Jump to record** to recenter the editor, **Open form** to open the ServiceNow record in a new tab, and **Copy sys\_id**.

## Edit in bulk

Select rows with their checkboxes — `Shift`-click for a range, `Cmd/Ctrl`-click to pick individually. When one or more rows are selected, a bulk action bar appears with the selection count, a **Remove** action for the whole selection, and **Clear** to drop the selection.

## Add records

Drag a record from the [Data Hub](/freelucy/work-in-the-app/data-hub) onto the table, or use a record's **Add to Upstream** or **Add to Downstream** action. The relationship is staged on that side.

## How staged edits look

List marks staged edits the same way Flow does:

* A **staged add** shows a green accent and a plus badge.
* A **staged removal** shows a strikethrough, with an **Undo** action on the row.

***

## What's next

* [Classic view](/freelucy/views-in-depth/classic)
* [Flow view](/freelucy/views-in-depth/flow)


# Themes and language

Switch between light and dark, and work in your language.

YouDesign Freelucy adapts to how you like to work. Switch the theme and the interface language from the header, on any page.

## Light and dark theme

Use the **theme toggle** in the header to switch between light and dark. The whole interface follows, including the editor canvas in every view.

<figure><img src="/files/LJl77entvKLA07somAyb" alt="" width="375"><figcaption></figcaption></figure>

{% hint style="info" %}
**Exports follow your theme.** If you export an image while in dark mode, the image comes out dark. Switch to light first if you want a light export.
{% endhint %}

## Language

Use the **language switcher** in the header to change the interface language. Freelucy is fully translated into many language:

<figure><img src="/files/gj6UO7VqpGFkj3V6ntmY" alt="" width="375"><figcaption><p>Settings — supported languages</p></figcaption></figure>

Freelucy detects your browser language on first use and matches it if a translation is available. Otherwise the interface falls back to English (US). You can override the choice anytime from the switcher.

***

## What's next

* [Accessibility](/freelucy/personalize-and-accessibility/accessibility)
* [Keyboard shortcuts](/freelucy/personalize-and-accessibility/keyboard-shortcuts)


# Accessibility

Tune Freelucy for comfort, contrast, and motion sensitivity.

YouDesign Freelucy is built to meet WCAG 2.2 AA, and it gives you a set of controls to tune the experience to how you work. You will find them in the settings menu.

<figure><img src="/files/3XA61TRl2OL5EOHxJjFj" alt="" width="375"><figcaption><p>Settings — Accesibility</p></figcaption></figure>

## Settings

* **Reduce motion.** Suppress animations, scroll hints, and easing across the app. Freelucy also respects your operating system's reduce-motion setting.
* **High-contrast palette.** Increase contrast for clearer separation between elements.
* **Single-character keyboard shortcuts.** Turn single-key shortcuts on or off. Turn them off if single keys get in the way of typing or assistive tools. See [Keyboard shortcuts](/freelucy/personalize-and-accessibility/keyboard-shortcuts).

The same menu has a **Show tutorial** action that replays the in-app guided tour whenever you want a refresher.

## Keyboard and screen readers

Freelucy is fully keyboard navigable, and it announces actions such as adding, removing, and jumping through a live region so screen readers can follow along. For the full set of shortcuts, see [Keyboard shortcuts](/freelucy/personalize-and-accessibility/keyboard-shortcuts).

***

## What's next

* [Keyboard shortcuts](/freelucy/personalize-and-accessibility/keyboard-shortcuts)
* [Themes and language](/freelucy/personalize-and-accessibility/themes-and-language)


# Keyboard shortcuts

Move around Freelucy without the mouse.

YouDesign Freelucy is fully keyboard navigable. You can switch views, move through lists, and act on records without the mouse.

## Switch views

Switch views with the view tabs, or press `Alt/Option` together with the view's number. For example, `Alt/Option + 1` opens Classic, `Alt/Option + 2` opens Flow, and `Alt/Option + 3` opens List.

## Move and act

* **Tab** moves through the header, menus, and dialogs in a logical order.
* **Arrow keys** move between rows inside Flow columns and the List table, which use a roving focus so one arrow press lands you on the next row. In Classic, arrow keys pan the canvas or move the selection, depending on the mode — see below.
* **Delete** removes the focused relationship.
* The **context menu** key opens the actions for the focused record.

## Navigate the Classic canvas

The Classic canvas is a single Tab stop with two modes, so the arrow keys can both pan the view and walk the graph. Screen readers announce the current mode and every focus move.

* **Canvas mode** is where you land when you Tab into the editor. Arrow keys pan the view, `+` and `-` zoom, and `0` or `f` fits the graph to the view. Press **Enter** to switch to object mode.
* **Object mode** moves a selection around the graph. An arrow key moves to the nearest node or connection in that on-screen direction — a connection sits between the primary element and its node, so pressing the same arrow twice steps across it onto the node. The view follows the selection, so the focused item never scrolls out of sight.

While in object mode:

* **Home** jumps back to the primary element.
* **Enter** activates the selection: a node opens its context menu, a connection opens its relationship form, and a group expands or collapses.
* **Delete** removes the selected node's relationship.
* **Escape** dismisses an open tooltip or menu first; press it again to return to canvas mode, where arrows pan again.

A mouse click anywhere on the canvas also returns you to canvas mode.

## Single-character shortcuts

Some shortcuts are single keys, such as `/` to focus search and the Classic zoom keys `+`, `-`, `0`, and `f`. These are convenient but can get in the way of typing or assistive tools, so they are governed by a toggle. The Classic keys are only active while the canvas has focus, so they never interfere with typing elsewhere.

Turn **Single-character keyboard shortcuts** on or off in the [accessibility settings](/freelucy/personalize-and-accessibility/accessibility). When the toggle is off, single-key shortcuts such as `/` are disabled, while combination shortcuts like `Alt/Option + 1` keep working.

***

## What's next

* [Accessibility](/freelucy/personalize-and-accessibility/accessibility)
* [Choose a view](/freelucy/get-started/choose-a-view)


# Configuration overview

Five steps to make Freelucy ready for your users.

YouDesign Freelucy installs clean — no default tables, no demo data, no roles assigned. Before users can do meaningful work, an administrator configures it for your environment.

There are five tasks. Do them in this order.

<table><thead><tr><th width="66.78939787484705">#</th><th width="186.4701072461903">Task</th><th width="187.97825875878334">Who</th><th>Why</th></tr></thead><tbody><tr><td>1</td><td><a href="/pages/VOK6KEFtqt6vJ82P3guw">Enable relationship deletion</a></td><td>System Admin</td><td>Freelucy ships without delete rights on <code>cmdb_rel_ci</code>. Grant them once.</td></tr><tr><td>2</td><td><a href="/pages/XY3WyulfZhh2fCzz74MP">Grant access to users</a></td><td>ServiceNow Admin</td><td>Assign the Editor or Reader role to the right people or groups.</td></tr><tr><td>3</td><td><a href="/pages/PXBSAu5yz0Ub3AoJcurm">Manage cross-scope privileges</a></td><td>ServiceNow Admin</td><td>Let Freelucy read the tables your users need to map.</td></tr><tr><td>4</td><td><a href="/pages/UHlm1lJOAOMor6EfIpo3">Manage suggested relationships</a></td><td>ServiceNow Admin</td><td>Define which relationships are valid between which classes.</td></tr><tr><td>5</td><td><a href="/pages/JFPbh2H1t7iiTFJ10I44">Add Freelucy to a form view</a></td><td>ServiceNow Admin</td><td>Surface Freelucy as a button or embedded viewer on the records users open.</td></tr></tbody></table>

{% hint style="info" %}
**Already on YouDesign Command?** If you're using the Visual Relationship Editor that ships with YouDesign Command (formerly UPMX) instead of the standalone Freelucy app, the same configuration concepts apply — set the application scope to **Command** where these instructions reference Freelucy.
{% endhint %}

***

## What's next

Start with [Enable relationship deletion](/freelucy/configuration/enable-relationship-deletion).


# Grant access to users

Assign the Editor or Reader role so the right people can use Freelucy.

YouDesign Freelucy ships with two roles. Assign them through standard ServiceNow user administration, to individual users or, preferably, to groups.

## The two roles

<table><thead><tr><th width="104.55434487760067">Role</th><th>Technical name</th><th width="118.27309440262616">Inherits</th><th>What it allows</th></tr></thead><tbody><tr><td>Editor</td><td><code>x_inpgh_lucy.editor</code></td><td>Reader</td><td>Create, update, and delete relationships, and commit changes.</td></tr><tr><td>Reader</td><td><code>x_inpgh_lucy.reader</code></td><td>None</td><td>View existing relationships of a CI in read-only mode.</td></tr></tbody></table>

The Editor role contains the Reader role, so you only ever need to assign one or the other, not both.

{% hint style="info" %}
**What Reader users see.** A Reader opens Freelucy in read-only mode. They can browse the record across all views, inspect relationships, and jump between records, but the add, update, remove, and commit actions are not available to them.
{% endhint %}

***

## Assign a role to a group (recommended)

{% hint style="success" %}
**Best practice.** Assign roles to groups, not individual users. It scales better and survives team changes without manual cleanup.
{% endhint %}

1. From the ServiceNow homepage, click **All** and filter for **User Administration**, then open **Groups**.
2. Open the group that should receive Freelucy access.
3. On the **Roles** tab, click **Edit**.
4. Filter by `x_inpgh_lucy` and select **Editor** or **Reader**.
5. Click the right arrow to add the role to the Roles List.
6. Click **Save**.

***

## Assign a role to an individual user

Use this only when group-based assignment is not appropriate, for example a one-off pilot user.

1. From the ServiceNow homepage, click **All** and filter for **User Administration**, then open **Users**.
2. Open the user record.
3. On the **Roles** tab, click **Edit**.
4. Filter by `x_inpgh_lucy` and select the role.
5. Click the right arrow to add the role to the Roles List.
6. Click **Save**.

***

## What's next

Continue with [Manage cross-scope privileges](/freelucy/configuration/cross-scope-privileges).


# Enable relationship deletion

Authorize Freelucy to delete CI relationships.

By default, YouDesign Freelucy cannot delete relationships from `cmdb_rel_ci`. ServiceNow scoped applications need explicit authorization to delete records on that table. You grant it once, in the global scope, using either of two methods.

{% hint style="danger" %}
**Global scope, System Administrator.** A System Administrator must perform these steps in the **Global** application scope.
{% endhint %}

Pick one of the two methods below. They achieve the same result.

***

## Method A — Authorize via the `cmdb_rel_ci` table

Use this method if you prefer to make the change directly on the table definition.

1. From the ServiceNow homepage, click **All** and filter for **System Definition**, then open **Tables**.
2. Search for `cmdb_rel_ci` under **Name**.
3. Open **CI Relationship**.
4. Click the **Application Access** tab.
5. Tick the **Can delete** checkbox and save.

Users with the Editor role can now delete relationships in Freelucy.

***

## Method B — Authorize via an Update Set

Use this method if you prefer to deploy the change as a packaged Update Set, for example through your normal change pipeline.

Download the Update Set XML:

{% file src="/files/zD3oInMzjPKHqJ72U27e" %}
Allow YouDesign Freelucy Deleting Relationships — ServiceNow Update Set
{% endfile %}

Then import it into ServiceNow:

1. From the ServiceNow homepage, click **All** and filter for **Retrieved Update Sets**.
2. Open **Retrieved Update Sets**.
3. Click **Import Update Set from XML**.
4. Click **Browse**, pick the XML file, and click **Upload**.
5. Open **Allow YouDesign Freelucy Deleting Relationships**.
6. Click **Preview Update Set**.
7. When the preview succeeds, close the dialog.
8. Click **Commit Update Set**.
9. When the commit succeeds, close the dialog.

Users with the Editor role can now delete relationships in Freelucy.

***

## What's next

Continue with [Grant access to users](/freelucy/configuration/grant-access).


# Manage cross-scope privileges

Let Freelucy read the ServiceNow tables your users need to map.

YouDesign Freelucy is a scoped ServiceNow application. Freelucy does not enforce any cross-scope restrictions of its own — whether it can read a table is governed by ServiceNow's cross-scope access protection, which is a setting on the **target** table's application. Most ServiceNow tables don't enforce it, so Freelucy reads them out of the box. But when a table you need to map **enforces** cross-scope access, ServiceNow blocks Freelucy from reading it until you grant access with an **Application Cross-Scope Privilege**.

## When you need this

You only need a cross-scope privilege when a table you want to map enforces cross-scope access — Freelucy already reads tables that don't. The usual signs that a table is enforcing it:

* A table you want to map relationships on doesn't appear in Freelucy's table picker.
* Freelucy returns an empty result when you know records exist on a table.
* A custom CI table you've added isn't readable in Freelucy.

***

## Step 1 — Set the application scope to Freelucy

Cross-scope privileges are created in the scope of the consumer application — Freelucy.

1. Click the **globe icon** at the top right of the menu bar.
2. Open **Application scope** and filter for **Freelucy**.
3. Select **Freelucy**.

{% hint style="info" %}
**On YouDesign Command?** If you're using the Visual Relationship Editor inside YouDesign Command (formerly UPM-X), set the application scope to **Command** instead of Freelucy.
{% endhint %}

***

## Step 2 — Create the cross-scope privilege

1. Click **All** and filter for **Application Cross-Scope**.
2. Open **Application Cross-Scope Access**. (Or go directly to the `sys_scope_privilege` table.)
3. Click **New**.
4. Fill in the new record:
   * **Target name** — the technical name of the table you want Freelucy to access.
   * **Operation** — choose **Read**. This lets Freelucy read all records on the target table.
5. Set **Status** to **Allowed**.
6. Save.

Freelucy can now read records from that table. If the table also has a [suggested relationship](/freelucy/configuration/suggested-relationships) defined, it will appear in the table picker.

{% hint style="info" %}
**Want more depth?** ServiceNow's documentation on [Cross Scope Privileges](https://docs.servicenow.com/bundle/rome-application-development/page/build/applications/reference/c_CrossScopePrivilegeRecord.html) covers the full mechanism, including write, create, and delete operations.
{% endhint %}

***

## What's next

Continue with [Manage suggested relationships](/freelucy/configuration/suggested-relationships).


# Manage suggested relationships

Define which relationship types are valid between which classes.

Suggested Relationships are the rules that tell YouDesign Freelucy *which* relationship types are valid between *which* classes. They drive two things:

* The **dropdown of target tables** that appears when a user opens Freelucy on a CI.
* The **list of permitted relationship types** when the user drags one element onto another.

If a class pair has no suggested relationship defined, Freelucy will not let users connect them. This is intentional — it's how Freelucy enforces your CSDM and metamodel governance.

***

## Open the Suggested Relationships table

From the application navigator, go to **Relationships → Suggested Relationships**.

You'll see every rule currently in effect. Each row is a triple: a base class, a relationship type, and a dependent class.

***

## Create a new suggested relationship

1. Click **New** on the Suggested Relationships table.
2. The new-record form opens.
3. Fill in:
   * **Base class** — the class on the upstream side.
   * **Relationship** — the relationship type from `cmdb_rel_type`.
   * **Dependent class** — the class on the downstream side.
4. Save.

The rule is now active. Users opening Freelucy on a record of the base class will see the dependent class in the Data Hub, and the chosen relationship type will be available when they connect them.

{% hint style="info" %}
**Direction matters.** Suggested Relationships are directional. If you want users to be able to map both ways between two classes, define two rules — one for each direction.
{% endhint %}

***

## What's next

Continue with [Add Freelucy to a form view](/freelucy/configuration/form-view).


# Add Freelucy to a form view

Surface Freelucy as a button or embedded viewer on the records users open.

After installation, every `cmdb_ci` base table and its extended tables already show an **Edit Relationships** button. For other tables, including custom CI tables, you decide how YouDesign Freelucy appears on the form.

Freelucy ships with two UI Formatters and one UI Action. Use whichever combination matches your users' workflow.

| Component                          | What it does                                                           |
| ---------------------------------- | ---------------------------------------------------------------------- |
| **Freelucy Edit Button** formatter | Adds a button to the form that opens Freelucy.                         |
| **Freelucy Viewer** formatter      | Embeds a relationship view directly inside the form.                   |
| **Edit Relationships** UI Action   | Adds an action item to the form's UI Actions menu that opens Freelucy. |

<figure><img src="/files/gAnBSrpCwTu2RGKgMDew" alt=""><figcaption></figcaption></figure>

{% hint style="info" %}
**The embedded viewer has a fullscreen toggle.** The Freelucy Viewer shows the relationships inline on the form. Users can expand it to fullscreen for room to work, then collapse it back into the form.
{% endhint %}

***

## Add a UI Formatter to a form

Use this when you want Freelucy embedded in the form, or a button placed exactly where you want it.

1. Open a record on the table you are configuring.
2. Right-click the form header and select **Configure → Form Layout**.
3. Add **Freelucy Edit Button**, **Freelucy Viewer**, or both, depending on what you want.
4. Save the layout.

***

## Add the Edit Relationships UI Action to a table

Use this when you want Freelucy in the standard UI Actions menu rather than embedded in the form.

1. Open **All → System UI → UI Actions**.
2. Filter for **Edit Relationships** and open the record.
3. Configure the action so it appears on the tables you want, typically by editing the table name or adding the table to the conditions.
4. Save.

***

## What's next

Configuration is complete. Walk your users through [How relationships work in Freelucy](/freelucy/work-in-the-app/usage).


# Architecture

How Freelucy is built and how it sits inside ServiceNow.

YouDesign Freelucy is a **scoped ServiceNow application** that runs entirely inside your ServiceNow instance. It introduces no custom tables, requires no integrations, and reads only the tables your administrators authorize through cross-scope privileges.

***

## What this means in practice

* **100% on ServiceNow.** Freelucy runs natively. There is no external service, no integration to configure, and no data leaving your instance.
* **No custom tables.** Freelucy uses core ServiceNow constructs, such as `cmdb_rel_ci`, `cmdb_rel_type`, scoped roles, and cross-scope privileges. Nothing new is introduced into your data model.
* **No additional licenses.** Because no custom tables are added, no additional ServiceNow end-user licenses are required to use Freelucy.
* **Governed access.** Administrators control which tables Freelucy can read, through cross-scope privileges, and which class pairs users can connect, through suggested relationships. Users only see what your governance allows.
* **Built on Now™ certified.** Freelucy holds ServiceNow's highest technical designation for partner applications, meaning it has been designed and tested for fast, agile, resilient, and secure interaction on the Now Platform.

***

## How the editor is built

Freelucy presents one record through three views, and they all share the same editing state.

* **One editing model, many views.** Classic, Flow, and List are interchangeable views over the same record. Your staged changes live in one shared place, so switching views never loses work.
* **Stage then commit.** Edits are held as pending changes and written to ServiceNow only when you commit, as a single batch.
* **Rule-driven.** A relationship-rule resolver decides which sides and relationship types are valid for any given pair of records, so every view offers only the relationships your metamodel permits.

***

## What's next

* See [Configuration overview](/freelucy/configuration/configuration) for the administrator setup that activates this architecture for your users.
* See the [Glossary](/freelucy/reference/glossary) for the terms used throughout this documentation.


# Glossary

The terms used throughout the Freelucy documentation.

**Primary element** The record you opened YouDesign Freelucy from. Every view centers on it, and you map relationships from it.

**Upstream and downstream** The two directions a relationship can point. Freelucy keeps the two sides separate so the direction of every relationship is always clear.

**View** One of the three ways to see and edit a record: [Classic](/freelucy/views-in-depth/classic), [Flow](/freelucy/views-in-depth/flow), and [List](/freelucy/views-in-depth/list). All three edit the same record and share the same staged changes.

**Data Hub** The drawer you source records from to relate to your primary element. Search suggested tables, browse a record tree, and add records by click or drag. See [Find records with the Data Hub](/freelucy/work-in-the-app/data-hub).

**Stage** To make an edit in Freelucy without writing it to ServiceNow yet. Adds, updates, and removals are all staged first.

**Commit** To write your staged changes to ServiceNow as a single batch, after reviewing them. See [Commit your changes](/freelucy/work-in-the-app/commit-changes).

**Discard** To drop every staged change and refetch the record as it is stored in ServiceNow.

**Update** To move a relationship to the other side, upstream or downstream, or to change its relationship type.

**Relationship type** The kind of relationship between two records, drawn from your CSDM, such as Depends on or Hosted on. Freelucy offers only the types your metamodel allows for a given pair.

**Suggested relationships** The administrator-defined set of relationship types that are valid between which classes. They determine what users are allowed to create. See [Manage suggested relationships](/freelucy/configuration/suggested-relationships).

**Editor and Reader roles** The two Freelucy roles. Editors can create, update, delete, and commit. Readers open Freelucy in read-only mode. See [Grant access to users](/freelucy/configuration/grant-access).

**Read-only mode** How Freelucy appears to a Reader. The record is fully browsable across all views, but editing and commit actions are not available.


# Welcome

See it. Fix it. Govern it.

Blueprints turns your ServiceNow data into something you can actually design against. Define the structural rules once. Pull live records into the **Blueprints canvas**. See what is compliant, fix what is not, and commit the result.

{% hint style="info" %}
Native ServiceNow application. Installs from the ServiceNow Store. No separate infrastructure, your data stays in your ServiceNow instance.
{% endhint %}

## Start here by your role

### If you are evaluating or installing the app

Read these pages first:

* [Installation and Setup](/blueprints/get-the-app/installation)
* [30-Day Free Trial](/blueprints/get-the-app/free-trial)
* [Getting Started](/blueprints/start-here/getting-started)

### If you create structure and governance

Read these pages first:

* [Getting Started](/blueprints/start-here/getting-started)
* [Roles and Permissions](/blueprints/start-here/roles-and-permissions)
* [Templates](/blueprints/work-in-the-app/templates)
* [Compliance and Auditor](/blueprints/review-and-share/compliance)
* [Scheduled Audits](/blueprints/review-and-share/scheduled-audits)

### If you build and maintain blueprints

Read these pages first:

* [Getting Started](/blueprints/start-here/getting-started)
* [Home and Search](/blueprints/work-in-the-app/home)
* [Blueprints](/blueprints/work-in-the-app/blueprints)
* [Records and Relationships](/blueprints/work-in-the-app/records-and-relationships)

### If you review, present, or approve work

Read these pages first:

* [Roles and Permissions](/blueprints/start-here/roles-and-permissions)
* [Compliance and Auditor](/blueprints/review-and-share/compliance)
* [Reviews](/blueprints/review-and-share/reviews)
* [Presenter Mode and Sharing](/blueprints/review-and-share/presenting)
* [Glossary](/blueprints/reference/glossary)

### If you administer the app in ServiceNow

Read these pages first:

* [Installation and Setup](/blueprints/get-the-app/installation)
* [ServiceNow Administration](/blueprints/admin-and-governance/servicenow-admin-guide)
* [Security and Data Handling](/blueprints/admin-and-governance/security-and-data-handling)

## The Blueprints workflow

1. Open **Home** and choose a template.
2. Create a new blueprint from that template.
3. Add records from the **Data Hub** or plan future-state records.
4. Review fields, relationships, and compliance issues in the **Data panel**.
5. Use **Save/Update** to store your working blueprint.
6. If your role allows it, use **Commit Changes** to push approved blueprint changes back to ServiceNow.
7. Use **Presenter Mode** or shared links when you want others to review the result without editing it.

## What this help center covers

* How to install the app and start a free trial
* How access works and what each role can do
* How Home, search, filters, and favorites work
* How templates define tables, fields, filters, and relationship rules
* How blueprint editing works from draft creation to save and commit
* How compliance is measured in the editor and in Auditor
* How to present and share blueprints safely
* Which settings, accessibility options, and keyboard shortcuts are available
* Blueprint-specific terms in a dedicated glossary
* What ServiceNow admins should know about architecture, access, and data handling

## Quick answers

The terms that come up most often:

* **Installation and Setup** walks you through getting the app from the ServiceNow Store, installing it, and assigning roles.
* **30-Day Free Trial** explains how to start a trial and make the most of it.
* **Save/Update** stores your template or blueprint work in the app.
* **Commit Changes** is used to publish approved blueprint changes back to ServiceNow.
* **Presenter Mode** is the read-only view of a blueprint.
* **Auditor** runs any template against your data and shows non-compliant records and relationships in minutes.
* **ServiceNow Administration** explains the scoped-app architecture, roles, storage, and admin responsibilities.
* **Security and Data Handling** explains the app's in-platform runtime boundary, preference storage, and privacy expectations.

If you are new to the product, start with [Getting Started](/blueprints/start-here/getting-started).

If you need to install the app first, start with [Installation and Setup](/blueprints/get-the-app/installation).

YouDesign Blueprints is part of the **YouDesign Enterprise Transformation Suite** by ins-pi.

## What changed recently

Scheduled audits, findings routed to record owners, and a compliance trend arrived in 26.1. See [Release Notes](/blueprints/get-the-app/release-notes).


# Installation and Setup

You are the admin installing the Blueprints application on a ServiceNow instance for the first time. This takes six steps. All of them happen inside ServiceNow. Everything stays inside your ServiceNow instance, and you don't need any new infrastructure.

{% hint style="info" %}
Scoped ServiceNow application. All runtime, all data, all APIs stay inside your instance.
{% endhint %}

## Before you begin

You need:

* a **Now Support (HI) account** linked to your organization
* the **admin** role on the target ServiceNow instance
* network access to `store.servicenow.com` from your browser

> If you do not have a Now Support account, ask your organization's **ServiceNow Administrator** to add your email address to the company's Now Support profile.

## Step 1: Find the app on the ServiceNow Store

1. Go to [store.servicenow.com](https://store.servicenow.com)
2. Use the search bar to search for **YouDesign Blueprints**
3. Select the app from the results to open the product page

> **Tip:** You can also filter the Store by provider, release version, category, or price using the left-side filter panel.

## Step 2: Request the app

On the product page:

1. Click the **Request App** button on the right side of the page
2. The request is sent to the app vendor for review
3. You receive an approval notification email, typically within one business day

> **What happens behind the scenes:** The vendor reviews the request and confirms your organization's access. This is a one-time step per organization.

## Step 3: Get the app entitlement

After your request is approved:

1. Return to the YouDesign Blueprints product page on the ServiceNow Store
2. The button now shows **Get** instead of Request App
3. Click **Get**
4. A dialog appears asking you to choose an entitlement scope:
   * **All instances: entitles every ServiceNow instance in your organization (recommended)**
   * **Selected instances:** entitles only the instances you choose
5. Click **OK** to confirm
6. Accept the ServiceNow Store agreement if prompted

## Step 4: Install on your ServiceNow instance

1. Log in to your target ServiceNow instance with **admin** credentials
2. Navigate to **System Applications > All Available Applications > All**
3. Search for **YouDesign Blueprints**
4. Click **Install**

The app installs automatically. Once complete, it is ready to configure.

> **Tip for newer instances (Vancouver+):** You can also use the **Application Manager** inside Admin Center for a consolidated view of all available and installed apps.

## Step 5: Verify the installation

After installation, confirm that:

* [ ] The application module is accessible under its scoped route
* [ ] The scoped application tables are present (e.g. `x_inpi_ydbp_templates`, `x_inpi_ydbp_blueprints`)
* [ ] The Scripted REST API endpoints are active under `/api/x_inpi_ydbp/`

## Step 6: Assign roles to users

YouDesign Blueprints uses four scoped roles:

| Role                          | Technical name                          | Purpose                                            |
| ----------------------------- | --------------------------------------- | -------------------------------------------------- |
| **Blueprint Template Editor** | `x_inpi_ydbp.blueprint_template_editor` | Create and manage templates, full blueprint access |
| **Blueprint Editor**          | `x_inpi_ydbp.blueprint_editor`          | Create and edit blueprints                         |
| **Blueprint Committer**       | `x_inpi_ydbp.blueprint_commit`          | Review and publish approved changes                |
| **Blueprint Viewer**          | `x_inpi_ydbp.blueprint_viewer`          | Read-only access to blueprints                     |

### Assign roles to a group (recommended)

Assigning roles to groups is more scalable and easier to audit than assigning to individual users.

1. Navigate to **User Administration > Groups**
2. Select the target group or create a new one
3. Open the group record
4. Scroll to the **Roles** related list tab
5. Click **Edit**
6. In the Collection list, search for `x_inpi_ydbp`
7. Select the appropriate role and move it to the Roles list using the arrow button
8. Click **Save**, then **Update** the group record

Any user added to this group automatically inherits the assigned roles.

### Assign a role to an individual user

1. Navigate to **User Administration > Users**
2. Search for and open the user record
3. Scroll to the **Roles** related list tab
4. Click **Edit**
5. Search for roles starting with `x_inpi_ydbp`
6. Select the role and move it to the Roles list
7. Click **Save**, then **Update** the user record

## Role assignment best practices

| Practice                                    | Why it matters                                                                                |
| ------------------------------------------- | --------------------------------------------------------------------------------------------- |
| **Assign roles to groups, not individuals** | Easier to manage, audit, and scale as your team grows                                         |
| **Follow least-privilege**                  | Only give users the minimum role needed for their job                                         |
| **Start with Blueprint Viewer**             | `For users who only need to review blueprints, Blueprint Viewer is the safest starting point` |
| **Separate editing from committing**        | Let editors build and committers approve. This supports controlled change workflows           |

> For a detailed breakdown of what each role can do, see [Roles and Permissions](/blueprints/start-here/roles-and-permissions).

## Post-installation checklist

Use this checklist to confirm a successful setup:

* [ ] App is installed and accessible on the instance
* [ ] At least one user has the **Blueprint Template Editor** role to create initial templates
* [ ] At least one template exists for blueprint creators to use
* [ ] Blueprint Editors can create and save a test blueprint
* [ ] Blueprint Viewers open blueprints in Presenter Mode as expected
* [ ] The compliance score and Auditor are functional
* [ ] Commit workflow is available to users with the Blueprint Committer role

## Updating the app

When a new version of YouDesign Blueprints is available:

1. You receive a notification email from the ServiceNow Store
2. Read the [Release Notes](/blueprints/get-the-app/release-notes) for that version
3. Log in to your instance as admin
4. Navigate to **System Applications > All Available Applications > All**
5. Find YouDesign Blueprints and click **Update**

{% hint style="warning" %}
Step 2 is not optional for 26.1. Scheduled audits need tables and platform records that do not arrive with the application update, and audits do not run until an administrator creates them. See [Release Notes](/blueprints/get-the-app/release-notes#for-administrators).
{% endhint %}

> **Tip:** Always test updates on a sub-production instance before applying them to production.

## Troubleshooting

| Issue                                         | What to check                                                                           |
| --------------------------------------------- | --------------------------------------------------------------------------------------- |
| App not visible in All Available Applications | Confirm the entitlement was completed on the Store and that you are logged in as admin  |
| Users cannot see the app                      | Confirm at least one `x_inpi_ydbp` role is assigned to the user or their group          |
| Install button is greyed out                  | Check that you have the admin role and that your instance is entitled                   |
| Users see wrong actions                       | Review the role assignment. Missing or extra permissions usually explain UI differences |

For architecture and data handling details, see [ServiceNow Administration](/blueprints/admin-and-governance/servicenow-admin-guide) and [Security and Data Handling](/blueprints/admin-and-governance/security-and-data-handling).


# Release Notes

What changed in each release, and what you need to do about it.

Each release lists what is new, what changed in behaviour you may already rely on, and anything an administrator has to set up before the new features work.

{% hint style="info" %}
Your installed version is shown in **Settings**, at the bottom of the panel. Features marked **New in 26.1** do not appear on earlier versions.
{% endhint %}

## 26.1

Scheduled audits. Blueprints could already tell you whether one blueprint matched its template. This release runs that check across your CMDB on a schedule, routes each problem to whoever owns the record, and shows whether data quality is improving over time.

### Reviews

A new workspace with three tabs, reached from **Reviews** on Home.

| Tab           | Answers                                                     |
| ------------- | ----------------------------------------------------------- |
| **Dashboard** | Is data quality improving, and where are the worst problems |
| **Findings**  | What do I personally have to fix                            |
| **Schedules** | When do audits run, and who hears about them                |

See [Reviews](/blueprints/review-and-share/reviews).

<figure><img src="/files/471s61uyxuCx8nmA1ZUN" alt="The Reviews dashboard with compliance, change, open findings and how many reach nobody, above a compliance-over-time chart"><figcaption><p>Reviews, new in 26.1</p></figcaption></figure>

### Scheduled audits

Audits run without anybody pressing a button. A schedule names the template to audit, how often, and at what time.

Cadences: daily, weekly, every two weeks, monthly, quarterly, half-yearly and yearly. The month-based cadences advance by calendar month, so an audit set for the 31st keeps its date rather than drifting earlier each month.

A schedule audits **one template**. A schedule is a cadence over one map; two maps on one cadence produce a run whose findings are hard to attribute, and two schedules say the same thing more clearly.

See [Scheduled Audits](/blueprints/review-and-share/scheduled-audits).

### Ownership resolved per record

Each audited table is mapped to a **field on the record** that names its owner, such as `managed_by` or `support_group`. A finding then reaches the owner of that particular record.

This is deliberately not a single nominated person per table. On a CMDB of any size, one person receiving every finding on a table is a queue that is mostly other people's problems, and nobody works it.

Where a record names nobody, an optional **fallback** takes the finding rather than it reaching no one. That fallback can be a group or a named person; a group is usually right, for the same reason the mapping is a field, but a table with one genuine owner does not need a group invented for it.

See [Scheduled Audits](/blueprints/review-and-share/scheduled-audits#who-fixes-what).

### Remediation records

A finding can raise a record in a table you already use — a change, a demand, or your own data quality queue. Blueprints does not ship its own task table, so remediation work sits in the same queue, with the same assignment rules and SLAs, as everything else.

The record closes automatically when a later audit finds the data fixed, including when it was fixed somewhere other than the ticket. If somebody closes the record by hand while the data still fails, the next run raises a fresh one.

See [Scheduled Audits](/blueprints/review-and-share/scheduled-audits#remediation-records).

### Notifications

One message per recipient per run, never one per finding. A run finding 334 problems across two owners sends two emails.

Three notifications, each independently switchable:

* **Responsible** — to whoever owns the flagged records, with counts and a link
* **Run summary** — to the people informed about a schedule
* **Summary report** — a periodic management view on its own cadence, independent of how often audits run

See [Scheduled Audits](/blueprints/review-and-share/scheduled-audits#notifications).

### Compliance trend

The Dashboard plots compliance over time, per template, per rule or per table. Rates are weighted by how many records each rule evaluated, never averaged across rules — a rule covering 40 records does not carry the same weight as one covering 200,000.

Every point is hoverable. The tooltip gives the date, the rate, how much was evaluated, whether the run was scheduled or forced, and the rules that failed most records **in that run** — so "where were the problems" can be asked of any run, not only the latest.

Series are named in a legend inside the chart, each with its movement across the window. The axis ticks whichever calendar unit the runs span: quarters, then months, then days, and the clock when every run falls on one day.

Trends are built from immutable snapshots, so history survives deleting an audit run.

### Reading the Dashboard

Template, **Break down by** and the run-count slider sit on one row, wrapping to a second line on a narrow screen rather than squeezing the slider to a width where a range of 2 to 50 cannot be aimed.

While the history loads, the chart card shows a spinner. It used to fall through to "No completed audits yet" and then replace that with a chart, which reads as an answer rather than as a wait.

On **Schedules**, the inactive switch sits beside **New schedule** and states the count either way — "3 inactive hidden" or "3 inactive shown" — so a filter cannot silently remove rows.

### Working a backlog

Findings can be filtered to **several templates at once**, because customers split a wide map into narrow ones and then want one backlog rather than two lists that cannot be compared.

Because that makes the list longer, it can be grouped by template, table or responsible. Groups are collapsible with their own counts, and the column you group by leaves the table — the heading already says it.

Sorting and searching both work on the owner's name, which is what most people reach for first when a backlog is theirs to triage.

Clicking a finding opens the record in a **new tab**. Triage is list-shaped, and navigating away costs the filters and the scroll position.

### Changed behaviour

{% hint style="warning" %}
These change how the app behaves for people who already use it.
{% endhint %}

**Elements are now called Records.** The things you put on a canvas, and the counts and headings that describe them, all changed wording: "3 missing elements" is now "3 missing records", the compliance panel's **Elements** tab is now **Records**, and so on throughout the app and this documentation. Command has always called them Records, and one concept with two names across two products in the same suite is a cost you paid on every page.

Nothing moved and nothing behaves differently. Stored data, field names and the API are untouched, so saved blueprints, templates and integrations are unaffected. The change is wording only.

{% hint style="warning" %}
**Reviews is not yet translated in every language.** The workspace ships in English, German, Turkish, Spanish, Portuguese and French. In Japanese, Hindi and Bengali its labels and messages still read in English; the rest of the application is translated as before. Nothing is broken by this — the text is simply not localised yet.
{% endhint %}

**Findings are visible only to their audience.** Template Editors see the whole estate. Everyone else sees findings assigned to them or to one of their groups, findings on schedules they are informed about, and trends for templates they have a stake in. See [Roles and Permissions](/blueprints/start-here/roles-and-permissions#who-sees-which-audit-results).

**Configuring audits requires the Blueprint Template Editor role.** Creating or editing a schedule, and forcing a run, are template-editor actions. Blueprint Editors can see the schedules they are informed about, but the create, edit and run controls are not shown to them.

**The Reviews button on Home now opens the Dashboard** rather than the Findings list, and carries a count of the findings assigned to you.

### For administrators

26.1 adds tables, columns and platform records that do not arrive with the application update. Audits do not run until they exist, and nothing else in the app is affected while they are missing.

See [ServiceNow Administration](/blueprints/admin-and-governance/servicenow-admin-guide#setting-up-scheduled-audits-261) for the full list and the order to create it in.

{% hint style="danger" %}
**On a domain-separated (MSP) instance, create the Set Domain business rules first.** The six new audit tables carry a `sys_domain` column but shipped without a rule to populate it, so their rows would be written with an empty domain and be visible across domains. Run `./scripts/create-domain-business-rules.sh` before enabling audits. See [Domain separation (MSP)](/blueprints/admin-and-governance/servicenow-admin-guide#domain-separation-msp).
{% endhint %}

{% hint style="warning" %}
**Check the three notifications are set to send on an event.** Creating a Notification through the API fills in the event name but leaves **Send when** at its default, **Record inserted or updated**, and a notification in that state never fires. Audits then run and route correctly while producing no email at all, and no failure anywhere to explain it. Run `./scripts/repair-audit-notifications.sh --dry-run` to see the current setting, and without the flag to correct it. See [Three traps worth knowing](/blueprints/admin-and-governance/servicenow-admin-guide#three-traps-worth-knowing).
{% endhint %}

## 26.0.0

Templates, blueprints, the canvas, compliance scoring, Auditor, Presenter Mode and commit workflows. See the rest of this documentation for how those work.

### Fixed since release

{% hint style="info" %}
These correct 26.0.0 behaviour and arrive with the **26.1** update. There is no separate 26.0 patch to install.
{% endhint %}

**An empty blueprint reported full compliance.** A blueprint with no records and no relationships read Good, 100%, green. No check had run, which is not the same as every check passing, and on the blueprint list it hid work that had not started. It now reads as not evaluated, and shows a dash rather than a figure. A genuine 0% is unchanged — every check ran and every check failed is a real result.

**A class filter was not applied to records arriving through a relationship.** A record dragged from the Data Hub was filtered, but records pulled in automatically by following a relationship were checked against nothing. So a record the template excluded could land on the canvas, satisfy a rule, and show a tick — while the audit, which does apply the filter, was measuring a different population. Cascade-loaded records are now checked against the same filter, and the app says how many were held back.

**Records already on a canvas were not re-checked when a filter changed.** Adding or tightening a filter left previously-placed records looking legitimate although the audit had stopped counting them. They are now marked with a filter icon — deliberately neither a tick nor a warning, because an excluded record needs removing or the filter widening, not a new relationship.

**Relationship conditions were invisible outside the template editor.** A relationship requiring `type = cots` and `level = 3` showed only its name on the canvas, so a reader had no way to know the rule was conditional at all. Hovering a relationship now lists its conditions under the cardinality rule they qualify, in the blueprint view as well as the editor. The label itself stays the relationship name: printed on the label, two lines of conditions made the label the largest thing on the canvas and pushed the relationship name into second place.

**The Auditor showed half a relationship's conditions.** Each direction reported only the condition set governing its own check, so a relationship conditioned at both ends showed one side, and which side depended on which direction you happened to be reading. Both are now listed, one table per line, under their own heading.

**Conditions showed column names instead of labels.** A condition read `x_inpgh_upmx_health = 1` — a column name from a scoped application, shown to whoever has to fix the record. Field metadata is now loaded for every table on the canvas rather than only the selected relationship's two ends, so the same condition reads `Health = 1` everywhere it appears.

**Auditor did not say why a check failed.** "No matching dependencies found" covered both a genuinely absent relationship and one whose records failed a field condition, so it could not tell you whether to create a relationship or fix a field. It now reports which, and shows the conditions a check applied — including on checks that passed, since that is what confirms the check meant what you intended.

**The condition builder was hard to read.** Conditions, the groups holding them, and the buttons acting on them all rendered at one visual level, so nothing showed where a group began or what a delete button belonged to. Groups are now contained, AND sits between conditions inside a group, and each condition is two lines instead of four. **Add condition** and **OR** sit together inside the group, because they are the same decision - add another test, joined one way or the other.

**Relationship conditions sat under the wrong direction's rule.** Both directions' cardinality controls rendered first and both condition sections after them, so the first section appeared beneath the second rule. Each section now sits directly under the rule it qualifies. They are also renamed: "Conditions on Business Application records" described a class filter, and was read as one, so a condition meant to narrow what counts towards a rule was expected to keep records off the canvas. The heading now says which records count, and says where the class filter actually lives.

**Removing a record left orphans, or took far too much.** Removal offered three choices. "Selected only" left behind every record the removed one had brought in, so deleting `salesforce.com` left its capabilities sitting next to `ServiceNow` as though they belonged to it. "All connected" did the opposite: it followed every link outwards, so a capability shared by two applications carried the removal into the second application and emptied that side of the canvas too.

There is one right answer, so there is now one action. Removal takes the selection plus every record that nothing else still brings in, and stops at anything something else does. Records you added yourself are never taken, and neither are future-state records. When more than the selection would go, a preview names what goes and what stays before anything happens. See [Remove records](/blueprints/work-in-the-app/records-and-relationships#remove-records).

**A confirmation message showed its own key instead of a sentence.** The message after removing a record and its dependents had singular and plural forms but was given neither count to choose between, so it rendered the literal text `status.dataHubRemoveItemsWithDependencies`. A check now fails the build if any message with plural forms is used without a count.

**A relationship condition could render without its field name.** The condition builder loads field metadata for both ends of the relationship at once, and the first end to answer cancelled the second, which was then never retried. Whichever end lost the race listed no fields, so a saved condition showed as an operator and a value with nothing naming what it tested: `= Replatform` rather than `Migration Strategy = Replatform`. Both ends now load independently, and a cancelled load is retried instead of being remembered as done.

**A blueprint could not read its own relationship rules.** The relationship panel is read-only in a blueprint, which is correct — the rules belong to the template. It was made read-only by wrapping the panel in a disabled fieldset, and that disables every control inside it, including the chevron that expands a rule to show its cardinality and conditions. So the one place a blueprint reader goes to ask what a relationship requires could not be opened.

It failed silently, too: a disabled fieldset does not mark its descendants disabled, so the chevron looked and reported itself as working while the browser refused every click. A blueprint now shows the rule details outright rather than offering a control that cannot work, and **Add condition** no longer appears where nothing can be added.

**Users holding an older role name resolved to no role.** The role list did not recognise `blueprint_publisher`, the previous name for `blueprint_commit`, so anyone still assigned it was treated as having no application role at all — read-only, with no explanation. It is now accepted as an alias.

**The mouse wheel did nothing over a chart or an icon.** The app cancels wheel events that have nothing to scroll, because the window is a fixed height and a page that rubber-bands under a fixed header looks broken. The check deciding "is there anything to scroll here" only recognised HTML elements, and an SVG element is not one — so it answered no and cancelled the scroll. That covered the compliance chart and every icon in the product, since the icons are SVG. Scrolling now works wherever the pointer is.

**Relationship conditions are marked before you hover.** A relationship carrying conditions shows a **C:&#x20;*****n*** badge on the canvas, beside the relationship in the panel, and in a template's contents on Home. The conditions themselves are in the tooltip, so without a mark there was no reason to look — which is the problem the conditions were surfaced to solve.

**Condition field lists are alphabetical.** They arrived in dictionary order, which is neither alphabetical nor meaningful: "OPEX Total, Health, Attestation Score, Invoice number" is a list you have to read end to end. Fields the template already selected still come first.

**Run now did not update "last run".** Only the hourly tick stamped it, so forcing a run left the Schedules card showing the previous night's time and read as though nothing had happened.

### Improved since release

**Selecting a record highlights the records it connects to.** Selecting an application used to highlight the relationship lines but nothing at either end, so on a canvas holding two applications and forty capabilities there was no way to see which belonged to which without opening each one.


# 30-Day Free Trial

The trial gives you a real environment to test Blueprints against your own architecture. Every feature is available, all four roles can be assigned, and your data stays in your ServiceNow instance throughout.

{% hint style="info" %}
Scoped ServiceNow application. All runtime, all data, all APIs stay inside your instance. Installs under the x\_inpi\_ydbp scope. Does not modify your production CMDB or existing ACLs.
{% endhint %}

## What the trial includes

* Full access to all YouDesign Blueprints features
* Template creation and management
* Blueprint editing, compliance checking, and Auditor
* Presenter Mode and sharing
* All four application roles available for assignment
* 30 calendar days from the date you activate the trial

## What the trial does not include

* Installation on **production** instances. Trials are limited to sub-production (development or test) instances.
* Automatic renewal. The trial ends after 30 days unless you purchase the app.

## Who can start a trial

You need:

* a **Now Support (HI) account** linked to your organization
* access to at least one **sub-production** ServiceNow instance
* the **admin** role on the instance where you plan to install

> If you do not have a Now Support account, ask your organization's Customer Administrator to add you.

***

## How to activate the trial

### Step 1: Find YouDesign Blueprints on the Store

1. Go to [store.servicenow.com](https://store.servicenow.com)
2. Search for **YouDesign Blueprints**
3. Open the product page from the search results

### Step 2: Start the trial

1. On the product page, click the **Try** button on the right side
2. Sign in with your **Now Support (HI) credentials** when prompted
3. A notice screen appears with information about the app
4. Click **Continue**
5. Check the box to accept the **Terms of Use** and **App Subscription Terms and Conditions**
6. Click **Try**
7. Click **OK** to confirm

> **That's it.** The app is now available for installation on your sub-production instances.

### Step 3: Install on your sub-production instance

1. Log in to your **development or test** ServiceNow instance with admin credentials
2. Navigate to **System Applications > All Available Applications > All**
3. Search for **YouDesign Blueprints**
4. Click **Install**

The app deploys automatically and is ready to use immediately.

### Step 4: Set up roles and start exploring

After installation:

1. Assign yourself the **Blueprint Template Editor** role so you have full access during the trial
2. Create your first template to define a blueprint structure
3. Create a blueprint from that template and explore the editor
4. Invite colleagues and assign them the appropriate roles

> For detailed role assignment steps, see [Installation and Setup](/blueprints/get-the-app/installation#step-6-assign-roles-to-users).

***

## Suggested trial plan

Make the most of your 30 days with this suggested path:

### Week 1: Set up and explore

| Day     | Activity                                                                   |
| ------- | -------------------------------------------------------------------------- |
| Day 1   | Install the app and assign roles to your evaluation team                   |
| Day 2-3 | Create your first template with 2-3 tables, fields, and relationship rules |
| Day 4-5 | Build a blueprint from that template using real ServiceNow data            |

### Week 2: Build and review

| Day     | Activity                                                              |
| ------- | --------------------------------------------------------------------- |
| Day 6-7 | Add future-state records and test the planning workflow               |
| Day 8-9 | Review compliance scores and use the Auditor                          |
| Day 10  | Test the Commit Changes workflow with a Blueprint Committer role user |

### Week 3: Collaborate and present

| Day       | Activity                                                |
| --------- | ------------------------------------------------------- |
| Day 11-13 | Share blueprints with stakeholders using Presenter Mode |
| Day 14-15 | Collect feedback from your team on the workflow         |

### Week 4: Evaluate and decide

| Day       | Activity                                                    |
| --------- | ----------------------------------------------------------- |
| Day 16-18 | Build a second template for a different use case            |
| Day 19-20 | Run a full audit cycle and export compliance reports        |
| Day 21    | Start the purchase process                                  |
| Day 22-28 | Align internal stakeholders, run the PO through procurement |
| Day 29-30 | Make your purchase decision before the trial expires        |

***

## Tracking your trial status

* The ServiceNow Store shows a **green indicator** on the app with your trial expiration date
* You can check the trial status anytime by returning to the YouDesign Blueprints product page on the Store

## What happens when the trial ends

When the 30-day trial period expires:

* The app **remains installed** on your instance but access may be restricted
* No data is lost. Your templates and blueprints are preserved.
* To continue using the app, you need to complete a purchase through the ServiceNow Store

## How to purchase after the trial

1. Return to the YouDesign Blueprints product page on [store.servicenow.com](https://store.servicenow.com)
2. Click the **Buy** button
3. Request a quote from ins-pi via email, generate a PO from your procurement system, return to the product page, click **Purchase with PO,** and upload your PO document.
4. After purchase, click **Get** to entitle your production instances
5. Install on production following the steps in [Installation and Setup](/blueprints/get-the-app/installation)

> **Moving to production:** For paid apps, you may need to click **Request license** and work with your ServiceNow account manager to add the app to your service contract before the production entitlement becomes available.

***

## Frequently asked questions

### Can I extend the trial?

The standard trial is 30 days. Contact the app vendor through the ServiceNow Store product page if you need additional evaluation time.

### Can I install the trial on production?

No. Trials are restricted to sub-production instances only. You need to purchase the app for production use.

### What happens to my data after the trial?

Your templates, blueprints, and configurations are preserved on the instance. If you purchase the app, you can continue working with everything you created during the trial.

### Can multiple people in my organization use the trial?

Yes. Once the trial is activated, any admin can install it on sub-production instances. You can assign all four roles to different users for a realistic evaluation.

### Do I need to uninstall before purchasing?

No. The purchase upgrades your entitlement. The app and all your data stay in place.


# Getting Started

You have Blueprints installed and a role assigned. This page walks you through opening the app for the first time, what you see, and what to do next based on your role.

{% hint style="info" %}
Blueprints runs inside your ServiceNow instance. No separate infrastructure. Your data stays where it is.
{% endhint %}

## What YouDesign Blueprints does

Blueprints is a ServiceNow amplifier. It runs directly on your data and unlocks capabilities that were not previously possible. Structured visual blueprints you can see, measure, and govern.

| You can                                           | How it works                                                                              |
| ------------------------------------------------- | ----------------------------------------------------------------------------------------- |
| Start from a reusable template                    | Templates define the structure: tables, fields, filters, relationships, and min/max rules |
| Build a blueprint from real or planned records    | Pull live ServiceNow data onto the canvas, or stage future-state records                  |
| Define or review relationships between records    | Existing relationships load automatically. Add, edit, or remove as needed                 |
| Measure compliance against template rules         | Live per-record and per-blueprint scoring. Green, amber, red.                             |
| Share the result in a read-only presentation view | Presenter Mode. No edit rights, no exposed instance.                                      |

## What you need before you start

| Prerequisite                    | Detail                                                                                                           |
| ------------------------------- | ---------------------------------------------------------------------------------------------------------------- |
| Blueprints installed            | On a sub-production instance (trial) or licensed instance. See Installation and Setup                            |
| A role assigned to you          | Blueprint Template Editor, Blueprint Editor, Blueprint Committer, or Blueprint Viewer. See Roles and Permissions |
| At least one template available | Ships with the instance or created by a Blueprint Template Editor                                                |

If you can open the app but you do not see actions such as **New Blueprint**, **Manage Templates**, or **Commit Changes**, that usually means your role does not include that permission. See [Roles and Permissions](/blueprints/start-here/roles-and-permissions).

## The four concepts to learn first

<table><thead><tr><th width="374">Concept</th><th>What it is</th></tr></thead><tbody><tr><td>Template</td><td>Defines the structure of a blueprint: which tables, which fields, which filters, which relationships, and min/max rules</td></tr><tr><td>Blueprint</td><td>A working instance created from a template. Holds selected records, layout, future-state work, and review context</td></tr><tr><td>Save/Update</td><td>Stores current template or blueprint work</td></tr><tr><td>Commit Changes</td><td>Publishes approved blueprint changes back to ServiceNow. Separate workflow from normal saving</td></tr></tbody></table>

## Your first workflow

### 1. Open Home

{% hint style="info" %}
**Who this workflow is for**

The workflow below is for users with a Blueprint Template Editor, Blueprint Editor, or Blueprint Committer role. Blueprint Viewers land in Presenter Mode and can review existing blueprints. See [Roles and Permissions](/blueprints/start-here/roles-and-permissions) for what each role can do.
{% endhint %}

The app opens on Home. From Home you search templates, create blueprints, manage existing ones, and open Auditor.

### 2. Create a blueprint from a template

On Home, click **New Blueprint** to open the **Select a Template** dialog. Then:

1. Search by name or filter by **Category** to find the right template
2. Click the chevron on a template to inspect its tables, relationships, and rules first if you want
3. Click the template to create the blueprint

If you only need to review rules without building a blueprint, open **Auditor** instead and choose a template there.

### 3. Add data to the blueprint

Inside the Blueprint Editor:

* use the **Data Hub** on the left to search tables and records
* drag a record onto the matching table card on the canvas, or double-click it to add it
* records that are already in the blueprint show a green check in the Data Hub

### 4. Review details and issues

Use the **Data panel** on the right to:

* edit blueprint metadata such as name, description, status, and target date
* review or edit record fields
* inspect relationships
* see missing required values and relationship issues

### 5. Save your work

Use **Save** in the header to store your current work. After the first save, the button changes to **Update** for subsequent saves.

The editor also protects unsaved changes. If you try to leave the page with pending edits, an **Unsaved changes** dialog asks whether you want to **Save and leave** or **Leave without saving**. Press Esc to dismiss the dialog and stay on the page.

<figure><img src="/files/zWJ6AIKhg65peioamN9M" alt="Unsaved changes dialog with Save and leave and Leave without saving buttons" width="563"><figcaption></figcaption></figure>

### 6. Review compliance

Use the compliance score in the header or on Home to see whether the blueprint currently satisfies the rules defined by its template.

If you need a deeper, record-by-record review, use [Compliance and Auditor](/blueprints/review-and-share/compliance).

### 7. Present or share

Use **Present** when you want a read-only view for workshops, reviews, or leadership updates. See [Presenter Mode and Sharing](/blueprints/review-and-share/presenting).

## Where to go next

* If you manage blueprint standards: [Templates](/blueprints/work-in-the-app/templates)
* If you build drafts and update data: [Blueprints](/blueprints/work-in-the-app/blueprints)
* If you work mostly with canvas content: [Records and Relationships](/blueprints/work-in-the-app/records-and-relationships)
* If you review quality or prepare audits: [Compliance and Auditor](/blueprints/review-and-share/compliance)
* If you want a fast reference: [Keyboard Shortcuts](/blueprints/personalize/keyboard-shortcuts) and [Glossary](/blueprints/reference/glossary)


# Roles and Permissions

Your role decides which actions show up and which screens you can work in.

If a button or menu item is missing, your role is usually the reason.

Blueprints roles are ServiceNow roles under the `x_inpi_ydbp` scope. They follow your instance's standard role assignment, ACL, and audit behavior.

## Role overview

| Role                      | Main purpose                        | Typical actions                                                                     |
| ------------------------- | ----------------------------------- | ----------------------------------------------------------------------------------- |
| Blueprint Template Editor | Define structure and governance     | Create templates, edit template rules, manage templates, create and edit blueprints |
| Blueprint Editor          | Build blueprint content             | Create blueprints, edit blueprint content, save/update blueprints                   |
| Blueprint Committer       | Review and publish approved changes | Open existing blueprints, review pending changes, run commit workflows              |
| Blueprint Viewer          | Read-only access                    | Open blueprints in Presenter Mode, review data and compliance without editing       |

## What each role can do

<table><thead><tr><th>Role</th><th width="258.74609375">Can</th><th>Cannot</th></tr></thead><tbody><tr><td>Blueprint Template Editor</td><td>Create and manage templates, configure tables/fields/filters/relationship rules, create and edit blueprints, open compliance and commit workflows, delete blueprints</td><td></td></tr><tr><td>Blueprint Editor</td><td>Create blueprints from templates, edit existing blueprints, save and update, duplicate blueprints, open compliance and commit workflows</td><td>Manage templates (unless also a Blueprint Template Editor)</td></tr><tr><td>Blueprint Committer</td><td>Open existing blueprints for review, access commit workflows, publish approved changes through Commit Changes</td><td>Create or edit blueprints, manage templates</td></tr><tr><td>Blueprint Viewer</td><td>Open blueprints in Presenter Mode, inspect blueprint details and compliance, use shared links safely</td><td>Create, edit, commit, or delete</td></tr></tbody></table>

## Important role-based behaviors

### Home page actions change by role

* **Manage Templates** appears only when your role allows template governance.
* **New Blueprint** appears only when your role allows blueprint creation.
* **Commit Changes** appears only when your role allows commit workflows.

### Opening a blueprint depends on your role

* Blueprint Template Editors, Blueprint Editors, and Blueprint Committers open the blueprint in the **Blueprint Editor**
* Blueprint Viewers open the same blueprint in **Presenter Mode**

### Delete permissions are stricter than edit permissions

* Blueprint Template Editors can delete blueprints
* Blueprint Editors can delete only blueprints they own
* Blueprint Viewers cannot delete blueprints

## Who sees which audit results

{% hint style="success" %}
**New in 26.1.** Applies to [Reviews](/blueprints/review-and-share/reviews) only.
{% endhint %}

Findings expose data quality problems on records you may not be entitled to see, so audit results are scoped to their audience.

| Role                      | Sees                                                                                                                                              |
| ------------------------- | ------------------------------------------------------------------------------------------------------------------------------------------------- |
| Blueprint Template Editor | Every finding, run, trend and schedule                                                                                                            |
| Everyone else             | Findings assigned to them or to one of their groups, findings on schedules they are informed about, and trends for templates they have a stake in |

A scoped reader is told the list is limited, so a short list does not read as a healthy estate.

This is enforced by the application, not merely hidden. Access to the underlying record is checked separately: a finding on a record you cannot read is withheld, and the count of withheld rows is shown rather than the list silently being short.

### Configuring audits is a template-editor action

Creating or editing a schedule, and starting a run by hand, require the **Blueprint Template Editor** role.

Blueprint Editors can open the Schedules tab and see the schedules they are informed about. The create, edit and run controls are not shown to them, and the page says which role is needed rather than leaving a page with no buttons and no explanation.

## Where to check your current role

On Home, open your user avatar menu. The app shows the Blueprints roles currently assigned to you.

## When something looks wrong

If you expected to see an action and it is missing:

1. Check your role in the avatar menu
2. Refresh the app if your access was changed recently
3. Contact your ServiceNow administrator if the role assignment still looks incorrect


# Home and Search

Home is where the work starts. Search. Create. Manage. Audit. Everything you open in the app begins here.

{% hint style="info" %}
Home is a ServiceNow page in the YouDesign Blueprints scope. What you see depends on your role, ACLs, and table access. Sections and actions you cannot use are hidden. See [Roles and Permissions](/blueprints/start-here/roles-and-permissions) for the full matrix.
{% endhint %}

## Templates

<figure><img src="/files/MrlQx8bHWcrC3Js8nOIe" alt="Home listing blueprints as cards with an attention score, record count and relationship count, above buttons for Manage templates, Auditor, Reviews and New blueprint"><figcaption><p>Home: your blueprints, with the four things you can do next along the top</p></figcaption></figure>

Use this section when you want to start from structure.

You can:

* browse available templates
* mark templates as favorites
* reorder favorite templates
* expand a template to inspect its tables, relationships, and rules
* create a new blueprint from a selected template

If you are a Blueprint Template Editor, you can also open **Manage Templates** from Home.

## Blueprints

Use this section when you want to continue existing work.

Each blueprint card shows:

* the template it is based on
* the blueprint name
* the lifecycle status
* the compliance score
* current counts for records and relationships
* pending changes such as future-state additions or relationship deletions
* an **Open** or **View** action depending on your role

## Search on Home

The top search field searches across both templates and blueprints.

Search is useful when you know the name of a template or blueprint but do not want to scroll through long lists.

{% hint style="info" %}
Press **Ctrl+F** or **Cmd+F** to jump straight to the Home search field.
{% endhint %}

## Blueprint filters

Use the filter row above the blueprint list to narrow what you see.

You can filter by:

* **My Blueprints**
* **Status**
* **Compliance**
* **Template**

You can also sort the blueprint list by:

* **Recent**
* **Oldest**
* **A–Z**
* **Z–A**

These preferences are stored per user, so the app remembers how you like to work.

## Favorites

Mark templates as favorites to keep the ones you use most at the top of the list.

Favorites are useful when:

* your organization has many templates
* most users work repeatedly with a small set
* you want important templates to stay at the top

Favorites appear first in the template chooser and can be reordered.

## Creating a blueprint from Home

On Home, click **New Blueprint** to open the **Select a Template** dialog. Then:

1. Search by name or filter by **Category** to find the right template
2. Click the chevron on a template to inspect its tables, relationships, and rules first if you want
3. Click the template to create the blueprint

The new blueprint opens directly in the Blueprint Editor.

## Managing templates from Home

**Manage Templates** opens a side panel where you can:

* search templates
* filter by template category
* create a new template
* edit an existing template
* rename, duplicate, or delete a template

## Opening Auditor from Home

**Auditor** checks records against a template's rules. Open it from Home to run a compliance spot-check.

When you open Auditor:

1. choose a template
2. review the template rules
3. select records to audit against those rules

See [Compliance and Auditor](/blueprints/review-and-share/compliance) for the full workflow.

## Blueprint card actions

The blueprint menu can include these actions:

* **Present**
* **Compliance Overview**
* **Commit Changes**
* **Rename**
* **Duplicate**
* **Copy link**
* **Share via email**
* **Delete**

{% hint style="info" %}
**Tips for working on Home**

* Use **favorites** to reduce template clutter
* Use **My Blueprints** when you only want your own work
* Open **Compliance Overview** before sharing a blueprint widely
* Use **Present** instead of edit mode during stakeholder meetings
  {% endhint %}


# Templates

A template is a set of rules. Every blueprint inherits them.

Good templates make structure consistent, planning faster, and compliance measurable.

{% hint style="info" %}
Templates are ServiceNow records under the `x_inpi_ydbp` scope. They follow your instance's standard ACL and audit behavior. Only [Blueprint Template Editors](/blueprints/start-here/roles-and-permissions) can create or modify them.
{% endhint %}

## What a template controls

<figure><img src="/files/wLTCSMmvPycvCHUtNXTd" alt="The Template Editor with two tables on the canvas joined by a Provided By relationship, and the template properties panel open on the right"><figcaption><p>A template is tables, the relationships between them, and the rules those carry</p></figcaption></figure>

A template can define:

* which ServiceNow tables appear on the canvas
* which related lists are relevant
* which fields matter for each table
* which filters limit the visible data set
* which relationships are available between tables
* which minimum and maximum rules apply to records and relationships
* the icon, name, description, and category users see on Home

## Create a new template

From Home:

1. Open **Manage Templates**
2. Select **New Template**
3. Enter a **name** and **description**
4. Save the template
5. Continue configuring the template in the **Template Editor**

After the first save, the template becomes easier to manage because actions such as **duplicate**, **delete**, and icon handling are available.

## The Template Editor

The Template Editor has three working areas.

### Left: Add Table panel

Use **Add Table** to search ServiceNow tables and add them to the canvas.

You can search tables by business label or technical name, sort the list, and group by application scope. Expand a table to inspect related lists, or add several tables in sequence without closing the panel.

### Center: canvas

The canvas is where you arrange the template visually.

Drag and resize table cards, zoom and pan, and use snap-to-grid with alignment guides. You can also inspect suggested relationships between the tables you have added.

### Right: Data panel

The Data panel changes based on what you select.

When you select a table, the Data panel shows three tabs: **Rules**, **Fields**, and **Filters**.

When you select a relationship, the panel shows the relationship configuration instead.

## Template details

Use the template details view to maintain the template's **Name**, **Description**, **Category**, and **Icon**.

## Configure table rules

In the **Rules** tab for a table, you can set how many records are expected.

Common rule patterns are **optional**, **required**, **exactly one**, or **custom min/max**.

## Configure required fields

In the **Fields** tab, you choose which fields matter for users when they work with blueprint records.

This is useful when you want blueprint users to focus on a small, meaningful subset of ServiceNow data instead of every available field.

### Mark a field as audited

Next to each selected field you can switch on **Audit this field for completeness**. An audit then reports records where that field is empty.

This is separate from the **mandatory** marker you may see beside a field. That marker comes from the ServiceNow form and describes what the platform enforces when someone saves a record. Marking a field as audited is your own choice about what counts as complete data for this template.

Only fields you have selected can be audited. If you deselect a field, it stops being audited, because a field the template does not show is not something a data owner can act on.

## Configure filters

In the **Filters** tab, you define which records should appear in the blueprint experience.

You can add existing ServiceNow filters or custom filter logic built in the template.

Filters affect what users see in the **Data Hub** and help keep a blueprint focused on the right records.

## Configure relationships

Relationships are the backbone of the template.

The editor can show direct suggested relationships, inherited relationship suggestions, and related-list-based connections.

For each relationship type, you can define rules in both directions.

For example, you can tell the template how many Applications a Business Process must have, or how many Business Processes an Application may support.

This is where minimum and maximum relationship rules belong.

### Require field values on related records

Counting related records is often not enough. "Every Capability must have at least one related Business Application" is satisfied by an application that was retired years ago.

Directly under each direction's cardinality controls you can add conditions on the related record. Only records matching those conditions count towards the rule. So you can require at least one related Business Application that is in production, or that is of a particular type.

Each direction has its own conditions, sitting under the rule they qualify and headed **Which&#x20;*****table*****&#x20;records count**, because the related record differs depending on which way you are looking.

{% hint style="warning" %}
A condition here narrows what **counts towards this rule**. It does not decide which records may be placed on the canvas at all. That is the table's own filter, on the table itself. A condition of `Level = 3` on the relationship does not stop a Level 2 capability being added; it stops a Level 2 capability satisfying the rule.

If you want a class kept off the canvas entirely, set it in [Configure filters](#configure-filters).
{% endhint %}

<figure><img src="/files/6myIi8fIiw5V8IWroOwK" alt="The relationship panel: each direction&#x27;s rule followed by its own condition section, one requiring Migration Strategy = Replatform and the other with no conditions"><figcaption><p>Each direction's conditions sit under that direction's rule. Here applications only count towards the rule if their migration strategy is Replatform</p></figcaption></figure>

The field list is alphabetical, with the fields the template already selected first, since those are usually the ones a condition tests.

Two rules govern how conditions combine:

* Conditions inside a group are joined with **AND**. All of them must be satisfied by the **same** related record. A Capability linked to one production application of the wrong type and one correctly typed application that is not in production does **not** satisfy a rule requiring a production application of that type.
* Groups are joined with **OR**. Use **OR**, beside **Add condition**, when either of two situations is acceptable.

A rule with no conditions behaves exactly as before: it counts related records without looking at their field values.

### Limiting which records a rule applies to

Counting conditions answer "which related records satisfy this rule". **Applies to** answers a different question: which records the rule is about at all.

"Obsolete applications must have no capability mappings" is a rule about obsolete applications. Written as a counting condition it becomes "count only obsolete related applications", so every application is audited, and every application with no mappings passes — including active ones, which is the gap the rule exists to find.

Set it in **Which&#x20;*****table*****&#x20;records this rule applies to**, above the counting conditions. A record outside the scope is not audited by that rule at all: it neither passes nor fails, and it does not count towards the compliance score.

This is per rule. The table's [Filter](#configure-filters) scopes every rule on that table, plus the Data Hub and the canvas, so it cannot express "this one rule is about obsolete applications, the others are about all of them". **Applies to** can.

{% hint style="info" %}
Scheduled audits need the `rule_scope_query` column on `x_inpi_ydbp_audit_rules`. Without it the scope is discarded on save and every rule audits its whole table. See [ServiceNow Administration](/blueprints/admin-and-governance/servicenow-admin-guide#setting-up-scheduled-audits-261).
{% endhint %}

### A condition applies to one direction only

Each direction's conditions govern **that direction's check, and only that one**. Auditing an Application counts its Capabilities, so the conditions under **Which Business Capability records count** decide the result. Conditions on the Application side belong to the opposite check, the one that runs when a Capability is audited, and have no effect here.

This catches people out when the rule reads like a scope. "Retired Applications have no Capabilities" cannot be written as a condition on the Application side of a relationship: every Application is still audited, and a live one with no Capabilities passes correctly, because 0 is within 0-0. To audit only retired Applications, put `Internal Lifecycle = Retired` in the table's [Filter](#configure-filters). The filter decides which records are audited; a relationship condition decides which related records count once one is.

Where a rule carries conditions on both sides, the Auditor shows both, so you can see everything the rule asks for, and marks the one that did not apply to the check you are reading with **(other direction)**.

## Save, duplicate, and delete

Use **Save** whenever you change template metadata, canvas structure, table rules, field selection, filters, or relationship configuration.

You can also:

* **Duplicate** a saved template to create a starting point for a variation
* **Delete** a template if it is no longer needed

{% hint style="info" %}
Deleting a template is a governance decision. Existing blueprints based on that template can be affected, so the app warns you before deletion.
{% endhint %}

{% hint style="info" %}
**Tips for designing templates**

* Start with the smallest structure that still reflects the real process
* Use categories so users can find the right template faster
* Keep required fields focused on decision-making, not data overload
* Use relationship rules only where they are meaningful enough to enforce
* Test the template by creating a real blueprint from it before rolling it out widely
  {% endhint %}


# Blueprints

A template sets the rules. A blueprint is where the work happens.

Each blueprint combines a template's structure with selected ServiceNow records, future-state planning, canvas layout and compliance context.

{% hint style="info" %}
Blueprints are ServiceNow records under the `x_inpi_ydbp` scope. What you can do in the Blueprint Editor depends on your role. See [**Roles and Permissions**](/blueprints/start-here/roles-and-permissions) for details.
{% endhint %}

## Create a blueprint

On Home, click **New Blueprint** to open the **Select a Template** dialog. Then:

1. Search by name or filter by **Category** to find the right template
2. Click the chevron on a template to inspect its tables, relationships, and rules first if you want
3. Click the template to create the blueprint

The app opens the new blueprint in the **Blueprint Editor**.

## Blueprint Editor layout

<figure><img src="/files/VLDbraTrR4Fnp2RHwZd8" alt="The Blueprint Editor with a Business Capability table, a Business Application table showing current and future records, and a related list below"><figcaption><p>A blueprint fills the template with real records, and scores itself as you work</p></figcaption></figure>

The Blueprint Editor has the same basic working model as the Template Editor, but the purpose is different.

### Header

The header shows the **blueprint name**, a **details** action, the current **compliance score**, **Save/Update**, a menu for blueprint actions, and **Commit** (when there are pending publishable changes).

### Left: Data Hub

Use the **Data Hub** to load records from the tables already defined in the template.

You can choose a source table, search and sort records, expand hierarchies where available, and drag or double-click records into the blueprint.

### Center: canvas

The canvas shows the table cards defined by the template and the records you have added.

Use it to arrange the layout, inspect relationships between tables, and review where data is present or missing.

## Right: Data panel

The Data panel shows blueprint details when nothing is selected, table-level rules and filters when a table is selected, and field or relationship details when an record is selected.

## Blueprint details

Blueprint details include the template it is based on, the blueprint name, description, status, target date, owner, and the last update timestamp.

These fields help other people understand the blueprint without opening every record.

## Save/Update versus Commit

These two actions are intentionally different. The header button shows **Save** for new blueprints and **Update** after the first save.

| Action          | Use it when                                                                      | What it does                                                                                                                                  |
| --------------- | -------------------------------------------------------------------------------- | --------------------------------------------------------------------------------------------------------------------------------------------- |
| **Save/Update** | You want to store working progress without publishing it back to ServiceNow yet. | Saves blueprint metadata, canvas layout, staged future-state work, relationship staging, and blueprint-specific view or organization choices. |
| **Commit**      | Approved blueprint work should be published back to ServiceNow.                  | Runs the controlled commit workflow that publishes approved changes beyond the working draft.                                                 |

This is a controlled workflow and is separate from normal saving.

## Commit Progress dialog

When you commit, the app opens a **Commit Progress** dialog that tracks the operation in real time.

The dialog shows a progress bar, the count of successful operations, the count of failed operations, and a list of any issues detected with the specific records or relationships involved.

When the commit finishes, dismiss the dialog with **Esc** or the **Close** button. Failed items remain in the working draft so you can fix them and try again.

## Working safely

The Blueprint Editor protects unsaved changes.

If you try to leave with pending work, the app asks whether you want to stay on the page, leave without saving, or save and leave.

Refreshing or closing the browser tab can also trigger a native unsaved-changes warning.

## Blueprint actions

Depending on your role, the blueprint actions menu can include:

* **Copy link**
* **Share via email**
* **Duplicate**
* **Delete**

The Home page blueprint menu also includes **Present**, **Compliance Overview**, and role-specific commit actions.

## Open versus View

What happens when you open a blueprint depends on your role:

* Blueprint Template Editors, Blueprint Editors, and Blueprint Committers open the Blueprint Editor. Blueprint Viewers open Presenter Mode.

{% hint style="info" %}
**Tips for working with blueprints**

* Save early when you are changing layout, metadata, or staged future-state content
* Review the compliance score before sharing or committing
* Use **Presenter Mode** when the goal is discussion rather than editing
* Keep the blueprint name and description current so other teams can understand the intent quickly
  {% endhint %}


# Records and Relationships

Structure first, then content.

{% hint style="info" %}
Records and relationships live inside a blueprint, which is a ServiceNow record under the `x_inpi_ydbp` scope. What you can do depends on your role. See Roles and Permissions for details.
{% endhint %}

Once a blueprint exists, this is where you add, edit, review, and remove records, and where you work with the relationships between them.

## Add records from the Data Hub

<figure><img src="/files/VLDbraTrR4Fnp2RHwZd8" alt="Records grouped under Current and Future headings inside a table node, each with a compliance tick"><figcaption><p>Records sit inside their table. Future ones are labelled and counted separately</p></figcaption></figure>

The **Data Hub** is the source list for the records you can place into a blueprint.

To add a record:

1. Open the **Data Hub**
2. Select a source table
3. Search or browse the available records
4. Drag a record to the matching table card or double-click it

The app only accepts records in the matching table card, which helps keep the blueprint aligned with the template.

### Class filters apply everywhere records arrive

If the template puts a filter on a table — Business Applications where criticality is high, capabilities at level 3 — that filter governs every route onto the canvas, not just search:

* The Data Hub lists only records the filter admits, so the count beside the table is the filtered count.
* Records pulled in automatically by following a relationship are checked too. If a record you drop relates to five applications and the filter admits two, three are left out and the app says how many.
* Records already on the canvas are re-checked. One that stops matching after a filter is added or tightened is marked with a **filter icon** rather than a tick or a warning.

That last state matters. An excluded record is not being audited at all, so a tick would claim a check that never ran and a warning would send you to add a relationship the record does not need. What it needs is removing, or the filter widening.

### What the icon beside a record means

| Icon              | Meaning                                                  |
| ----------------- | -------------------------------------------------------- |
| Green tick        | Relationship rules met, and every audited field filled   |
| **Amber warning** | Relationship rules met, but an audited field is empty    |
| Red warning       | A relationship rule is not satisfied                     |
| Filter            | Excluded by the template filter, so nothing is evaluated |

Amber exists because green was overstating what had been checked. A record whose relationships are all correct but whose audited fields are blank is not complete, and the only way to find that out was to select the record and open its Fields tab.

Only fields marked **Audit this field for completeness** count towards amber. Every shown field would turn almost every record amber and make the colour worthless. This is the same set the [scheduled audit](/blueprints/review-and-share/scheduled-audits) reports on, so the canvas and the audit agree about what complete means.

The blueprint's **compliance percentage counts these too**, one check per record on a table that audits any field, so a canvas showing amber can no longer read 100%. One check per record rather than per field: a record is complete or it is not, and counting each field separately would let a table with five audited fields outweigh every relationship rule in the template. The compliance tooltip breaks out how many records are affected.

{% hint style="info" %}
The **Auditor** still checks relationship rules only, and says so at the top of the page. Field completeness there is not yet implemented.
{% endhint %}

{% hint style="info" %}
This is the same filter the scheduled audit uses to decide which records to evaluate. Before, the canvas could hold records the audit ignored — a blueprint could look complete while the compliance figure was measuring a different, smaller population.
{% endhint %}

## Understand current-state and future-state items

Blueprints can contain two kinds of content.

### Current-state records

These are based on records that already exist in ServiceNow.

### Future-state records

These are planned items that do not exist yet.

Future-state items are useful when the blueprint is being used for planning, target architecture, migration preparation, or change design.

The app marks future-state content visually so it is easy to distinguish from current-state data.

## Edit record fields

When you select an record on the canvas, the Data panel opens record-level editing.

The **Fields** tab can show text fields, choice fields, date and date-time fields, boolean values, numbers, and reference lookups.

Which fields appear depends on the template configuration for that table.

## Review required information quickly

The record **Fields** tab highlights missing required information.

If there are issues, you can use the issue counter to filter the view down to missing fields only.

This is useful when a blueprint has many editable fields and you only want to see what still needs attention.

## Work with relationships

When you select an record, the **Relationships** tab shows its incoming and outgoing relationships.

You can use it to review what is already connected, stage additional relationships, mark current relationships for removal, and inspect which relationship rules are currently satisfied or broken.

The tab also shows totals and issue counts so you can focus quickly on non-compliant connections.

## Understand relationship rules

Relationship rules come from the template.

They describe which relationship type is allowed, which direction the rule applies in, the minimum number of matches required, and the maximum number allowed if there is one.

This is why two tables can be connected visually but still show a compliance issue: the problem may be the count, not the existence of the relationship itself.

## Suggested relationships on the canvas

The canvas can show suggested table-to-table relationships based on ServiceNow metadata.

These suggestions help users understand how the selected tables can connect before they start editing record-level relationships.

Suggested relationships can come from direct matches, inherited matches, and related-list metadata.

## What a relationship requires

Hover any relationship on the canvas, or the info icon beside it in the panel, to see what it asks for.

<figure><img src="/files/5zRrcNFd9YE97VroCMu1" alt="A relationship tooltip: Provided By, then each table with its icon and what it needs, then a Conditions section listing the field conditions per table"><figcaption><p>Each end states its own rule, and the conditions that qualify them follow underneath</p></figcaption></figure>

Each row is one end of the relationship, led by that table's icon — the same icon as its card on the canvas, so you can match the row to the end you mean without reading two similar names.

**Conditions** lists the field conditions the rule applies, one line per table, against the table each one filters. Field names are shown by their label, so a condition reads `Health = 1` rather than the column name behind it. A relationship with no conditions has no such section, so the absence is the answer.

A relationship that carries conditions is marked on the canvas with a **C:&#x20;*****n*** badge, so you can see it is conditional without hovering. The same badge appears beside the relationship in the panel, and in a template's contents when you expand it on Home.

## Remove records

Removing a record is not always isolated. Most records on a canvas are not there because somebody chose them: they arrived by following a relationship from a record that was chosen. When the record that brought them in goes, they have no reason to stay.

So removal takes the selection **plus every record that nothing else still brings in**. A record something else still brings in stays.

Take a canvas holding two applications that share a capability. Removing the first application removes the capabilities only it brought in. The shared capability stays, because the second application still brings it in — and the removal stops there rather than following the shared capability into the second application.

Two kinds of record are never taken:

* **Records you added yourself**, from the Data Hub. Removing an application's capabilities does not remove the application.
* **Future-state records.** A future-state blueprint is built by adding and removing deliberately, and a cascade would undo that. Removing a future-state record only ever removes that record.

### The preview

When a removal would take more than the selection, you see exactly what goes and what stays before anything happens.

<figure><img src="/files/HxVnGcRdXlmSXwfOJwbT" alt="The removal dialog: Deltek selected, two capabilities under Also removed, two capabilities under Staying, and a Remove 3 records button"><figcaption><p>What goes, what stays, and why. The button counts the total you are agreeing to</p></figcaption></figure>

**Also removed** are the records nothing else brings in. **Staying** are the ones something else still does — which is usually the thing you were unsure about when you started.

If nothing else would move, there is no dialog. The record is removed and a message says so.

{% hint style="info" %}
Removal takes records off the blueprint canvas. It does not delete anything from your CMDB and does not stage a relationship change, so nothing about it reaches your data. See [Save/Update versus Commit](/blueprints/work-in-the-app/blueprints#saveupdate-versus-commit).
{% endhint %}

## Organize the canvas

You can keep the blueprint readable by dragging table cards into a clearer layout, resizing them, using grid and snap settings, and using the canvas zoom and pan controls.

The blueprint stores its layout, so you can reopen it later without rebuilding the visual arrangement.

## What changes in Presenter Mode

In Presenter Mode, Blueprint Viewers can still inspect records and relationships, but they cannot:

* drag or resize table cards
* change fields
* stage relationship edits
* save or commit


# Compliance and Auditor

Two ways to review a blueprint against its template.

Compliance is the live score you see in the header as you work in the app. Auditor is a separate workspace for reviewing records one by one against a template.

{% hint style="info" %}
Compliance and Auditor work on blueprints, which are ServiceNow records under the `x_inpi_ydbp` scope. What you can see and do depends on your role. See [Roles and Permissions](/blueprints/start-here/roles-and-permissions) for details.
{% endhint %}

{% hint style="success" %}
**New in 26.1.** Both check a blueprint you have open. To run the same checks across your CMDB on a schedule and route each problem to whoever owns the record, see [Reviews](/blueprints/review-and-share/reviews).
{% endhint %}

## What compliance checks are based on

Compliance always checks against the blueprint's template. Three things get checked:

* **Tables** — whether each table has the right number of records, between any minimum or maximum the template defines
* **Relationships** — whether connections between tables follow the template's rules, including how many are required or allowed, and where the template requires it, whether the related records carry particular field values
* **Fields** — whether the fields the template marks as required are filled in

## Where you see compliance

<figure><img src="/files/7IwizISe2DqghvKjHJ0p" alt="The Compliance Overview panel on its Relationships tab, listing each rule with required and current counts and a pass or fail status"><figcaption><p>Every rule, what it required, what it found, and whether that passed</p></figcaption></figure>

## On Home

Each blueprint shows a compliance score in the header so you can spot which blueprints are in good shape and which need attention.

The app uses three high-level states:

| State         | Meaning                                                                       |
| ------------- | ----------------------------------------------------------------------------- |
| **Good**      | The blueprint is currently satisfying its checked rules.                      |
| **Attention** | The blueprint has issues that should be reviewed soon.                        |
| **Critical**  | The blueprint has important missing content or broken rules that need action. |

## In the Blueprint Editor

Compliance appears in four places in the editor:

* **In the header** — a compliance score for the whole blueprint
* **On each table card** — a status indicator for that table
* **On a selected record** — issue counts for fields and relationships
* **In the Compliance Details dialog** — full breakdown on demand

## Compliance Details

Open the **Compliance Details** dialog from the compliance score in the header, or from **Compliance Overview** in the blueprint's menu on Home.

The dialog shows the full compliance picture for the blueprint and answers questions like:

* Which tables are missing required content?
* Which relationship rules are currently broken?
* Is the blueprint close to complete, or missing something fundamental?

Click **Export PDF** to save the result as a PDF.

## Auditor

Use Auditor when you want to review records one by one instead of scanning the canvas. It works best for going through a list of records, marking off each as you go.

Auditor is available to **Blueprint Template Editors**, **Blueprint Editors**, and **Blueprint Committers**.

## Open Auditor

On Home, click **Auditor**, then choose a template from the **Select a Template for Auditor** dialog. The workspace opens on the chosen template.

## Auditor layout

<figure><img src="/files/zjbcH0RtTNopJP0KdsS8" alt="Auditor after a run: six business capabilities in the audit list, four passed and two failed, with the template rule shown above"><figcaption><p>Pick records, run the check, and get a verdict per record</p></figcaption></figure>

Auditor has three main parts.

### Template Rules header

Shows the template being audited. Expand it to see the rules being checked, collapse it for more space.

### Left: Data Hub

Pick a table, find records, and add them to the Audit List. Use **Add all** to queue the entire table at once, or click individual records to add them one at a time.

### Right: Audit List

Where the audit runs. Search, filter, sort, or group the list. Click **Run Audit** to start, or **Clear All** to empty the list. Click **Export PDF** to save the result when finished.

## Audit statuses

As the audit runs, each item can move through statuses such as:

| Status     | Meaning                                              |
| ---------- | ---------------------------------------------------- |
| `queued`   | The item is waiting to be checked.                   |
| `checking` | The audit is currently evaluating the item.          |
| `passed`   | The evaluated relationship checks passed.            |
| `failed`   | One or more evaluated relationship checks failed.    |
| `error`    | The audit could not complete normally for that item. |

Expanding an item shows which checks passed, which failed, and which matching dependencies were found.

## Important scope note

Auditor currently checks **relationship rules only**.

It does **not** currently evaluate table-level minimum and maximum record counts inside the Auditor workflow.

If you need the full blueprint picture, use Auditor together with the normal compliance views in Home and the Blueprint Editor.

## When to use each tool

| Use this tool          | Best when                                                                                                                                 | Scope                               |
| ---------------------- | ----------------------------------------------------------------------------------------------------------------------------------------- | ----------------------------------- |
| **Compliance Details** | You are already inside a blueprint, want a blueprint-wide summary, or need to export a blueprint compliance report.                       | Whole blueprint                     |
| **Auditor**            | You want to review selected records one by one, build a dedicated audit list, or sort, group, and export audit results around a template. | Selected records against a template |


# Reviews

What has to be fixed, whether it is getting better, and when audits run.

{% hint style="success" %}
**New in 26.1.** Reviews does not appear on earlier versions.
{% endhint %}

Compliance tells you whether one blueprint matches its template, while you are looking at it. Reviews runs that same check across your CMDB on a schedule and keeps the results, so you can see what needs fixing without opening a blueprint at all.

Open it from **Reviews** on Home. The count on the button is the number of findings assigned to you.

{% hint style="info" %}
You see the findings you are responsible for or informed about, not the whole estate. Blueprint Template Editors see everything. See [Roles and Permissions](/blueprints/start-here/roles-and-permissions#who-sees-which-audit-results).
{% endhint %}

## Dashboard

Whether data quality is improving, and where the worst problems are.

<figure><img src="/files/471s61uyxuCx8nmA1ZUN" alt="The Reviews dashboard showing compliance, change, open findings and how many reach nobody, above a compliance-over-time chart"><figcaption><p>The four headline numbers, then the trend</p></figcaption></figure>

### The four headline numbers

| Number              | Meaning                                              |
| ------------------- | ---------------------------------------------------- |
| **Compliance**      | Share of checks that passed in the most recent run   |
| **Change**          | How much that moved across the window, and from when |
| **Open findings**   | Problems currently outstanding, across every run     |
| **Reaching nobody** | Open findings with no owner resolved                 |

The last one is the one worth watching. A backlog somebody owns is a plan. A backlog nobody owns will not shrink on its own, and a single "open findings" figure hides the difference.

{% hint style="info" %}
**Open findings** accumulates across every schedule and persists until somebody fixes each one. It is not the same as what a single run found — for that, hover a point on the chart.
{% endhint %}

### Compliance over time

One point per completed audit run, oldest on the left.

* A **circle** is a scheduled run. A **hollow square** is a run somebody started by hand.
* Only completed runs are plotted. A run where rules errored evaluated less than it should have, so plotting it would read as an improvement that never happened.
* A run that evaluated nothing is left out rather than drawn at zero. Nothing measured is unknown, not non-compliant.

Use **Show the last N runs** to change how far back the chart goes. It sits on the same row as the two selects, and drops to its own line on a narrow screen.

While the history loads, the card shows a spinner rather than an empty state — "no completed audits yet" and "not loaded yet" are different answers.

### Break down by

Switch the chart between three grains:

| Grain        | One line per                                    |
| ------------ | ----------------------------------------------- |
| **Template** | Blueprint Template                              |
| **Rule**     | Audit rule, named by its table and relationship |
| **Table**    | Audited table                                   |

Rates are **weighted by how many records each rule evaluated**, never averaged across rules. A rule covering 40 records and one covering 200,000 do not carry the same weight. Averaging the two rates would report roughly 75% where the real figure is 50%.

A gap in a line means that series measured nothing in that run, rather than scoring zero.

Series are named in the legend at the top right of the chart, each with its movement across the window. The axis ticks whichever calendar unit the runs actually span: quarters, then months, then days, and the clock when every run is the same day. Points are spaced one per run rather than by elapsed time, because runs cluster and a proportional axis would pile three test runs on top of each other and leave the rest of the chart empty.

### Reading a point

Hover any point on the line. The tooltip carries the date, the rate, how much was evaluated, whether the run was scheduled or forced, and the rules that failed the most records **in that run**.

The evaluated count is the one to watch. 100% over four records and 100% over four hundred are not the same claim, and the line cannot show the difference.

Failing rules are ordered by **failure count**, not rate. A rule failing 285 of 358 records is a bigger problem than one failing 2 of 2, and ordering by rate puts the second at the top.

Asked of the point rather than of the chart, so you can ask it of any run rather than only the most recent one.

### Warnings you may see

| Warning                                                     | What it means                                                                  |
| ----------------------------------------------------------- | ------------------------------------------------------------------------------ |
| The audited rules or their scope changed during this period | Part of any movement in the rate is a change in what was counted, not progress |
| A run stopped collecting failures                           | The failure count is a floor rather than a total                               |
| Runs were excluded because they did not complete            | Those runs are not plotted                                                     |

## Findings

What has to be fixed, and by whom.

<figure><img src="/files/PuGAZlHmLaRS9z0lgyg6" alt="The findings list with record, table, problem, responsible person, state and date columns"><figcaption><p>One row per broken record, with the owner resolved from the record itself</p></figcaption></figure>

### Filters

| Filter                     | Options                                             |
| -------------------------- | --------------------------------------------------- |
| **Whose findings to show** | All, mine, unassigned                               |
| **Finding state**          | Open, resolved automatically, resolved manually     |
| **Template**               | Any number of templates that actually have findings |
| **Group by**               | No grouping, template, table, or responsible        |

The template list offers only templates with results. An estate can hold dozens of templates and audit three; offering the rest sends you looking for a trend that was never measured.

You can select **more than one template**. Customers commonly split a wide map into narrow ones — capability to application, application to service — and then want both backlogs in one list rather than two lists that cannot be compared.

Use the search box in the header to filter further. It matches the record, its table, the problem text and the **owner**, which is what most people reach for first.

### Grouping

Selecting several templates makes the list longer, so it can be grouped by template, table or responsible.

Groups are collapsible, ordered alphabetically, and only the first opens — grouping exists to condense a long list, and expanding all of them puts you back where you started. Each heading carries its own count, so "who has the most to do" is answerable at a glance.

The column you group by is removed from the table. Printing the same owner on all 65 of their rows spends width restating the heading, and reclaiming it is why grouping beats adding a Template column.

<figure><img src="/files/ZSj0zJGlRNLjiFHYpanb" alt="Findings grouped by responsible: Anna Wagener with 65 expanded, Application Development with 31 collapsed, and no Responsible column in the table"><figcaption><p>Grouped by responsible. The heading carries the count, and the column it groups by leaves the table</p></figcaption></figure>

### The list

| Column          | Meaning                                                                              |
| --------------- | ------------------------------------------------------------------------------------ |
| **Record**      | The flagged record's display name                                                    |
| **Table**       | Its table, by label. Hover for the technical name                                    |
| **Problem**     | What is wrong, phrased for whoever has to fix it                                     |
| **Responsible** | The person or group resolved from the record, or "Nobody assigned". Sortable by name |
| **State**       | Open, or how it was resolved                                                         |
| **Opened**      | When the finding first appeared                                                      |

A problem reads like this:

> No Business Application is linked to this record via "Provided By". At least 1 is required.

### Fixing something

Click any row, or the icon at the end of it. The record opens **in a new tab**, on its Blueprint Template's canvas, together with the relations it already has — so you can see what is there before you see what is missing.

A new tab because triage is list-shaped: you work down a filtered set, and navigating away costs the filters and the scroll position. The list stays exactly where you left it.

The count on the **Findings** tab shows how many match your filters against the total, for example `48/668`.

{% hint style="warning" %}
**Nobody assigned** means the audited record does not name an owner in the field the schedule is configured to read. It is a data problem the audit has just surfaced, not an audit problem. Fix it by populating the owner field, or by setting a fallback person or group on the schedule.
{% endhint %}

## Schedules

When audits run, and who hears about them.

<figure><img src="/files/eYZtVQaP3PkLmwZBYc4Y" alt="The schedules tab with Show inactive turned on, listing an active and a paused schedule"><figcaption><p>Show inactive reveals paused schedules rather than hiding that they exist</p></figcaption></figure>

Each card shows the schedule name, the template it audits, when it next runs and when it last ran.

* **Show inactive** reveals paused schedules. They are hidden by default, and the switch carries the count either way — "3 inactive hidden" or "3 inactive shown" — so a filter cannot silently remove rows.
* **Run now** starts an audit immediately, without waiting for the schedule.
* **Edit** opens the configuration.

Creating, editing and running are Blueprint Template Editor actions. If you do not hold that role the page tells you so rather than showing controls that would fail.

For how to set one up, see [Scheduled Audits](/blueprints/review-and-share/scheduled-audits).

## How Reviews relates to Compliance and Auditor

All three check data against a template, and they answer different questions.

| Feature                                               | Question                                                   | Scope                                   | When it runs         |
| ----------------------------------------------------- | ---------------------------------------------------------- | --------------------------------------- | -------------------- |
| [Compliance](/blueprints/review-and-share/compliance) | Does this blueprint match its template right now           | One blueprint                           | Live, as you work    |
| [Auditor](/blueprints/review-and-share/compliance)    | Do these records satisfy the template's relationship rules | Records you choose                      | When you review them |
| **Reviews**                                           | Is the CMDB improving, and who has to fix what             | Every record the template's rules cover | On a schedule        |


# Scheduled Audits

Set an audit to run on its own, route each finding to whoever owns the record, and raise the work.

{% hint style="success" %}
**New in 26.1.** Scheduled audits do not exist on earlier versions.
{% endhint %}

A schedule answers four questions: which template to audit, how often, who fixes what, and who hears about it.

{% hint style="info" %}
Creating and editing schedules requires the **Blueprint Template Editor** role. See [Roles and Permissions](/blueprints/start-here/roles-and-permissions).
{% endhint %}

Open **Reviews** on Home, then the **Schedules** tab, then **New schedule**.

<figure><img src="/files/cxt7eKjqAplCrzrC05Au" alt="The schedule form: name, cadence, run time, templates, who to inform, and an owner field pair per audited table"><figcaption><p>One form: what gets audited, how often, who hears about it, and who fixes what</p></figcaption></figure>

## What gets audited

A schedule names **one template to audit**. The tables that template carries rules for are the ones audited — a template with no rules audits nothing.

One template per schedule, because a schedule is a cadence over one map. Two maps on one cadence produce a run whose findings are hard to attribute, and two schedules say the same thing more clearly. To audit two templates nightly, create two schedules.

{% hint style="warning" %}
If **Who fixes what** is empty after saving, the selected templates carry no audit rules. Open the template, define its relationships or required fields, and save it to project rules.
{% endhint %}

Two schedules can audit the same template, and the page warns you when they do. It is allowed, because two cadences over one map is a reasonable thing to want, but the same broken record then opens a separate finding under each schedule and its owner sees the problem twice.

## How often

| Cadence         | Advances by        |
| --------------- | ------------------ |
| Daily           | 1 day              |
| Weekly          | 7 days             |
| Every two weeks | 14 days            |
| Monthly         | 1 calendar month   |
| Quarterly       | 3 calendar months  |
| Half-yearly     | 6 calendar months  |
| Yearly          | 12 calendar months |

**Run at** is a 24-hour time, for example `02:00`. Weekly and fortnightly schedules also take a **run day**.

The month-based cadences advance by calendar month rather than by a fixed number of days, so an audit set for the 31st keeps its date instead of drifting earlier each month. Where the next month is shorter, it lands on the last day of that month.

Two behaviours worth knowing:

* A new schedule does not run immediately. It is scheduled for its next occurrence, so creating a nightly audit at midday starts it tonight rather than while you are still filling in the form.
* A schedule that was due several times while the instance was down produces **one** run, not one per missed occurrence.

## Who fixes what

Each audited table is mapped to a **field on the record** that names its owner. The finding then reaches that record's owner.

{% hint style="info" %}
This is deliberately not one nominated person per table. On a CMDB of any size that produces a queue which is mostly other people's problems, and nobody works it.
{% endhint %}

You can set two fields per table, and either alone is enough:

| Field                  | Points at        | Example                                 |
| ---------------------- | ---------------- | --------------------------------------- |
| **Person owner field** | `sys_user`       | `managed_by`, `owned_by`, `assigned_to` |
| **Group owner field**  | `sys_user_group` | `support_group`, `managed_by_group`     |

Both are offered because a record commonly has an individual and a queue, and they are different audiences.

The picker lists only fields that exist on the table and reference the right thing, including fields inherited from a parent table. Most useful owner fields live on `cmdb_ci` rather than on the leaf table, and the picker says which table defines each one.

### Ownership belongs to the template

Mappings are held per **(template, table)** pair, not per schedule. The same table audited under two templates can resolve to different owners, because who owns an application in a capability map is not necessarily who owns it in a data lineage map.

Two consequences:

* Two schedules auditing one template share its mapping. Define it once.
* A run started by hand resolves owners the same way a scheduled run does.

### If the record names nobody

Set a **fallback**: a group or a named person. Findings on records with no owner go there instead of reaching nobody.

Prefer a group. The reason the owner mapping is a field in the first place is that one person receiving every finding on a table is a queue of other people's problems, and a catch-all pointed at an individual rebuilds exactly that. A person is the right choice when the table has one genuine owner — a small estate, or a class only one team touches.

Without a fallback, those findings are recorded as unassigned and shown on the Dashboard under **Reaching nobody**. They are never hidden.

{% hint style="warning" %}
Check the field you pick is actually populated. A field that exists but is empty on every record routes every finding to nobody, which looks like an audit fault and is a data gap.
{% endhint %}

## Notifications

Three notifications, each switchable per schedule.

| Setting                | Sends to                                 | Contains                                                    |
| ---------------------- | ---------------------------------------- | ----------------------------------------------------------- |
| **Notify responsible** | Whoever owns the flagged records         | Failing count, across how many tables and rules, and a link |
| **Notify run summary** | The schedule's informed person and group | Passed, failed, errors, rules, and a link                   |
| **Notify when clean**  | As above                                 | Sends the run summary even when nothing failed              |

**Also inform** takes a person and a group, and both receive it. They are different audiences: a named individual who watches the estate, and a distribution list that covers absence.

A group with its own email address is written to at that address, because a distribution list you already maintain is what naming the group meant. A group without one is expanded to its members when the run finishes, so somebody who joined the group today is included today. Either way a recipient needs an email address on their user record: one without is skipped, and the finding still shows on the Dashboard.

{% hint style="info" %}
**Switches on, audits running, no email arriving?** That is an instance setup item rather than a schedule setting. See [Three traps worth knowing](/blueprints/admin-and-governance/servicenow-admin-guide#three-traps-worth-knowing).
{% endhint %}

### One message per recipient

Never one per finding. A run finding 334 problems across two owners sends two emails, each carrying its own counts. An owner responsible for three tables hears once, with the totals combined.

Messages link into the findings view rather than listing records. A mail with three hundred rows is unreadable, and the findings list lets the reader filter to their own and click through.

A message covers **that run only**, so an owner is not told tonight's audit found the whole accumulated backlog.

### Notify when clean

Off by default. A clean run mailing everybody every night is how people learn to filter your notifications into a folder they never open.

A **failed** run notifies regardless of this setting. Silence after a failure is indistinguishable from silence after a clean pass, and the two need opposite responses.

## Summary report

A periodic management view, on its own cadence, independent of how often audits run — a weekly report can cover nightly runs.

Configure it on `x_inpi_ydbp_audit_report_schedules`. It takes recipients as a group, a user list, or both, and optionally narrows to particular templates. Leaving templates empty covers everything.

The report carries the compliance rate for the period, the change since the previous period, the current open finding count and a link.

{% hint style="info" %}
A period in which no audits completed produces a report that says so, rather than a report showing 0%. Nothing measured is not the same as everything broken, and the two need opposite reactions.
{% endhint %}

Figures come from snapshots rather than from live findings, so the report and the Dashboard always agree.

## Remediation records

A finding can raise a record in a table you already use.

{% hint style="info" %}
Blueprints does not ship its own task table. Remediation work belongs in the queue your team already works, with your assignment rules, SLAs and reporting, rather than in a queue nobody asked for.
{% endhint %}

Configure a target on `x_inpi_ydbp_remediation_targets`, then point a schedule at it with **Remediation target**.

A target names:

* The **target table**. Any table you already have, whether or not it extends `task`.
* A **field mapping** — where the flagged record, rule, template, run, link, assignee, group and description each go. Mapping is explicit rather than guessed from field names, because `assigned_to` is a person on one customer's table and a queue name on another's.
* **Default values** for fields the target requires but Blueprints has nothing to say about.
* Which **states count as resolved**, and which single state Blueprints writes when it closes a record.

### Validation happens when you save

A configuration that would fail at audit time is refused at save time. The target table must exist, every mapped field must exist on it or a table it extends, every mapped field must be able to hold the value, every default must name a real field, and every mandatory field must be filled by a mapping or a default.

All problems are reported at once, so you fix one form once.

### The lifecycle

| When                                                | What happens                                                                |
| --------------------------------------------------- | --------------------------------------------------------------------------- |
| A finding first opens                               | One record is created and linked to the finding                             |
| The finding is seen again                           | Nothing. A nightly audit does not raise a ticket a night                    |
| The data is fixed, anywhere                         | The finding closes, and the record closes using the mapped resolution state |
| Somebody closes the record but the data still fails | The finding reopens and a fresh record is raised                            |

That last row matters: without it, closing a ticket would make the problem look handled while the record stayed broken, and the compliance rate would measure queue hygiene rather than data quality.

A record somebody resolved their own way — closed as skipped rather than complete — is left alone rather than restamped.

### Cross-scope access

The target table is usually outside the Blueprints scope, so the application needs explicit write access to it. Without that, audits still run and findings still appear; only the records are missing, and the audit run says why.

See [ServiceNow Administration](/blueprints/admin-and-governance/servicenow-admin-guide#setting-up-scheduled-audits-261).

## When things do not run

| Symptom                       | Cause                                                                             |
| ----------------------------- | --------------------------------------------------------------------------------- |
| Nothing ever runs             | The hourly job is missing, or its start date is in the future                     |
| **Who fixes what** is empty   | The selected templates carry no audit rules                                       |
| Every finding is unassigned   | The owner field is empty on those records, and no fallback person or group is set |
| No remediation records appear | The cross-scope grant is missing. The run's message says `not_permitted`          |
| No report arrives             | No report schedule exists, or it has no recipients                                |


# Presenter Mode and Sharing

Two ways to share. One way to present.

Presenter Mode is the read-only view that lets you walk people through a blueprint without risking accidental edits. It is built for workshops, approvals, status reviews, and leadership presentations.

{% hint style="info" %}
Presenter Mode and sharing both work on blueprints, which are ServiceNow records under the [`x_inpi_ydbp`](/blueprints/start-here/roles-and-permissions) scope. What people see when they open a shared link depends on their role. See [Roles and Permissions](/blueprints/start-here/roles-and-permissions) for details.
{% endhint %}

## How to open Presenter Mode

<figure><img src="/files/KyAhwj37XkW8rfoyTdIB" alt="Presenter Mode showing the blueprint canvas with Share and Edit buttons and no editing toolbar"><figcaption><p>The same canvas without the editing surface, plus a Share button</p></figcaption></figure>

You can open Presenter Mode from the blueprint actions on Home by selecting **Present**.

Blueprint Viewers also land in Presenter Mode automatically when they open a blueprint.

## Presenter Mode versus Blueprint Editor

| Capability                                 | Presenter Mode | Blueprint Editor            |
| ------------------------------------------ | -------------- | --------------------------- |
| Inspect tables, records, and relationships | Yes            | Yes                         |
| Zoom and pan the canvas                    | Yes            | Yes                         |
| Review blueprint metadata                  | Yes            | Yes                         |
| Open compliance details                    | Yes            | Yes                         |
| Edit fields or metadata                    | No             | Yes, if your role allows it |
| Stage relationship changes                 | No             | Yes, if your role allows it |
| Move or resize table cards                 | No             | Yes, if your role allows it |
| Save or commit                             | No             | Yes, if your role allows it |

## Edit button for users with access

If your role allows blueprint editing, Presenter Mode can offer an **Edit** action so you can switch back into the **Blueprint Editor** when needed.

## Sharing options

Blueprints can be shared from Home, from blueprint actions, or directly from the **Share** button in the Presenter Mode toolbar.

Common sharing actions are **Copy link** and **Share via email**. These are useful when you want to send someone directly to the correct blueprint without asking them to search for it first.

## Role-based behavior when sharing

The same link can behave differently depending on the user. Blueprint Template Editors, Blueprint Editors, and Blueprint Committers open the blueprint in the **Blueprint** **Editor**. Blueprint Viewers see the read-only Presenter Mode experience instead.

{% hint style="info" %}
**Restricted data behavior**

In viewer-restricted sessions, technical identifiers that should not be exposed can appear as **Access restricted** instead of raw system values. This makes Presenter Mode safer for broader audiences.
{% endhint %}

{% hint style="info" %}
**When to reach for Presenter Mode**

* Stakeholder walkthroughs
* Architecture reviews
* Compliance review meetings
* Business process discussions
* Any session where accidental edits would be a problem
  {% endhint %}


# Settings and Accessibility

Set it. Save it. Use it.

YouDesign Blueprints saves your preferences for your account, so themes, accessibility options, canvas grid, language, and favorites are still there next time you open the app.

{% hint style="info" %}
Settings live inside the YouDesign Blueprints app, scoped to ServiceNow under `x_inpi_ydbp`. **Each person has their own settings**, so what you change here doesn't affect anyone else in your instance.
{% endhint %}

## Open Settings

<figure><img src="/files/HvtiiDReKqAl5mfcR6zF" alt="The Settings panel listing tutorials, theme mode, grid, language, accessibility, documentation and feedback, with the version at the bottom"><figcaption><p>Settings are per person. Your installed version is at the bottom</p></figcaption></figure>

Click the **Open menu** icon in the top-left of the app header and select **Settings**. The same settings apply everywhere in YouDesign Blueprints.

## Settings overview

| Setting                        | Options                                                                                            | What it changes                                                                                                                            |
| ------------------------------ | -------------------------------------------------------------------------------------------------- | ------------------------------------------------------------------------------------------------------------------------------------------ |
| **Show tutorials**             | On or off                                                                                          | Controls whether contextual walkthroughs appear as you use the app.                                                                        |
| **Theme mode**                 | **Light**, **Dark**                                                                                | Changes the visual theme used across the application.                                                                                      |
| **Grid**                       | None, Line grid, Dot grid, Cross grid                                                              | Changes the grid style shown on the canvas.                                                                                                |
| **Snap to grid**               | On or off                                                                                          | Snaps table cards to the grid as you move them.                                                                                            |
| **Language**                   | English (US), English (UK), German, Turkish, Spanish, Portuguese, French, Japanese, Hindi, Bengali | Changes the app interface language. Labels from ServiceNow records translate only when your ServiceNow instance has translations for them. |
| **Precise Selection**          | On or off                                                                                          | Tightens click targets so it is easier to select the right record on a dense canvas.                                                       |
| **Reduce Motion**              | On or off                                                                                          | Reduces or turns off animations across the app. Useful if motion makes you uncomfortable or distracts from content.                        |
| **High Contrast**              | On or off                                                                                          | Increases contrast to improve readability and distinction between UI records.                                                              |
| **Single-Character Shortcuts** | On or off                                                                                          | Enables the canvas zoom shortcuts `+`, `-`, and `0`.                                                                                       |

## Language

Changing the language updates the YouDesign Blueprints interface (buttons, menus, and dialogs) immediately. Labels that come from ServiceNow records, like table and field names, only appear translated if your ServiceNow instance has translations for them.

## Documentation and Feedback

Settings includes two help entries:

**Documentation** opens the published help center in a new browser tab. Use it to look something up without leaving your current blueprint.

**Feedback** opens a small menu with two options: report a bug or request a feature. Both open your mail client with a pre-filled message and the right subject prefix.

**Report a bug:** Opens your mail client with a message addressed to `bugs@ins-pi.com`, subject prefixed `[BUG]`, and a template asking what you were doing, what you expected, what actually happened, and any screenshots.

**Request a feature:** Opens the same flow with subject prefixed `[FEATURE]` and a template asking what problem you want to solve, who would benefit, and any references that inspired the idea.

{% hint style="info" %}
Both feedback emails include a diagnostic block at the bottom with your app version, page, ServiceNow instance, theme, language, browser, and timestamp. Leave it intact so support can reproduce what you were seeing.
{% endhint %}

## Roles menu

On **Home**, your avatar menu also shows the Blueprints roles currently assigned to you.

This is useful when you want to confirm whether you are working as a **Blueprint Template Editor**, **Blueprint Editor**, **Blueprint Committer**, or **Blueprint Viewer**.


# Keyboard Shortcuts

Less clicking. More doing.

YouDesign Blueprints supports keyboard shortcuts for search, save, canvas navigation, zoom, and tutorial control. Most work without setup.

{% hint style="info" %}
Shortcuts work inside the YouDesign Blueprints app, scoped to ServiceNow under `x_inpi_ydbp`. The single-character zoom shortcuts (`+`, `-`, `0`) are off by default and need Single-Character Shortcuts to be enabled in Settings and Accessibility before they take effect.
{% endhint %}

## Global shortcuts

| Shortcut           | What it does                                                        |
| ------------------ | ------------------------------------------------------------------- |
| `Ctrl+F` / `Cmd+F` | Focuses the search field on the current screen.                     |
| `Esc`              | Closes the current dialog, tooltip, tutorial, or editor side panel. |

## Search behavior by screen

Ctrl+F / Cmd+F focuses different fields depending on the screen:

* **Home:** the header search field
* **Template Editor:** the **Search ServiceNow tables** field in **Add Table**
* **Blueprint Editor:** the **Search tables and records** field in **Data Hub**

## Editor shortcuts

These shortcuts apply in **Template Editor** and **Blueprint Editor**.

| Shortcut           | What it does                                                                                                                                                  |
| ------------------ | ------------------------------------------------------------------------------------------------------------------------------------------------------------- |
| `Ctrl+S` / `Cmd+S` | Saves the current template or blueprint (equivalent to clicking **Save** or **Update**).                                                                      |
| `Esc`              | Closes the right **Data panel** first, then the **Data Hub** on the left. Only works when no dialog is open and your cursor is not in an editable text field. |

## Canvas shortcuts

These work when the canvas is focused.

| Shortcut                       | What it does                |
| ------------------------------ | --------------------------- |
| `Ctrl+Z` / `Cmd+Z`             | Undo the last change        |
| `Ctrl+Shift+Z` / `Cmd+Shift+Z` | Redo the last undone change |
| `Arrow Left`                   | Pan left                    |
| `Arrow Right`                  | Pan right                   |
| `Arrow Up`                     | Pan up                      |
| `Arrow Down`                   | Pan down                    |

## Zoom shortcuts

These shortcuts depend on **Single-Character Shortcuts** being enabled in **Settings**.

| Shortcut   | What it does                 |
| ---------- | ---------------------------- |
| `+` or `=` | Zoom in                      |
| `-` or `_` | Zoom out                     |
| `0`        | Fit or reset the canvas view |

Mouse wheel and trackpad gestures also work for zooming.

## Add Table panel navigation

When focus is inside the hierarchical **Add** Table list in Template Editor:

| Shortcut                  | What it does                             |
| ------------------------- | ---------------------------------------- |
| `Arrow Up` / `Arrow Down` | Move between rows                        |
| `Arrow Right`             | Expand a scope or related-list section   |
| `Arrow Left`              | Collapse a scope or related-list section |
| `Enter` / `Space`         | Activate the focused row or control      |

## Tutorial overlay navigation

When a tutorial is open:

| Shortcut                 | What it does           |
| ------------------------ | ---------------------- |
| `Arrow Right` or `Enter` | Next tutorial step     |
| `Arrow Left`             | Previous tutorial step |
| `Esc`                    | Close the tutorial     |
|                          |                        |

{% hint style="info" %}
**Practical tips**

* If `Ctrl+F` seems to do nothing, check whether the relevant panel is closed. The app often opens the correct panel first and then focuses the search field.
* If `+`, `-`, or `0` do not work, enable Single-Character Shortcuts in [Settings and Accessibility](/blueprints/personalize/settings).
* If undo or redo does not work, click the canvas first to make sure keyboard focus is on it.
  {% endhint %}


# ServiceNow Administration

Scoped. Governed. In-platform.

YouDesign Blueprints runs inside the customer's ServiceNow environment. This page covers what admins, platform owners, and security reviewers need to know about its runtime model, data stores, and access controls.

{% hint style="info" %}
This page is technical reference for administrators, platform owners, security reviewers, and governance leads. End-user role behavior lives on [Roles and Permissions](/blueprints/start-here/roles-and-permissions). Data residency and security review topics live on [Security and Data Handling](/blueprints/admin-and-governance/security-and-data-handling).
{% endhint %}

## What YouDesign Blueprints is

YouDesign Blueprints is a scoped ServiceNow application with the application scope `x_inpi_ydbp`.

It runs inside the customer's ServiceNow environment and uses ServiceNow-hosted UI and backend components for blueprint design, review, and the Commit workflow.

## Architecture at a glance

| Area                     | What it means in practice                                                                                                                                                   |
| ------------------------ | --------------------------------------------------------------------------------------------------------------------------------------------------------------------------- |
| **Application model**    | Scoped ServiceNow application under `x_inpi_ydbp`                                                                                                                           |
| **Frontend runtime**     | UI loaded inside the ServiceNow shell under the scoped route /x\_inpi\_ydbp\_app.do                                                                                         |
| **Backend runtime**      | Scoped Scripted REST APIs and platform server-side scripts running on the ServiceNow instance                                                                               |
| **Primary data stores**  | Scoped application tables such as `x_inpi_ydbp_templates`, `x_inpi_ydbp_blueprints`, `x_inpi_ydbp_blueprints_content`, and per-user settings in `x_inpi_ydbp_user_settings` |
| **Authentication model** | ServiceNow session-based access. The application uses the active user's session and platform token.                                                                         |
| **Authorization model**  | Role-based access. ACLs and platform controls also apply.                                                                                                                   |

## What admins should know about the runtime model

The application runs entirely inside ServiceNow:

* Users open the application through ServiceNow.
* The UI is served inside the ServiceNow shell.
* App APIs are called through scoped endpoints under `/api/x_inpi_ydbp/youdesign_blueprints/...`
* Blueprint and template records are stored in scoped ServiceNow tables.

In other words, the application runs entirely on the ServiceNow platform, no external services or separate hosting required.

## Main administration concerns

### Access and role assignment

The main runtime roles are:

| Role                                    | Purpose                                      |
| --------------------------------------- | -------------------------------------------- |
| `x_inpi_ydbp.blueprint_template_editor` | Configure templates and governance           |
| `x_inpi_ydbp.blueprint_editor`          | Create and edit blueprint content            |
| `x_inpi_ydbp.blueprint_commit`          | Review and commit approved blueprint changes |
| `x_inpi_ydbp.blueprint_viewer`          | Read-only access                             |

As with any ServiceNow application, role assignment should follow least-privilege principles.

### Data ownership and storage

The application stores:

* Template definitions
* Blueprint metadata
* Blueprint canvas content and layout
* Staged future-state and relationship work
* Per-user application preferences such as theme, language, accessibility settings, favorites, and sort preferences

### Platform governance

YouDesign Blueprints is not an external design tool that connects to ServiceNow. It is a scoped ServiceNow application with its own tables, endpoints, roles, and Commit workflow.

## Architecture and enterprise review

The application is designed with several boundary controls in place:

* Scoped app isolation through `x_inpi_ydbp`.
* Role-based access to creation, editing, viewing, and Commit workflows.
* In-platform persistence for templates, blueprints, and user settings.
* Separation between normal draft saving and explicit Commit actions.
* Backend-centric integration with ServiceNow data and metadata. The browser does not call external services directly.

These properties make the application easier to review for boundary control, access governance, and predictable behavior.

## Setting up scheduled audits (26.1)

{% hint style="success" %}
**New in 26.1.** See [Scheduled Audits](/blueprints/review-and-share/scheduled-audits) for what these features do.
{% endhint %}

Scheduled audits need tables and platform records that do not arrive with the application update. Until they exist, audits do not run and nothing else in the app is affected — each consumer checks whether its table is present and the hourly job logs what is missing.

Create them in this order. Each step is independently useful, so you can stop after any of them.

| Step | What                                                             | Why it matters                                                                                         |
| ---- | ---------------------------------------------------------------- | ------------------------------------------------------------------------------------------------------ |
| 1    | Table `x_inpi_ydbp_audit_snapshots`                              | Blocks the compliance trend and the summary report. Highest value, nothing depends on it               |
| 2    | Script Include `AuditSummaryReport`                              | The periodic report                                                                                    |
| 3    | Table `x_inpi_ydbp_audit_report_schedules`                       | When that report goes out, and to whom                                                                 |
| 4    | Notification columns on `x_inpi_ydbp_audit_configurations`       | Per-schedule notification switches                                                                     |
| 5    | Script Include `RemediationTarget`                               | Remediation record creation and validation                                                             |
| 6    | Table `x_inpi_ydbp_remediation_targets`                          | Where remediation work is written                                                                      |
| 7    | Routing columns on configurations and findings                   | Links a finding to the record raised for it                                                            |
| 8    | Business rule on remediation targets                             | Refuses a mapping that would fail at audit time                                                        |
| 9    | Cross-scope write access to your remediation table               | Without it, records are silently not created                                                           |
| 10   | Register the three notification events                           |                                                                                                        |
| 10b  | Column `rule_scope_query` on `x_inpi_ydbp_audit_rules`           | Per-rule **Applies to** scope. Without it the scope is discarded and every rule audits its whole table |
| 11   | Three Notification records                                       | The messages themselves. Set **Send when** to **Event is fired** on each                               |
| 12   | The hourly scheduled job                                         | Runs audits, sweeps resolutions, sends reports                                                         |
| 13   | Column `fallback_person` on `x_inpi_ydbp_audit_responsibilities` | A fallback can be a person as well as a group                                                          |

Column-by-column definitions, and the exact settings for each record, are in `ServiceNow/Tables/AUDIT_SETUP.md` in the application repository.

{% hint style="warning" %}
**Step 13 fails quietly if you skip it.** The endpoint accepts a fallback person and the audit runner reads one, so without the column the value is written to a field that does not exist, discarded, and gone when the form reloads — it looks like it saved. Add it as a Reference to `sys_user`, alongside the existing `fallback_group`:
{% endhint %}

| Column            | Type      | References | Label           |
| ----------------- | --------- | ---------- | --------------- |
| `fallback_person` | Reference | `sys_user` | Fallback person |

### Access control

Audit tables follow the same pattern as the rest of the application: read for `blueprint_editor`, and create, write and delete for `blueprint_template_editor`.

{% hint style="warning" %}
The endpoints refuse audit writes from anyone without the template-editor role, but that only stops the application offering the action. The ACLs are the boundary — a blueprint editor can otherwise reach the tables through the platform UI. Confirm write access on the audit tables is restricted to `blueprint_template_editor` before go-live.
{% endhint %}

ACL changes need the elevated `security_admin` role and can only be made from an interactive session. Note that an ACL update attempted over the REST API returns HTTP 200 with a failure body, so a script that checks only the status code will report success while changing nothing.

### Three traps worth knowing

**A notification with an event name but the wrong Send when produces nothing, and says nothing.** Setting the event name does not set **Send when**; a Notification created through the API keeps the default, **Record inserted or updated**. The event then fires, is marked processed, and no email is built — no outbox row, nothing failed, nothing ignored. Because the missing record looks like a sending problem, the time goes into SMTP accounts and the sender job, which are working. Set **Send when** to **Event is fired** on all three notifications, or check an existing instance with:

```bash
./scripts/repair-audit-notifications.sh --dry-run
```

Drop `--dry-run` to set it. Safe to run more than once.

**A scheduled job whose Run start is in the future never fires.** Set the first run to a time in the near past or the next few minutes.

**The report notification must branch on the no-runs flag.** Compliance figures arrive empty rather than zero when a period measured nothing, and a template that formats them as `0%` reports a collapse that did not happen.

## Domain separation (MSP)

All twelve application tables carry a `sys_domain` column, and each needs a **Set Domain** business rule to populate it. Without one, rows are written with an empty domain, and on a domain-separated instance an empty domain is visible across domains.

{% hint style="danger" %}
The six 26.1 audit tables shipped without this rule: `audit_report_schedules`, `audit_responsibilities`, `audit_rules`, `audit_runs`, `audit_snapshots` and `remediation_targets`. On an MSP instance that means every customer's findings and runs are visible to every other customer. Create the rules before enabling scheduled audits on a domain-separated instance.
{% endhint %}

The repository records all twelve rules and which exist, in `ServiceNow/BusinessRules/msp_set_domain_business_rules.json`. To create the missing ones:

```bash
./scripts/create-domain-business-rules.sh --dry-run
```

Drop `--dry-run` to create them. The script re-checks each table first, so it is safe to run more than once.

Each rule is a `before insert/update` rule gated on `gs.getProperty('glide.sys.domain.partitioning') == 'true'`, so on a single-domain instance it never runs. There is no reason to defer creating them until domain separation is switched on.

## Typical admin checklist

Before go-live or review sign-off, confirm:

* The required Blueprints roles are assigned to the correct user groups.
* The scoped application is installed and accessible through the intended ServiceNow entry points.
* The required tables, Scripted REST resources, and supporting backend scripts are available in the target instance.
* The intended users can save drafts, review compliance, and commit changes according to their assigned role.
* If scheduled audits are in use, the objects above exist, write access on the audit tables is restricted to `blueprint_template_editor`, and a test run produces findings and snapshots.
* A test run with notifications on produces one email per owner. Confirm this rather than assuming it, and confirm it before go-live: the failure mode is silence, which is indistinguishable from nothing having gone wrong.
* On a domain-separated instance, every application table has a Set Domain business rule. See [Domain separation (MSP)](#domain-separation-msp).

Make sure security and privacy reviewers have also read [Security and Data Handling](/blueprints/admin-and-governance/security-and-data-handling).

## What this page does not replace

This page is an overview. It does not replace:

* your ServiceNow role-governance process
* your instance-specific ACL review
* your change-management process
* your internal security approval workflow


# Security and Data Handling

Scoped. Contained. In-platform.

YouDesign Blueprints handles runtime data inside the customer's ServiceNow environment. This page is a plain-language summary for admins, security reviewers, and business stakeholders. Use it as a starting point for security review conversations. It does not replace a formal customer security review.

{% hint style="info" %}
This page summarizes runtime data behavior for security review conversations. For technical reference on architecture, identifiers, and role assignments, see ServiceNow Administration. For end-user role behavior, see [Roles and Permissions](/blueprints/start-here/roles-and-permissions).
{% endhint %}

{% hint style="info" %}

## Core position

YouDesign Blueprints operates inside the customer's ServiceNow environment as a scoped application. Blueprint data, template data, and user interactions stay inside the ServiceNow platform boundary.
{% endhint %}

## Data boundary summary

| Topic                            | What to expect                                                               |
| -------------------------------- | ---------------------------------------------------------------------------- |
| **Application runtime location** | Runs inside the customer's ServiceNow environment                            |
| **Primary application data**     | Stored in scoped ServiceNow tables under the application's scope.            |
| **Normal API calls**             | Sent to ServiceNow scoped endpoints for the application                      |
| **External product analytics**   | Not used. The application does not send analytics data to external services. |
| **AI runtime features**          | Not used. The application does not call external AI services.                |

## What the application stores

The application stores product data needed to support its workflows, including:

* Template definitions.
* Blueprint records and metadata.
* Blueprint canvas layout and content.
* Staged future-state content and relationship changes.
* Per-user settings and preferences.

## What user preferences are stored

The application stores preferences so each user gets a consistent experience across sessions.

Examples include:

* Theme.
* Language.
* Accessibility settings.
* Grid settings.
* Tutorial preference.
* Favorite templates and favorite order.
* Sorting preferences in **Home**, the **Blueprint Editor**, **Template Editor**, and **Auditor**.

These preferences make the application usable and consistent across sessions. They are not analytics or behavior tracking.

## Tracking and behavior monitoring

The application does not send user-behavior analytics or tracking events to external services.

In plain language:

* The application does not include analytics or usage-tracking features.
* Stored settings (theme, language, etc.) make the application usable and consistent across sessions.
* These are user preferences, not behavioral tracking.

## AI and token usage

YouDesign Blueprints does not include AI assistance features or call external LLM services.

That means:

* The application has no AI support workflow.
* It does not consume AI tokens.
* Using the application does not send blueprint content to external AI services.

## Data access by ins-pi

The application does not transmit customer blueprint content or source records to ins-pi systems. The application runs entirely within the customer's ServiceNow environment.

## Audit logging and data retention

Audit logging, data retention, and account deactivation use standard ServiceNow platform behavior for scoped applications. Your ServiceNow instance may add organization-specific retention or audit policies.

## What security reviewers usually want to hear

For stakeholder and review discussions, the most important points are:

* The application is a scoped ServiceNow application.
* The normal runtime stays inside the ServiceNow platform boundary.
* Application data is persisted in scoped ServiceNow tables.
* User settings are stored to support the experience, not to run analytics.
* The application does not include AI assistance features or consume AI tokens.

## Review note

If your organization requires a formal security or privacy statement, use this page as a starting summary. Pair it with your own ServiceNow platform review, role review, and instance-specific governance process.


# Glossary

Plain-language definitions. Cross-referenced to the screens.

This glossary covers the terms used across YouDesign Blueprints, what each means, and where you'll see it in the app.

{% hint style="info" %}
This page defines product-specific terminology. For ServiceNow platform terminology like scopes and ACLs, see ServiceNow Administration. For role names and what each role can do, see Roles and Permissions.
{% endhint %}

| Term                           | Plain-language meaning                                                                                                                                                                                                  | Where you see it                                                                                                                                                                            |
| ------------------------------ | ----------------------------------------------------------------------------------------------------------------------------------------------------------------------------------------------------------------------- | ------------------------------------------------------------------------------------------------------------------------------------------------------------------------------------------- |
| **Access restricted**          | A display state used in viewer-restricted sessions where technical identifiers that should not be exposed appear as "Access restricted" instead of raw system values.                                                   | Presenter Mode (see [Presenter Mode and Sharing](/blueprints/review-and-share/presenting))                                                                                                  |
| **Add record**                 | The action of placing a record from the Data Hub onto the canvas as a blueprint record.                                                                                                                                 | Blueprint Editor (see [Blueprints](/blueprints/work-in-the-app/blueprints))                                                                                                                 |
| **Add Table panel**            | The left-side panel in Template Editor where you search for ServiceNow tables and add them to the template canvas.                                                                                                      | Template Editor                                                                                                                                                                             |
| **ACL**                        | An access control list defined at the ServiceNow platform level that determines whether a user can read, create, update, or delete a record. The application respects ACLs throughout its workflows.                    | ServiceNow Administration, Security and Data Handling                                                                                                                                       |
| **Audit run**                  | One execution of a scheduled audit against one Blueprint Template. Records what it evaluated, what passed and failed, and when. Introduced in 26.1.                                                                     | Reviews (see [Reviews](/blueprints/review-and-share/reviews))                                                                                                                               |
| **Auditor**                    | A dedicated review workspace where you select records and check them against the relationship rules defined by a template.                                                                                              | Home, Auditor (see [Compliance and Auditor](/blueprints/review-and-share/compliance))                                                                                                       |
| **Audit List**                 | The list of records you have added to Auditor for review.                                                                                                                                                               | Auditor                                                                                                                                                                                     |
| **Audit status**               | The state of an record being reviewed in Auditor, for example pending, in progress, or reviewed.                                                                                                                        | Auditor (see [Compliance and Auditor](/blueprints/review-and-share/compliance))                                                                                                             |
| **Avatar menu**                | The menu accessed from your avatar in the main header. Contains Settings, role information, and sign-out.                                                                                                               | Home (see [Home and Search](/blueprints/work-in-the-app/home))                                                                                                                              |
| **Blueprint**                  | A working instance created from a template. It contains selected records, future-state work, layout, metadata, and compliance context.                                                                                  | Home, Blueprint Editor, Presenter Mode (see [Blueprints](/blueprints/work-in-the-app/blueprints))                                                                                           |
| **Blueprint Committer**        | A user with the role required to commit approved blueprint changes back to ServiceNow. Sees the editor experience by default.                                                                                           | Roles and Permissions, Blueprint Editor (see [Roles and Permissions](/blueprints/start-here/roles-and-permissions))                                                                         |
| **Blueprint draft**            | The unsaved working state of a blueprint before changes are committed back to ServiceNow.                                                                                                                               | Blueprint Editor (see [Blueprints](/blueprints/work-in-the-app/blueprints))                                                                                                                 |
| **Blueprint Editor**           | The screen where you build and maintain a blueprint.                                                                                                                                                                    | Home, editor route (see [Blueprints](/blueprints/work-in-the-app/blueprints))                                                                                                               |
| **Blueprint Template Editor**  | A user with the role required to configure templates and the rules that future blueprints follow.                                                                                                                       | Roles and Permissions, Template Editor (see [Roles and Permissions](/blueprints/start-here/roles-and-permissions))                                                                          |
| **Blueprint Viewer**           | A read-only user who lands in Presenter Mode by default and cannot edit blueprint or template content.                                                                                                                  | Roles and Permissions, Presenter Mode (see [Roles and Permissions](/blueprints/start-here/roles-and-permissions))                                                                           |
| **Canvas**                     | The central visual workspace where table cards, records, and relationships are shown.                                                                                                                                   | Template Editor, Blueprint Editor, Presenter Mode                                                                                                                                           |
| **Cardinality**                | In Blueprints, this means the minimum and maximum count for records or relationships.                                                                                                                                   | Templates, Compliance, Data panel                                                                                                                                                           |
| **CMDB**                       | The Configuration Management Database in ServiceNow. Many blueprint records come from CMDB tables such as `cmdb_ci_business_app`.                                                                                       | Blueprint Editor (see [Compliance and Auditor](/blueprints/review-and-share/compliance))                                                                                                    |
| **Commit**                     | The action that publishes approved blueprint changes back to ServiceNow. It is different from normal saving.                                                                                                            | Blueprint Editor, Home actions (see [Blueprints](/blueprints/work-in-the-app/blueprints))                                                                                                   |
| **Commit Summary**             | The dialog that lists all unpublished changes to be committed back to ServiceNow, with details about what will be created, updated, or removed.                                                                         | Blueprint Editor (see [Blueprints](/blueprints/work-in-the-app/blueprints))                                                                                                                 |
| **Compliance**                 | The measure of whether a blueprint currently satisfies the rules defined by its template.                                                                                                                               | Home, Blueprint Editor, Compliance Details (see [Compliance and Auditor](/blueprints/review-and-share/compliance))                                                                          |
| **Compliance Details**         | The dialog that shows the full compliance breakdown for a blueprint, including which rules pass and which fail.                                                                                                         | Blueprint Editor (see [Compliance and Auditor](/blueprints/review-and-share/compliance))                                                                                                    |
| **Compliance Overview**        | A high-level summary of compliance state used to navigate from a blueprint into the detailed compliance dialog.                                                                                                         | Blueprint Editor (see [Compliance and Auditor](/blueprints/review-and-share/compliance))                                                                                                    |
| **Compliance rate**            | Share of checks that passed, weighted by how many records each rule evaluated. Never an average of rule rates, because a rule covering 40 records must not outweigh one covering 200,000. Introduced in 26.1.           | Reviews Dashboard (see [Reviews](/blueprints/review-and-share/reviews))                                                                                                                     |
| **Compliance score**           | A numeric or visual indicator of how closely a blueprint follows its template. Updated live as you work.                                                                                                                | Blueprint Editor, Home (see [Compliance and Auditor](/blueprints/review-and-share/compliance))                                                                                              |
| **Current state**              | Content that already exists in ServiceNow today.                                                                                                                                                                        | Blueprint content, planning discussions                                                                                                                                                     |
| **Data Hub**                   | The left-side source panel in Blueprint Editor and Auditor where users search and add records from the tables defined by the template.                                                                                  | Blueprint Editor, Auditor (see [Blueprints](/blueprints/work-in-the-app/blueprints))                                                                                                        |
| **Data panel**                 | The right-side panel used to review metadata, fields, filters, rules, and relationships.                                                                                                                                | Template Editor, Blueprint Editor (see [Blueprints](/blueprints/work-in-the-app/blueprints))                                                                                                |
| **Edit (action)**              | The action that switches from Presenter Mode back into the Blueprint Editor. Available to roles that can edit.                                                                                                          | Presenter Mode (see [Presenter Mode and Sharing](/blueprints/review-and-share/presenting))                                                                                                  |
| **Record**                     | One ServiceNow record placed onto a blueprint's canvas, such as a business process or a business application. Called an **Element** before 26.1; the wording changed, the thing did not.                                | Blueprint Editor, Presenter Mode, Auditor (see [Records and](/blueprints/work-in-the-app/records-and-relationships) [Relationships](/blueprints/work-in-the-app/records-and-relationships)) |
| **Fallback group**             | The group that takes findings on records naming no owner, instead of those findings reaching nobody. Introduced in 26.1.                                                                                                | Scheduled Audits (see [Scheduled Audits](/blueprints/review-and-share/scheduled-audits))                                                                                                    |
| **Favorite template**          | A template marked with a star so it stays easier to find and can appear first in template lists.                                                                                                                        | Home, template chooser                                                                                                                                                                      |
| **Field issue counts**         | A per-record indicator showing how many required fields are missing or invalid.                                                                                                                                         | Blueprint Editor (see [Compliance and Auditor](/blueprints/review-and-share/compliance))                                                                                                    |
| **Field requirement**          | A field marked as required in the template, used to focus editing and compliance on the most important data.                                                                                                            | Templates, Blueprint record details                                                                                                                                                         |
| **Filter**                     | A template-defined rule that narrows which ServiceNow records appear for a table in the blueprint.                                                                                                                      | Templates, Data Hub                                                                                                                                                                         |
| **Finding**                    | One data problem on one record, found by one rule. Reopens if a later audit still finds it, and closes when the data is fixed. Introduced in 26.1.                                                                      | Reviews Findings (see [Reviews](/blueprints/review-and-share/reviews))                                                                                                                      |
| **Future state**               | Planned content that does not exist in ServiceNow yet but should be represented in the blueprint draft.                                                                                                                 | Blueprint Editor, compliance review                                                                                                                                                         |
| **Header compliance score**    | The compliance score shown in the Blueprint Editor header. Reflects the current state of the whole blueprint.                                                                                                           | Blueprint Editor (see [Compliance and Auditor](/blueprints/review-and-share/compliance))                                                                                                    |
| **Home**                       | The app landing page where you search, create, open, manage, and review templates and blueprints.                                                                                                                       | Default landing page (see [Home and Search](/blueprints/work-in-the-app/home))                                                                                                              |
| **Live compliance**            | The principle that compliance is computed continuously as the blueprint changes, rather than on a saved snapshot.                                                                                                       | Blueprint Editor (see [Compliance and Auditor](/blueprints/review-and-share/compliance))                                                                                                    |
| **Manage Templates**           | The administrative view for creating, editing, archiving, and organizing templates.                                                                                                                                     | Home (see [Templates](/blueprints/work-in-the-app/templates))                                                                                                                               |
| **Owner field**                | The field on an audited table that names who owns each record, such as `managed_by` or `support_group`. A finding reaches that record's owner rather than one nominated person for the whole table. Introduced in 26.1. | Scheduled Audits (see [Scheduled Audits](/blueprints/review-and-share/scheduled-audits))                                                                                                    |
| **Per-user setting**           | A preference stored against a single user. Doesn't affect what other users see.                                                                                                                                         | (see [Settings and Accessibility](/blueprints/personalize/settings))                                                                                                                        |
| **Presenter Mode**             | The read-only view of a blueprint used for presentations and stakeholder reviews.                                                                                                                                       | Home action, shared/view-only sessions (see [Presenter Mode and Sharing](/blueprints/review-and-share/presenting))                                                                          |
| **Reduce Motion**              | An accessibility setting that minimizes UI animation, including the icon animation used in some buttons. Available in Settings.                                                                                         | Settings and Accessibility, Presenter Mode                                                                                                                                                  |
| **Related list**               | A ServiceNow relationship surface that connects records through list-based context rather than a standard CMDB-style relationship definition.                                                                           | Templates, relationship suggestions                                                                                                                                                         |
| **Relationship**               | The connection between two records or two tables in a blueprint.                                                                                                                                                        | Canvas, Data panel, Compliance (see [Records and Relationships](/blueprints/work-in-the-app/records-and-relationships))                                                                     |
| **Relationship issue counts**  | A per-record indicator showing how many required or expected relationships are missing or invalid.                                                                                                                      | Blueprint Editor (see [Compliance and Auditor](/blueprints/review-and-share/compliance))                                                                                                    |
| **Relationship type**          | The business label for a relationship, such as "is supported by" or "is realized by", together with the rule that controls how it can be used.                                                                          | Templates, Relationships tab                                                                                                                                                                |
| **Remediation record**         | A record raised in a table you already use, carrying the finding's context so the work sits in your normal queue. Blueprints does not ship its own task table. Introduced in 26.1.                                      | Scheduled Audits (see [Scheduled Audits](/blueprints/review-and-share/scheduled-audits))                                                                                                    |
| **Remediation target**         | The configuration naming which table remediation records go into, how finding context maps onto its fields, and which of its states count as resolved. Introduced in 26.1.                                              | Scheduled Audits (see [Scheduled Audits](/blueprints/review-and-share/scheduled-audits))                                                                                                    |
| **Rule**                       | A condition defined by the template. Rules can apply to table counts, fields, filters, or relationships.                                                                                                                | Templates, Compliance, Auditor                                                                                                                                                              |
| **Save / Update**              | The action that stores current template or blueprint work in the app without running the separate commit workflow.                                                                                                      | Template Editor, Blueprint Editor (see [Blueprints](/blueprints/work-in-the-app/blueprints))                                                                                                |
| **Schedule**                   | When an audit runs, which templates it covers, who fixes what it finds, and who is informed. Introduced in 26.1.                                                                                                        | Reviews Schedules (see [Scheduled Audits](/blueprints/review-and-share/scheduled-audits))                                                                                                   |
| **Scope (ServiceNow)**         | The boundary of a ServiceNow application that contains its tables, roles, ACLs, and APIs. YouDesign Blueprints lives in the `x_inpi_ydbp` scope.                                                                        | (see [ServiceNow Administration](/blueprints/admin-and-governance/servicenow-admin-guide))                                                                                                  |
| **ServiceNow table**           | The source table from which blueprint records are loaded, such as `cmdb_ci_business_app`.                                                                                                                               | Templates, Data Hub, glossary discussions                                                                                                                                                   |
| **Single-Character Shortcuts** | A toggle in Settings that enables the canvas zoom shortcuts (`+`, `-`, `0`). Off by default.                                                                                                                            | Settings and Accessibility, Keyboard Shortcuts (see [Settings and Accessibility](/blueprints/personalize/settings))                                                                         |
| **Snap to grid**               | A canvas behavior that aligns table cards to fixed grid positions. Toggleable in Settings.                                                                                                                              | Blueprint Editor, Template Editor (see [Settings and Accessibility](/blueprints/personalize/settings))                                                                                      |
| **Snapshot**                   | An immutable record of what one rule measured in one run. Trends are built from snapshots, so history survives deleting a run. Introduced in 26.1.                                                                      | Reviews Dashboard (see [Reviews](/blueprints/review-and-share/reviews))                                                                                                                     |
| **Status**                     | The lifecycle state of a blueprint, such as Draft, Review, Active, Obsolete, or Archived.                                                                                                                               | Home cards, blueprint details                                                                                                                                                               |
| **Table card**                 | The visual card on the canvas that represents one table and contains the records currently placed there.                                                                                                                | Template Editor, Blueprint Editor, Presenter Mode                                                                                                                                           |
| **Table-level status**         | The overall pass/fail/warning state for a single table inside a blueprint, based on its rules.                                                                                                                          | Blueprint Editor (see [Compliance and Auditor](/blueprints/review-and-share/compliance))                                                                                                    |
| **Target date**                | An optional date on a blueprint used to communicate a goal, milestone, or planned completion point.                                                                                                                     | Blueprint details                                                                                                                                                                           |
| **Template**                   | A reusable definition that tells the app which tables, fields, filters, and relationships a blueprint should use.                                                                                                       | Home, Template Editor, blueprint creation (see [Templates](/blueprints/work-in-the-app/templates))                                                                                          |
| **Template category**          | The grouping label used to organize templates on Home and in the template chooser.                                                                                                                                      | Home, Manage Templates                                                                                                                                                                      |
| **Template Editor**            | The screen where a Template Editor configures the structure and rules used by future blueprints.                                                                                                                        | Home, editor route (see [Templates](/blueprints/work-in-the-app/templates))                                                                                                                 |
| **Theme**                      | The light or dark color scheme used by the application. Set per user.                                                                                                                                                   | (see [Settings and Accessibility](/blueprints/personalize/settings))                                                                                                                        |
| **Tutorial**                   | An in-app overlay that walks new users through the main flows. Can be re-enabled in Settings via the tutorial preference.                                                                                               | Settings and Accessibility, Keyboard Shortcuts (see [Settings and Accessibility](/blueprints/personalize/settings))                                                                         |
| **Unassigned finding**         | A finding whose record names no owner and whose table has no fallback person or group. Shown, never hidden: it is a data gap the audit has surfaced. Introduced in 26.1.                                                | Reviews (see [Reviews](/blueprints/review-and-share/reviews))                                                                                                                               |
| **Unpublished changes**        | Changes that exist in the blueprint draft but have not yet been committed back to ServiceNow.                                                                                                                           | Home cards, Blueprint Editor, Commit Summary                                                                                                                                                |


# Welcome

Welcome to the official documentation for **YouDesign Models**, an innovative enterprise transformation solution natively built on the ServiceNow® platform by [ins-pi](https://ins-pi.com).

## What is YouDesign Models?

YouDesign Models empowers enterprises to drive transformation with unprecedented clarity and efficiency. As a native ServiceNow application, it enables seamless collaboration across teams, offering dynamic visualizations, models, and diagrams to simplify complex planning, execution, and decision-making processes—all without leaving the ServiceNow ecosystem.

### Key Capabilities

* **Visual Collaboration**: Create interactive boards with shapes, relationships, and visualizations
* **Enterprise Data Integration**: Work directly with ServiceNow data and custom tables
* **Real-time Insights**: Transform complex interdependencies into clear, actionable diagrams
* **Seamless Integration**: 100% built on ServiceNow—no external integrations required
* **Enterprise-Ready**: Designed for governance, compliance, and at-scale operations

## Quick Navigation

### Getting Started

* [About YouDesign Models](broken://pages/92rQoA83a2qL0yr6UbrH) – Understand the core product
* [Native ServiceNow Integration](/models/reference/native-integration) – Why YouDesign Models is built on ServiceNow
* [Product Architecture](/models/reference/architecture) – Technical overview

### Using YouDesign Models

* [Features Overview](/models/work-in-the-app/features) – Explore all capabilities
* [User Interface Guide](/models/work-in-the-app/user-interface) – Learn the interface
* [Editor & Shapes](/models/work-in-the-app/editor) – Master the visual editor

### Administration & Setup

* [Getting Started](broken://pages/lPhZ58eZctCSYt4kYFis) – Installation and setup
* [Configuration](broken://pages/O78jpuPUvnh4OUUgIO6O) – Customize for your organization
* [Access Rights & Roles](/models/admin/access-rights-and-roles) – Manage permissions

### Real-World Applications

* [Use Cases](/models/use-cases/use-cases) – Discover how YouDesign Models solves business challenges

## Version Information

**Current Version**: v26

YouDesign Models is designed to align seamlessly with the ServiceNow product roadmap, ensuring compatibility with all recent releases and supported versions of ServiceNow.

> **Tip:** Check the [Product Roadmap](/models/get-the-app/roadmap) to see upcoming features and supported versions.

## About ins-pi

At [ins-pi](https://ins-pi.com), we are partners in enterprise transformation. We're dedicated to simplifying the complexities of change management through innovative solutions. YouDesign Models makes your transformation journey smoother, more insightful, and more successful.

***

**Ready to dive in?** Start with [About YouDesign Models](broken://pages/92rQoA83a2qL0yr6UbrH) or explore specific features using the navigation menu.


# Release Notes

A complete history of YouDesign Models releases. Click any version to expand and view the full release notes.

{% hint style="info" %}
**YouDesign is now YouDesign Models.** As of v26.0, we have renamed the product to better reflect what it does and the broader YouDesign product family it belongs to. Older releases below refer to the product as "YouDesign" — this is the same application.
{% endhint %}

<details>

<summary><strong>Version 26.0</strong></summary>

This is our biggest release to date, and it marks a turning point for the product.

With v26.0 we are **rebranding to YouDesign Models** — a clearer name that reflects what the tool does and the broader product family it now belongs to. Alongside the new identity, this release introduces the **AI Assistant**, a new **Settings page** with personal preferences, language selection, and accessibility options, major advances in **Related Lists** (many-to-many support and Realtime Indicators on related lists), a new **Export Whole Canvas** option, substantial **accessibility and WCAG-compliance work**, a refreshed color system, and improvements across every area of the product.

We have also switched to a new, date-based versioning scheme — **26.0** (year.release). Future releases in 2026 will follow as 26.1, 26.2, and so on.

<figure><img src="/files/kgONEEhF5q28p0vEhcE1" alt=""><figcaption></figcaption></figure>

**New Features**

* **YouDesign is now YouDesign Models.** As part of the v3.0 rebranding initiative, all user-facing labels, titles, configuration strings, and internal references have been renamed across the application and its supporting tooling.

* **AI Assistant.** Meet the **AI Assistant** — a new way to work with diagrams in YouDesign Models. Describe what you want in plain language or drop in an image, and the Assistant turns it into diagram content you can refine on the canvas.

  The Assistant also helps you work with what's already there:

  * **Organize your boards** — cluster elements by keyword to surface structure in existing diagrams.
  * **Polish your text** — fix grammar and spelling, shorten, rewrite for clarity, change tone, or translate.

  It's **privacy-aware by design**: the AI Assistant runs inside your ServiceNow instance, keeping your data within the boundaries of your environment.

  This is the first iteration, with more capabilities landing in upcoming releases.

* **Settings page — Preferences, Global Settings, and Accessibility.** A new Settings page is accessible from the hamburger menu (☰) next to the YouDesign Models logo in the top-left corner. The **Preferences** tab lets every user:
  * Switch the interface **language** from a dropdown covering 10 languages, with the change taking effect immediately and persisting across sessions.
  * Toggle **editor defaults** — Snap to Grid, Show Grid, and Guided Dragging.
  * **Reset preferences** to defaults via a new dedicated action.
  * **Clear cache** to remove locally stored data (IndexedDB, localStorage) when needed.
  * **Global Settings** — available to YouDesign Admins for managing application-wide configuration.
  * **Accessibility options.**

<figure><img src="/files/SxVTeS1m9vj3t7fzRVyx" alt=""><figcaption></figcaption></figure>

* **Related Lists — Many-to-Many (m2m) support in Load Dependencies.** Load Dependencies now automatically detects and correctly handles m2m related lists by default. The detection can be turned off if you prefer the previous behaviour.

<figure><img src="/files/YcEcumyouPyBfwmrrnN2" alt=""><figcaption></figcaption></figure>

* **Realtime Indicators on Related Lists.** Realtime Indicators can now be configured on related-list relationships, giving the same visual, data-driven insights on canvas that Realtime Indicators already provide elsewhere in the product.

<figure><img src="/files/x73ab0WQ9OSkLrvhum6e" alt=""><figcaption></figcaption></figure>

* **Export Whole Canvas.** A new **Whole Canvas** option in the Export menu complements the existing board and frame export flows, letting you capture the entire canvas content in a single export.

<figure><img src="/files/B0KoqyIX8hbn7PTqM1Qd" alt=""><figcaption></figcaption></figure>

* **Board Versioning — Stage Management.** You can now change the stage/status of a board version directly, with a redesigned version button showing stage-aware colors and a compact badge.

<figure><img src="/files/wwUJhV5iuo2y7IGWsWIV" alt=""><figcaption></figcaption></figure>

**Improvements — Branding, theming, and look & feel**

* Restructured color palette aligned with the YouDesign Models color system and **WCAG contrast compliance** across the application.
* Shape alignment helper lines updated for WCAG compliance.
* New icons, logos, and many other visual updates.

**Improvements — Usability**

* **Hamburger menu** added to editor mode, giving quick access to Settings and navigation.
* **Hierarchy Map:** styles can now be applied to Hierarchy Map Containers in the same way as to nodes.

<figure><img src="/files/p5BqYl1KdG7bkqgM8B1G" alt=""><figcaption></figcaption></figure>

* **HOP:** option to re-use existing elements (and their relationships) when expanding, reducing duplication on the canvas.

<figure><img src="/files/3Y0cSfMOfAT7DMAJVNr3" alt=""><figcaption></figcaption></figure>

* **Board Search:**
  * Added selection checkboxes to search results, enabling bulk selection directly from the search panel.
  * Added a collapse/expand option for Board Search result sections.

<figure><img src="/files/lDbayJMn5tVJV97bxiUY" alt=""><figcaption></figcaption></figure>

* **Data Panel:**
  * On-click loading for reference fields, reducing unnecessary upfront data fetches.
  * Table labels now appear in the field label when duplicate field labels would otherwise be ambiguous.
* **Text Area:** auto-resizes on typing and font-size changes, with a defined maximum size to avoid runaway growth.
* **Filters on selected objects:** new ability to filter based on the current selection.

<figure><img src="/files/8N765OnOYfMlOgwr0LYe" alt=""><figcaption></figcaption></figure>

* **AvoidNodes tooltip** now shows a clearer, more helpful message.
* **Shortcut:** added **Cmd/Ctrl+B** and **Cmd/Ctrl+I** for bold and italic in text editing.
* **Multiselection adornment** is now **draggable** — you can move a multi-selection by its adornment handle.
* **Link circles** are no longer shown when elements are multiselected, reducing visual noise.
* **PRESENT / EDIT buttons** unified across editor, presenter, and home page for consistent styling.
* **Start page:** board count display, improved spacing, and a new teamspace button.

**Improvements — Performance and stability**

* Filters and Board reviewed and optimised from a backend perspective.
* App loading performance greatly improved.

**Improvements — Data Panel, Explorer & Board Search**

* Explorer DataGrid restyled with proper headers, borders, status badges, and action icons.
* Explorer optimised for performance.
* Search and filter UI refactored with consistent button styling and improved component integration.

**Fixes — Hierarchy Map**

* Fixed an issue where **Duplicate** created an empty visualization.
* Fixed hidden elements being selectable on the canvas when their container was collapsed.
* Fixed the HM context not being reset after deleting the last element.
* Fixed **Column settings** not being applied for the HM Layout Type.
* Fixed an issue where users could not move elements freely when **auto-layout was off**.

**Fixes — Roadmap**

* Fixed Roadmap becoming hidden under a Frame after copy.
* Fixed the Roadmap toolbar appearing when selecting items outside the Roadmap.
* Fixed date changes not working when typing directly (without the datepicker).

**Fixes — Relationships & Related Lists**

* Fixed link labels appearing behind other links.
* Fixed missing placeholder label on Tag fields in Relationship fields.
* Fixed custom routing being reverted after relationship publication or after collapsing/expanding a container.
* Fixed Suggested Link Styles showing **undefined** display names when selecting a CI relationship.
* Fixed relationships jumping away from nodes after an Undo following Reset Styles.
* Fixed straight relationships creating unintended angles during connector adjustment.

**Fixes — Layers**

* Added validation for maximum length (250 characters) when renaming a layer.
* Fixed missing scroll in the Layers panel when the layer list exceeded panel height.
* Fixed a horizontal scroll appearing in the Layers Panel after minimizing.
* Fixed a pill for elements from a hidden layer being visible in the search modal.
* Fixed **Move to Layer** being hidden instead of disabled when no other layers existed.

**Fixes — Realtime Indicators**

* Fixed Realtime Indicator values remaining greyed out in the panel even when data was present and visible on canvas.
* Fixed vertical alignment options not working inside a Group.

**Fixes — Data Panel**

* Fixed the **Publish** button not being visible in Data Panel on Safari.
* Fixed planning not working on Data Panel for Visual shapes after a table was assigned.
* Fixed the Publish button remaining available for an already published relationship.
* Fixed duplicate endpoint requests when opening the Data Panel.

**Fixes — Explorer**

* Fixed the **Reject** button being available for users with only planning permissions.

**Fixes — Homepage, Board Search, and navigation**

* Board Search now remembers the last state of search/filter.
* Board Search now correctly searches custom shapes.
* After deleting a teamspace, the page now redirects and the URL no longer contains the deleted teamspace's ID.
* Fixed teamspaces auto-expanding after a deletion.
* Fixed the Organization dropdown not being sorted alphabetically in the Organization modal.
* Fixed an infinite API request loop when a non-existing teamspace ID was provided in the URL.

**Fixes — Shapes, frames, and canvas**

* Fixed Text Block not being addable to the diagram in some scenarios.
* Fixed Table and Element fields being empty for shapes without a table definition.
* Fixed the shape input area becoming too large in edit mode.
* Fixed a copied link not centering on the selected shape.
* Fixed accessibility tooltip issues on the Shape toolbar.
* Fixed text in the Text Area shape not being aligned according to default alignment settings.
* Fixed the **More** menu being unopenable when the entire Table panel was selected.
* Fixed multi-select bounding box glitches and size changes while dragging shapes.
* Fixed text alignment resetting to center while editing.
* Fixed container name truncation when changing alignment (right → left).
* Fixed a rare rendering issue affecting certain group-type nodes *(previously delivered as a v2.3 hotfix)*.
* **Frames:**
  * Fixed multiple selected frames not being movable by one of them.
  * Fixed duplicated frames being placed outside the viewport.
  * Fixed frame size resetting after refresh.

**Fixes — Export**

* Fixed the board being cut in exported images via the Generate-and-Attach link.

**Fixes — Context Map**

* Fixed locked Context Map showing all toolbar actions.
* Fixed Context Map becoming corrupted when adding a single element after reset.
* Fixed Context Map size not updating when decreasing levels.
* Fixed elements being movable to another layer in a Context Map.

**Fixes — Filters**

* Fixed filtering on References not working with the **CONTAINS** qualifier in the YD Data Hub.

**Fixes — Publish & access**

* Fixed List-type fields showing a red border and disabling Publish after some tags were added.
* Fixed the **Publish** button no longer highlighting after an update.
* Fixed elements not being publishable when the **Life Cycle Stage Status** field has a value.

**Fixes — BPMN / Swimlanes**

* Fixed an issue where adding a new lane from a collapsed lane created a lane with collapsed height but an expanded-state icon.

**Fixes — General**

* Fixed being unable to select elements with lasso-select inside a Container or Lane.
* Fixed board contents not being deleted when a board version was deleted.
* Fixed the text editor being misaligned in some scenarios.
* Fixed the "Is Group" checkbox being incorrectly checked when copying a record.
* Fixed the Replacement feature not working properly on logos.
* Fixed **max-length validation** showing "Board description" message for the Notes field.
* Fixed **distribution direction mapping** and improved alignment/distribution behaviour.
* Fixed **Visualizations** issues with Kanban (layout corruption after Option+Click copy of a multi-selection or dragging Frame + Kanban).
* Fixed present-mode hidden buttons still being clickable.
* Fixed toolbar/rotate buttons blinking during Undo/Redo with multi-selected objects.
* Fixed unable to undo when a level-one element had been deleted.

*Thanks for being part of this milestone with us — there's much more coming in 26.1 and beyond.*

</details>

<details>

<summary><strong>Version 2.3</strong></summary>

This release brings major enhancements to YouDesign, introducing powerful new features like Layers, expanded export options, and the new YouDesign Workspace. Alongside these capabilities, we've improved performance, refined the user experience across multiple areas, and resolved several issues to ensure a smoother, more reliable design and modeling experience.

**New Features**

* **Hierarchy Map type nodes:** Nodes can now be displayed in Compact, Text-Only, or Traditional type for cleaner visualization.

  ![Hierarchy Map type nodes](/files/c8799af940c5c60989f6db9c333477478de63c75)
* **Layers:** New Layer functionality allows organizing, hiding, locking, and managing complex diagrams more efficiently.

  ![Layers](/files/80052f4155e0df02020f049f048d09d8885abf3c)
* **Export functionality:** New export options simplify the migration of YouDesign content between instances.

  ![Board export](/files/9ca99357b91cd38b85f642857e3182d2df0307c1)

  ![Bulk export](/files/62431c9f73472edf23b84c333ce6063632da8ded)
* **YouDesign Workspace:** A centralized workspace offering an overview of YouDesign usage and quick access to configuration tables, exports, and other tools.
* Support for **YouDesign content `.json` files** into canvas, to quickly create predefined content.

**Improvements**

* **Helper Dialog redesign:** Updated layout with improved shortcuts and helpful links.

  ![Helper Dialog redesign](/files/590bdb5a95e0bdd4afae1866c38a9f1c3e9c6b71)
* **Performance improvements** for:
  * Homepage loading of Teamspaces, folders, and boards.
  * Creating, updating, and deleting board content.
* **Persistent links:** Links now remain stable even after changing the link path.
* **Core libraries** updated to newer versions.
* **Filters:**
  * Added support for Tags.
  * Added support for Reference Qualifiers.
* **Data Panel:**
  * Links can now be removed from current-state elements and restored when needed.
  * Added support for Reference Qualifiers.
* **Hierarchy Map:** Filters are now independent from Data Hub filters, allowing each instance of the Hierarchy Map to maintain its own filters.
* **Shape Form:** Added an "Insert with Preview and Stay" option to assist with cloning shapes while keeping the preview visible.
* **Board Form:** Added a new UI Action for quick board access.
* **UI improvements:** Updated top-right controls in Edit and Presenter modes.
* **Cleaner linking:** Removed unnecessary indicators when connecting links to target nodes.
* **Improved link stability** across multiple scenarios.
* **YouDesign BPM 1.1:** Lanes and pools now support expand/collapse behavior.
* **Improved node text editor** for better usability.

**Fixes**

* Fixed missing records in the AWS and Azure shape libraries.
* **Homepage:** Fixed missing result count when filters were applied.
* **YouDesign BPM 1.1:**
  * Resolved issues related to BPMN swimlanes.
  * Fixed a definition issue where two default link styles appeared between some shapes.
* Fixed an issue where boolean fields in the Data Panel were not handled correctly.
* Fixed cases where link preview did not match the final created link.
* Fixed issues where resetting link styles did not work for certain style properties.
* Fixed an issue preventing YouDesign Admin users from accessing YouDesign Global Settings.
* Corrected sorting issues affecting Indicator fields.
* Fixed an incomplete rendering behavior in Context Map.
* Resolved inconsistencies where links would slightly shift under certain scenarios.

</details>

<details>

<summary><strong>Version 2.2.1</strong></summary>

The patch improves the performance and stability of YouDesign. It enhances the Explorer tab and fixes issues with template insertion, relationship handling, board centering, and duplicated relationships in the Explorer.

For the full details of the minor release, see the **Version 2.2 Release Notes** below.

**Improvements**

* Improved performance of the Explorer tab for smoother navigation and faster load times.

**Fixes**

* Fixed an issue where templates containing grouped shapes were not inserted correctly.
* Fixed an issue where relationship types were not preserved after loading a board.
* Fixed an issue that, in some cases, caused the board to not be properly centered during initialization.
* Fixed an issue that caused relationships to appear duplicated in the Explorer.

</details>

<details>

<summary><strong>Version 2.2</strong></summary>

This release focuses on expanding **Business Process Management** capabilities with the new **YouDesign BPM** add-on, introducing flexible link styling, and improving shape replacement and data association workflows. It also includes multiple usability improvements, stability updates, and key fixes across the platform.

**New Features**

* **New Add-on: YouDesign BPM.** Introducing a new add-on available in the Store — **YouDesign BPM Extension Pack** — which brings **Business Process Management** capabilities, including a comprehensive **BPMN (Business Process Modeling Notation)** shape library for process modeling and visualization.

  ![BPMN Shape Library](/files/e04179fcb3d8c8d1598c75749ceafd0dcaff7003) *BPMN Shape Library*
* **Suggested Link Styles.** A new **Suggested Link** feature lets you define pre-configured link styles between shapes. You can choose and apply preferred styles easily. This feature is also leveraged by the new **YouDesign BPM** add-on.

  ![Suggested Links — BPMN Flow](/files/96bf47e6a98c4ee91c203cb8d7d7abc0d41d4c4c) *Suggested Links — BPMN Flow*
* **Enhanced Replace Shape & (Re)Assign Data Hub Elements.** The new **Replace Shape** feature complements improvements to **(Re)Assign Data Hub Elements**. Both are now managed under a unified Global Setting, giving you full control over how the **appearance** and **data associations** of shapes are enforced across your boards.

  ![Replacing Shapes](/files/a78f8b70e20c771d927296d609639b0eccf2eda0) *Replacing Shapes*

  ![(Re-)Assigning Data Hub Element](/files/16276cd8ba60dcc17cce52aa631edb53a6bda725) *(Re-)Assigning Data Hub Element*

**Improvements**

* Updated internal libraries to the latest stable versions for improved **maintainability** and **performance**.
* **Roadmap Visualization** is now **disabled by default** when **UPMX** is not installed (since it currently relies on it).
* Added a warning message in the **Shape Field form** when the selected table is not part of the existing Global Setting configuration.
* Added a notification in the **Shape form** for shapes marked as Data Hub shapes when they lack a table or display field association.
* Added **support for List fields** in the **Data Panel**.
* Added the ability to view and update **Board fields** (as shown on the homepage) directly from the **Data Panel**. This view is now available when no objects are selected on the canvas. Editable in Editor Mode; read-only in Presenter Mode.

**Fixes**

* Fixed an issue where **HOP** was reusing nodes near the start point.
* Resolved an issue where **RTI fields** of type *text* were not being highlighted on the canvas.
* Fixed an issue causing **oversized titles** in the visualization container after adding a node.
* Fixed an issue where **duplicating a node** placed the new node under attachments instead of above.
* Fixed a **Data Hub** issue where filtered records were ignored when dropping the table onto the canvas.
* Fixed a layering issue where links could appear under a frame when one node wasn't part of it.
* Fixed a freezing issue on the **Board** when rapidly changing the font size of a text node.
* Fixed a visual bug in **Kanban visualization** that showed incorrect content after an Undo action.
* Fixed a warning dialog appearing incorrectly when Start and End nodes were missing during Template creation.
* Fixed a duplication issue in the **Data Panel** when opening a Future State Element for the first time after dropping it on the canvas.
* Fixed visual issues related to how displayed values appeared in the Explorer.

**Fixes — Hierarchy Map**

* Fixed issues related to the Undo operation.
* Fixed exporting failures.
* Fixed a bug causing the toolbar to disappear unexpectedly.
* Resolved minor layout issues in Presentation Mode.

</details>

<details>

<summary><strong>Version 2.1.1</strong></summary>

This patch release addresses expected issues with the **Hierarchy Map** and other minor bugs. We also took the opportunity to include other improvements, such as enhanced **Data Panel** functionality and better handling of dependencies, along with a few visual refinements.

**Improvements**

* A loading indicator now appears near the bottom-right controls when the app is processing a transaction for an extended time.
* The **Data Panel** is now available in **Presentation Mode**, allowing you to inspect object information while it's open.
* The **Data Panel** now supports working with **HTML field types** using a larger input component.
* Minor visual refinements applied to **C4 shapes**.
* Improved handling of **Load Dependencies** with broken data in **CI Relationships**.
* Enhanced messaging when no **Load Dependencies** options are available.

**Fixes**

* **Hierarchy Map:**
  * Fixed an issue where loading related tables incorrectly displayed a warning message.
  * Fixed an issue where dependencies were not loading for standalone dropped elements.
  * Fixed an issue where dropping parent/child elements displayed them as separate nodes instead of their hierarchy.
* Fixed an issue where **Indicators** could be created without selecting a table.
* Fixed an issue that caused **undo/redo** actions to produce empty content between steps.
* Fixed an issue that caused the app to crash when swapping the direction in the **Relationship Dialog**.
* Fixed an issue where resetting link styles did not restore the label text border style to its default.
* Fixed an issue where **Visual Relationships** reverted to **CI Relationships** after reconnecting nodes.
* Fixed an issue where filter values were cleared after applying personal filters.
* Fixed an issue where **Indicator tables** appeared in the right panel for non-existing table records.
* Fixed an issue where relationship fields reset their style after publishing.

</details>

<details>

<summary><strong>Version 2.1</strong></summary>

This release introduces key enhancements including a new **Roadmap** visualization with native **UPMX Lifecycle** support, flexible **Relationship Fields**, and improved **Hierarchy Map** configuration. Publishing is now streamlined using ServiceNow ACLs, and canvas objects gain structured ordering to support future layering. Usability has been refined across **Data Panel**, **Explorer**, and visual elements, with better field visibility, improved messages, and layout stability. This release also resolves numerous bugs across core modules like **Data Hub**, **Realtime Indicator**, and **Load Dependencies**, ensuring a more stable and intuitive experience.

**New Features**

* Introducing a new visualization: **Roadmap**, which supports **UPMX Lifecycles** by default.

  ![Roadmap](/files/f4126597d6e2d3e4910e7e36ea977243082def47)
* Introducing **Relationship Fields**: a flexible new functionality that allows you to configure, manage, and display indicator fields linked to CI relationships.

  ![Relationship Fields — Data Panel](/files/4376a70b6b22537bbba3dac043bad8aac0201bdb)

  ![Relationship Fields — RTI](/files/6c8925e1eb640fe2fcbffc11eb8ae1b3d55e4233)
* Introducing **Show Reversed Relationship**: a global setting that lets you decide whether the direction of relationship creation or update should affect the available relationship types.

  ![Reversed relationship](/files/f7c2e3a8343904916b00eddc0c8da3ce86180dce)
* Added **Complement** to **Load Dependencies**, allowing you to choose whether to connect to existing items or create new connections.

  ![Complement](/files/ef6b93a50b4f9ff56f35c86c24ff66c06be2ce11)

**Improvements**

* **Hierarchy Map** visualization received a major upgrade:

  * New configuration window lets you choose which tables to include.
  * Option to load or exclude CI Relationships.
  * Additional filters and settings added for more control.
  * Refresh button added to quickly update your content.

  <div data-gb-custom-block data-tag="hint" data-style="info" class="hint hint-info"><p>Refreshing old Hierarchy Maps in the new version will reset them to default settings.</p></div>
* **Publish** functionality improved:
  * Removed the custom publish role.
  * YouDesign now fully relies on ServiceNow ACLs.
  * Enhanced **Data Panel** and **Explorer** to better handle and respect access restrictions defined by ServiceNow ACLs.
* **Canvas Object Order:**

  * In preparation for the addition of layers, we have redesigned how YouDesign handles the order of objects on the canvas. All objects now have an assigned stacking order (zOrder) indicating which objects should appear in front or behind others.
  * This provides a more stable, consistent, and strong core for future functionalities like Layers.

  <div data-gb-custom-block data-tag="hint" data-style="info" class="hint hint-info"><p><strong>Depending on your existing content, a script might need to be run post-upgrade.</strong></p><ul><li>We ship an on-demand scheduled job and a script with YouDesign V2.1 that sets a zOrder for all existing elements based on the visual hierarchy and creation timestamp.</li><li>Before running the script, we recommend backing up your Board Content <code>[x_inpi_yd_board_content]</code> and Templates <code>[x_inpi_yd_templates]</code> tables.</li><li>Most YouDesign customers will be unaffected by this. If you're unsure how to proceed or have any questions about this procedure, please contact your ins-pi representative.</li></ul></div>
* **Visualizations:** When the last item is deleted from a visualization, the shape now resets to its initial state.
* **Shapes:**
  * Added text support to the **Group** shape in the **Basic Shapes** category.
  * Corrected and upgraded several shapes where the `is_group` property was incorrectly enabled, ensuring only intended shapes have group shape functionality.
* **Publish:**
  * Clearer toast messages when publishing fails due to missing mandatory fields.
  * When rejecting an item, the associated field is now visible within the comment for better context and traceability.
  * **Explorer:**
    * Publish button is disabled while another publish action is running.
    * Now supports hierarchical display of groups, containers, and similar shapes.
  * **Data Panel:**
    * Now supports ServiceNow **Choice fields** without a "none" option.
    * Added support for **multiline text fields**.
* **Realtime Indicator:** Automatically selects the correct configuration when nodes and links are selected while the panel is open.
* **Data Hub:**
  * Table order now respects **Category** order and name, followed by **Shape** order and name.
  * New global setting lets you choose whether the **table selector** displays the shape name or the table definition name.
* Added option to toggle between **Editor** and **Presenter** mode when editing board-type links.
* **Filters Dialog:** Reference fields now support large datasets when selecting values.
* **Load Dependencies:** Layout improved.
* **HOP:** Improved the notification message sequence.
* **Visual Links:** You can now flip the arrow direction directly from the toolbar when selecting a visual link.
* **Date/Time Format:** Now respects the user's preferences; defaults to system format if none is set.
* **Background Color Selector:** Added a visible border to help distinguish white color selections in the toolbar.
* Improved the notification message displayed when a session times out, providing clearer guidance for users to reauthenticate and continue working.

**Fixes**

* Fixed an issue where mixed languages caused label inconsistencies in the **Data Panel**, **Load Dependencies**, and **Filters**.
* Fixed an issue where cropped images would disappear unexpectedly.
* Fixed an issue where backend modules were not visible to **YouDesign Admins**.
* Fixed an issue where, in some cases, editors could not delete their own boards.
* Fixed an issue that allowed links within grouped objects to be deleted unintentionally.
* Fixed an issue where newly added templates did not load their associated relationship styles.
* Fixed an issue where changing the level in **Hierarchy Map** was not reflected in the **Explorer**.
* Fixed an issue where reassigning elements and planning in the **Data Panel** did not appear in the **Explorer**.
* Fixed an issue in the **Data Panel** where setting the table to "none" did not refresh the available fields.
* Fixed an issue where filters were not applied after reassigning the table on elements.
* Fixed an issue where group or container shapes lost their ability to hold objects after assigning an element.
* Fixed an issue where **AWS shapes** could not change their border color.
* Fixed an issue where the **Hierarchy Map** layout became distorted after changing the level.
* Fixed an issue where the **Context Map** visualization broke after resetting the container.
* **Home page:**
  * Added missing scroll functionality to the member list.
  * Fixed an issue where the three-dots menu was not visible after searching items.
* **Data Hub:**
  * Fixed an issue where results were not displayed when they existed in an extended table.
  * Fixed an issue where applying new filters did not refresh the results.
* **Realtime Indicator:**
  * Fixed an issue where it was possible to select and highlight a Realtime Indicator value even when it was turned off.
  * Fixed an issue where having two indicators for the same field caused conflicts.
  * Fixed an issue where indicators were not automatically applied after publishing elements.
  * Fixed an issue where nodes retained their indicators after reassigning the table.
  * Fixed an issue where nodes remained grayed out after unselecting indicators.
* **Load Dependencies:** Fixed an issue where links were locked to a specific side after creation.

</details>

<details>

<summary><strong>Version 2.0</strong></summary>

This release introduces powerful new features and performance enhancements aimed at improving usability, collaboration, and stability. Highlights include the ability to assign DataHub elements to shapes, real-time collaboration, re-login functionality, and a more accessible and customizable visualization experience. Bug fixes address a wide range of issues related to visualizations, frame handling, and user accessibility, ensuring a smoother and more efficient workflow.

**New Features**

* **Assigning DataHub Elements to Shape:** Enables changing the table or element association to a specific shape on the canvas.

  ![Assigning Data Hub Elements](/files/e0f916127cf953cc200bb2f8093083c82cbe9a30)
* **Realtime Indicator Text Readability:** Ensures that text remains readable at all times, enhancing the user experience when visualizing indicators.

  ![RTI Text Readability](/files/746221d960681fa9d4716849142d598067295837)
* **Re-login Functionality:** Seamlessly re-authenticate when the user session expires, providing the ability to log in again without losing progress.

  ![Re-login](/files/ed2534a11d1b0d4632903772efe8456ed56c3fae)
* **Realtime Collaboration (Experimental):** Introducing the first iteration of real-time collaboration. This feature can be enabled in Global Settings as an experimental option.
* **Generate & Attach Board Preview:** Automatically generates a preview image of the board and attaches it to a specific record.
* **AvoidNodes Option for Relationship Type:** Adds the ability to switch relationship types while avoiding node interference.

  ![AvoidNodes](/files/af6251153d1ad2462e29bc506f2db77fd8d5d0e2)
* **New Container & Group Shapes:** Expands shape options for better structural representation and grouping on the canvas.

  ![Container & Group Shapes](/files/eeaa8f21f448b4e754b40dd904eb1483ccd27980)

  ![Container & Group Shapes](/files/36e94eec63b8973fe6c081d7fba17bf9adbe6b17)

**Improvements**

* **Reset Style for Shapes:** Enables shape styles to be reset to their default settings for quick adjustments.
* **Border for Text Shapes:** Adds a border to text shapes for enhanced visibility and separation.
* **Visualization:**
  * Unified naming conventions during export.
  * **Hierarchy Map:**
    * Added alphanumeric sorting for better content organization.
    * Introduced styling options for greater customization.
    * Improved content alignment when indicators are present.
* **Redirection:**
  * Clearer messages for restricted access when trying to open boards in presenter or editor mode.
  * Automatic redirection to the home page with a message when attempting to access a non-existing board.
* **Frame:**
  * Removed size restrictions when increasing frame dimensions and set a minimum size.
  * Enhanced usability of resizing circles when zoom level is low.
  * Improved arrow usability on frame sides for resizing.
* **Homepage:**
  * New folders are created at the bottom when a similar name already exists.
  * Optimized loading requests when using the filter dialog.
* **Enhanced Visibility:**
  * Improved visibility of selected objects when zoomed out.
  * Clearer background and border options in the toolbar when selecting shapes or relationships.
* **Performance Enhancements:**
  * Faster application loading time.
  * Reduced response time for applying templates.
* **Enhanced Accessibility:**
  * Added new possibility to use links when selecting shapes in the toolbar.
  * Improved toolbar positioning when selecting shapes and relationships.
  * Enhanced toolbar controls for selecting borders and colors.
* **Notifications:** Added notification messages when enabling or disabling features using shortcuts.
* **Improved Relationship Handling:**
  * Optimized relationship path persistence during mode switching and page reloads.
  * Default relationship type switched from "AvoidNodes" to "Orthogonal" for improved performance.

**Fixes**

* **Frame:**
  * Fixed missing resize handles when zoomed out.
  * Corrected disappearing frame after pasting content into the label.
* **Visualization:**
  * **Hierarchy Map:**
    * Fixed overlapping nodes and slider issues after deleting content.
    * Fixed an issue where links were still displayed when excluding nodes using the level slider.
  * **Kanban Board:**
    * Resolved item displacement and container overflow issues.
    * Fixed label editing issue after deletion.
    * Prevented items from being stuck between lanes.
    * Removed the possibility of dropping elements outside of lanes.
    * Resolved issues with data hub element drops and nested Kanban boards.
* **Homepage:**
  * Resolved issues where owners could not view items in the left panel.
  * Fixed problems with folder opening and board path display when filters are applied.
  * Restricted renaming of teamspaces, folders, or boards to prevent empty names.
  * Fixed accessibility issues when users with viewer access attempt to open a board with assigned scopes.
  * Fixed issues where admin users could not share boards with Teamspace Admins.
* Removed unnecessary scrollbars when creating templates.
* Disabled saving templates with only relationships.
* Corrected behavior of link popups during presentation mode.
* Corrected issues with duplicated shapes overlapping the original after undo.
* Improved alignment of arrow icons and fixed inverted AWS shapes.
* Resolved issues where changing shape colors was ineffective.
* Corrected issues with border thickness not persisting after reopening boards.
* Fixed an issue that caused reference fields to load slowly in the Data Panel.

</details>

<details>

<summary><strong>Version 1.4</strong></summary>

In this release, we've placed a strong focus on enhancing stability and addressing critical bug fixes to provide a more reliable and seamless experience. We've resolved a variety of issues across key areas like relationships, diagramming, and data handling to ensure smoother performance and fewer disruptions. Additionally, we've made significant upgrades in core areas such as visualizations, home page load times, and error handling, bringing overall performance and usability to the next level.

Along with these stability improvements, we've introduced exciting new features like the Template functionality for saving and reusing selections, export legends for Realtime Indicators, and the ability to copy and paste board content across tabs.

This release is all about improving the foundation of the app while adding valuable new features to help users work more efficiently.

**New Features**

* Introduced the **Template feature**, enabling users to save reusable selections of board content that can be easily applied to any board.

  ![Templates](/files/c49e67471c6fa856caf787580eff55ca1ae110af)
* Added "**Show Unique Relationship**" option to Load Dependencies and HOP.

  ![Show Unique Relationship](/files/b187647a0a04f20e5a60af4a3896a30c7c06493c)
* Enabled the ability to copy and paste board content between tabs within the same browser.
* Introduced legends for Realtime Indicators when exporting content.

  ![RTI Legends](/files/0bed1f7997ca0cc645afec0fb309151fae36a7df)
* **Editors can now create teamspaces**, based on a new Global Setting (active by default).
* Added a Global Setting for parent field configuration in hierarchies.
* Introduced tooltips for the Diagramming and Data Hub panels.

  ![Panel Tooltips](/files/76be56c6c835f811945a60b0a0e844c902754651)

**Improvements**

* Enhanced relationship routing for improved performance and stability.
* Upgraded the core diagramming library for better functionality and reliability.
* Refined note shapes for clearer and more effective usage.
* Enhanced error handling for Attachments to improve user experience.
* Standardized labels across the app for a more consistent appearance.
* Added support for label separators in Filters for greater flexibility.
* Enabled current-state elements to be edited with a double-click, aligning their behavior with other shapes.
* Centered alignment for HOP options for improved usability.
* Simplified toolbars with a new Style icon to access style options, making the interface less cluttered and more user-friendly.

  ![Style Icon Toolbar](/files/f8309ed30d2cf7ba393c5f9124fae56350601f80)
* Synchronized dependency icons across the app for a consistent look and feel.
* Added support for displaying multiple notifications simultaneously for better user feedback.
* Added notifications for loading or refreshing content for indicators.
* **Visualizations:**
  * Improved overall export component.
  * Improved the overall layout of the Context Map for better use of space.
* **Diagramming:**
  * Improved messaging when unsupported images are added to the canvas.
  * Introduced the ability to reset shapes to their default stencils.
* **Home Page:**
  * Optimized response times for initial page load, loading teamspaces and folders (with or without filters applied), and opening individual folders.
  * Reduced the number of requests required to load content and optimized folder caching.
  * Added a result count when using search and filters.
  * Increased the maximum allowed characters for board names to 140.
  * Added tooltips to board names in Editor and Presentation modes.
  * Improved the responsiveness of top bars in Editor and Presentation modes.
  * Introduced an owner field for folders and teamspaces to facilitate internal use.
  * Added restrictions to prevent recursive parent/child folder relationships when changing folders via the ServiceNow UI.
* **Shape field:**
  * Automatically selects the associated table when a shape is selected when changing configurations.
  * Disabled mandatory option when configuring Boolean fields for better usability.
  * Prevented the duplication of fields when changing configurations.

**Fixes**

* **Data Panel:**
  * Resolved an issue where long text in inputs prevented publishing.
  * Removed the Publish button for Current State Relationships.
  * Corrected mandatory fields that were not displayed as required.
  * Fixed inconsistent date formats for planning and publishing date fields.
  * Addressed an issue where using the Date/Time field triggered excessive planning updates.
* **Presentation mode:**
  * Fixed an issue preventing boards from opening correctly when accessed from external sources.
  * Resolved an issue where Viewers could not access the Realtime Indicator panel.
* **Home page:**
  * Corrected sorting issues with items.
  * Fixed an issue where not all results were displayed when filters were applied.
  * Resolved an issue when duplicating board versions.
  * Fixed a bug where users with Editor access but no Editor role could see the Edit button.
  * Prevented boards from being saved with empty names.
  * Fixed issues with filters involving groups.
  * Resolved an issue where forbidden words were allowed in teamspace names.
* **Diagramming:**
  * Fixed an issue where duplicated frames did not retain their content.
  * Addressed issues with transparent colors not applying to shapes.
  * Resolved an issue where resizing frames was impossible when the canvas was heavily zoomed out.
  * Fixed the "Align Shape" toolbar option, which was disabled during multiselection.
  * Corrected a bug where pasting styled text from external sources broke shapes.
  * Resolved an issue where frames disappeared after text was pasted into their titles.
  * Fixed a problem with the Tidy Icon, which caused broken links.
  * Ensured newly added images appear at the front by default.
  * Addressed issues where notes became distorted after zooming.
  * Fixed missing possible connections when dragging shapes from the Diagramming panel.
  * Resolved the "no results found" message incorrectly appearing during panel searches.
  * Addressed an issue where opening a pinned board version was blocked by another pinned version.
  * Added borders to text shapes for better clarity.
  * Prevented empty images from being added while moving/uploading images.
  * Fixed image disappearance issues after cropping.
  * Resolved an issue where frame names appeared oversized after zooming out.
  * Ensured the toolbar displays correctly when selecting default shapes.
  * **Table Panel:**
    * Corrected newly added column headers not displaying colors.
    * Fixed layout breaks when dragging cells.
    * Adjusted toolbar options to reflect appropriate actions when selecting cells.
    * Resolved bugs with "Bring to Front" and "Send to Back" not functioning as expected.
    * Removed the cell dropdown icon in presentation mode.
    * Fixed resizing issues in tables.
    * Prevented editing of locked cells.
* **Relationships:**
  * Resolved issues with relationship styles not updating after configuration changes.
  * Fixed canvas repositioning caused by initial text edits.
  * Addressed overlapping relationships.
  * Fixed a bug where the Suggested Dependencies dialog did not appear during relationship creation.
  * Resolved distortion of relationships after moving frames.
  * Fixed auto-layout icons breaking relationships after multiselection.
  * Addressed issues with duplicated relationships becoming distorted.
  * Resolved an issue with links not attaching correctly to the border of specific shapes.
* **Realtime Indicators:**
  * Fixed issues where new indicators did not update table content.
  * Resolved a bug where relationships and nodes were incorrectly positioned after adding indicators.
* **Load Dependencies:** Addressed crashes caused by broken relationship records during dependency loading.
* **Visualizations:**
  * **Context Map:**
    * Resolved an issue where editing and loading multiple times reduced title size.
    * Fixed an issue where resetting through the toolbar did not work as expected.
  * **Hierarchy Map:** Fixed a bug where the level slider displayed incorrect levels after deleting content.
  * **Kanban:**
    * Resolved an issue allowing lanes to drop out of containers when using Kanban in frames.
    * Fixed items appearing outside the Kanban layout.
* Resolved an issue where exporting multiple frames sometimes generated invalid ZIP files.
* Fixed sorting issues in the Data Hub.
* Corrected a bug where Viewers could not save side panel sizes or other preferences.

</details>

<details>

<summary><strong>Version 1.3</strong></summary>

This release introduces significant updates with new shape libraries and features, including the Metamodel category and specialized libraries for ServiceNow, YouDesign, BPM, AWS, Azure, and Google Cloud. Enhancements also include new Filters and HOP features, expanding functionality and customization within the platform. Improvements focus on visual and performance optimizations, such as better Hierarchy Map visuals, enhanced Realtime Indicators, and refined Relationship Styles. Numerous fixes address various components like Kanban, Data Panel, and Board Search, improving overall user experience and system reliability.

**New Features**

* Introduced a new "**Metamodel**" shape category, along with corresponding shapes for ServiceNow, YouDesign, BPM, and UPMX. Each shape now features three distinct text blocks, each of which can be edited independently for greater flexibility and customization.

  ![Metamodel category](/files/604e3f56b1ca1a9e08e96b1cdedf41f28a1836b2)
* "**Designer Network**" shape library added.

  ![Designer Network library](/files/ac1bdd710cf93077c40dbe67c84680f2de0c70f6)
* "**C4**" shape library added.

  ![C4 library](/files/4d166498caffd76f529069c2fbb40c095cb3181e)
* "**AWS Architecture Icon**" shape library added with 534 shapes. **Note:** Inactive by default.
* "**Azure Public Services Icons**" shape library added with 667 shapes.
* "**Google Cloud Provider**" shape library added with 216 shapes.

  ![Google Cloud library](/files/64c909d7f377c048f9308a4d1f8d49ddbe8d7cee)
* **Filters** to seamlessly filter Data Hub content. Global (YouDesign Admin), Teamspace (Teamspace Admin), and Personal (Editor) filters are available.

  ![Filters](/files/70a2d54a2d59b607b8cacdb761abea62ca29867f)
* **HOP** feature to load multi-level relationships. Watch out for the Rabbit!

  ![HOP](/files/21e18d3f58148068b036f05b48d17560fd9e6a36)
* **Show Unique Relationship** option for "Load Dependencies" to decide whether each unique CI Relationship should be rendered.

  ![Show Unique Relationship](/files/18fcae7f14c74002f1b62f9836430d095614c066)

**Improvements**

* Image addition now enforces the ServiceNow Attachment System Property.
* **Board Search:** Enhanced content criteria.
* **Hierarchy Map:** Visual improvements.
* **Board Search** now considers hidden elements from the **Hierarchy Map**.
* Optimized **Realtime Indicator** for storing data of applied indicators on Boards.
* Redirects to the app **Home Page** when opening the app with an unsupported URL.
* **Relationship Styles:** Now partially updates when the configuration changes.
* Added a tooltip in the Diagramming panel for shapes with a non-existing table.
* Improved performance when deleting large numbers of objects.
* **Data Panel:**
  * Displays relationship information and allows Publish actions when applicable.
  * Added support for Glide Date Time and Glide Date fields.
* Added a clear functionality to missing search input components.
* Synchronized names when adding existing elements to the canvas with planned values during Publish.
* Improved messaging for partial success in bulk Publish operations.
* Added a toast message when adding a whole Data Hub table into the Context Map.
* **Table Panel** and **Context Map:** Visual improvements.

**Fixes**

* Fixed an issue where **Kanban** displayed items outside of its boundaries.
* Fixed distortion when selecting and moving multiple relationships in some cases.
* Resolved an issue where relationships were not visible when loading from the Home Page.
* Fixed an issue where highlights did not work properly when dragging Data Hub elements onto the canvas.
* Resolved content height issue in the Diagramming panel on high-resolution screens.
* Fixed an issue when selecting tables within Home Page scopes.
* Removed the ability to create relationships between cells in the **Table Panel** shape.
* **Relationship Styles:**
  * Fixed an issue where toast messages appeared when no relationship styles were configured.
  * Resolved an issue when resetting Relationship Styles.
* Removed the tidy icon for cells in the **Table Panel** shape.
* Resolved an issue where cropped images would disappear.
* Fixed an issue where popup links remained sticky in presentation mode.
* Fixed an issue where content wasn't shown in the **Explorer tab** after duplicating the Board.
* Resolved visual issues in the **Data Panel** and Publish features.
* Fixed an issue with unsynchronized status in the **Explorer tab** when publishing.
* Removed the ability to add Future State elements to the **Context Map**.
* Resolved an issue causing pills to remain visible when no more content of the same type existed in **Board Search**.
* **Hierarchy Map:**
  * Fixed relationship distortions.
  * Fixed an issue where duplicating caused new containers to appear off-screen.
* Resolved an issue where content was lost when undoing/redoing actions.
* Fixed an issue where the Last Updated and Updated By fields for Board data were not updated properly.
* Resolved an issue where the number of results was not shown when applying filters on the Home Page.
* **Realtime Indicators:**
  * Resolved an issue where deleted configurations were not syncing with the Realtime Indicator Panel.
  * Fixed an issue when highlighting/selecting multiple indicators from the Panel.
  * Resolved an issue where applying indicators distorted relationships.
* Fixed an issue where newly created versions were not selected automatically.
* Resolved an issue where editing frame names caused the text editor to become oversized when the zoom was low.
* Fixed an issue where **Load Dependencies** were not connecting to nearby elements.
* Resolved an issue where the "Bring to Front" functionality did not work for images.
* Fixed an issue that allowed the creation of read-only references as future state relationships.
* Resolved an issue where changing shapes' color caused the opacity to reset to 100%.
* Fixed an issue where sharing wasn't showing all available groups.

</details>

<details>

<summary><strong>Version 1.2</strong></summary>

We are excited to introduce several new features, improvements, and fixes in this release, designed to enhance your experience and increase productivity. This update includes the addition of new shapes to the Architecture library as part of the UPMX extension, new content publishing capabilities, and improved presentation mode functionality. Additionally, we've made several design and performance enhancements across various components, including the Context Map, Data Panel, and Board Search. A number of bug fixes have also been implemented to resolve issues and improve overall stability.

**New Features**

* Added "**AI Model**" Shape to Architecture library as part of the new UPMX extension.
* Added "**Portfolio**" Shape to Architecture library as part of the new UPMX extension.
* Added "**Layer Architecture**" Shape to Architecture library as part of the new UPMX extension.
* Added "**Segment Architecture**" Shape to Architecture library as part of the new UPMX extension.
* Added "**Solution Architecture**" Shape to Architecture library as part of the new UPMX extension.
* Added "**Book of Debt**" Shape to Architecture library as part of the new UPMX extension.
* Added "**Governance Body**" Shape to Architecture library as part of the new UPMX extension.
* Added "**Decision Log**" Shape to Architecture library as part of the new UPMX extension.
* Added "**Idea**" Shape to Architecture library as part of the new UPMX extension.
* Added "**Demand**" Shape to Architecture library as part of the new UPMX extension.
* **Publish Feature:** Introducing the ability to publish content.
* **Presentation Mode Links:** Support for links in presentation mode.
* **Data Panel Board Link:** New board link available in the Data Panel.
* **Table Panel Shape:** Introducing a new table-like shape.

**Improvements**

* **Context Map:**
  * Color customization for each layer.
  * Ability to edit previous configurations.
  * Added reset button.
  * Layout and design enhancements.
* **Data Panel:**
  * Displays message when a table doesn't exist.
  * Design improvements for links.
* **Shape Repository:** Shapes with non-existing tables are now disabled.
* **Hierarchy Visualization Map:**
  * Layout, export, and design enhancements.
  * Resizable containers.
* **Board Search:**
  * Displays different types of relationships.
  * Design improvements.
* **Home Page:** Performance and design enhancements.
* **Relationship Styles:** Synchronization with configuration and reset options.
* **Realtime Indicators:** Improved design, indicators, and layout.
* **Presentation Mode:** Enhanced user experience.

**Fixes**

* Resolved an issue with sending shapes to back/front when multi-selecting.
* **Hierarchy Map Visualization:**
  * Added header on export.
  * Fixed element graying-out issue.
* Fixed issues when multiple elements and indicators were present.
* Resolved cropping issues.
* Fixed header cut-off and container hiding issues for Kanban visualization.
* Fixed issues when using advanced filters.
* Resolved duplication of shapes.
* Fixed issues with switching between presentation and editor modes.
* Corrected home page search result display issues.
* Fixed an issue with blank teamspace descriptions.
* Resolved design issues with multiple board scopes.
* Fixed an issue with deleting previously locked relationships.
* Resolved an issue with the auto-layout tidy functionality.

</details>

<details>

<summary><strong>Version 1.1</strong></summary>

This release brings exciting new features, including an image cropping tool and object grouping capabilities, enhancing editing precision and workspace organization. We've also introduced improved filtering on the Home Page, a "Scope" field for boards, and better search functionality. The update includes new visualizations like Context Map and List View, offering versatile ways to view your data. Additionally, backend relationships have been optimized for better performance, and significant bug fixes address issues with image handling, access control, and modeling. Overall, expect a smoother, more efficient YouDesign experience with these changes.

**New Features**

* **Cropping Images:** Tailor your images with our new cropping tool, enhancing precision in your edits.
* **Grouping Objects:** Streamline your workspace by easily grouping and ungrouping objects. Visual cues indicate when objects are grouped, with states preserved for your convenience.
* **Scope Field for Boards:** Define and clarify the scope of your projects with the new "Scope" field, enabling better organization and focus.
* **Home Page Filter:** Enhance your search efficiency with refined filtering options on the Home Page.
* **Board Search in Editor and Present Modes:** Filter and find elements within your boards more effectively, whether editing or presenting.
* **New Visualization — Context Map:** Visualize relationships and dependencies within your ServiceNow ecosystem inside-out from a specific starting point.
* **New Visualization — List View:** Display tabular data clearly and effectively.
* **Shape Relationship Style:** Apply styles dynamically based on relationships between shapes.
* **Additional Styles for Relationship Link Points:** Customize the appearance of your diagrams with new styles for relationship links.
* **Active Attribute in Shape Categories:** Toggle shape categories on and off during editing to streamline your workflow.

**Enhancements**

* **Backend Relationships:** Enhanced backend processes for better performance.
* **Sharing Feature:** Increased reliability and functionality in sharing features.
* **Visuals and Panels:** Updated visuals for real-time indicators, left, and right panels for improved user interaction.
* **Performance:** General stability and performance upgrades ensure a smoother, faster YouDesign experience.
* **Kanban Visualization:** Enhanced Kanban board functionalities for more intuitive task management.

**Bug Fixes**

*Note: The list below highlights significant issues resolved in this release. For a comprehensive bug fix list, refer to the detailed change log.*

* **Image Handling:** Resolved image addition and manipulation issues.
* **Access Control:** Improved security measures for better access control within the application.
* **Homepage Management:** Fixed bugs affecting boards, folders, and teamspace management.
* **Modeling Experience:** Enhanced stability and functionality in modeling features.
* **Configuration Cache:** Addressed cache issues during configuration deletions.
* **Hierarchy Map Visualizations:** Resolved visualization issues in hierarchy mapping.

</details>

<details>

<summary><strong>Version 1.0</strong></summary>

Welcome to the initial release of **YouDesign**, the cutting-edge solution developed by ins-pi and seamlessly integrated within the ServiceNow platform. **YouDesign** represents a revolutionary approach to diagramming and modeling, offering real-time visualization capabilities directly within the ServiceNow environment.

With **YouDesign**, enterprises can unleash their creativity and streamline their planning processes by transforming complex data into dynamic diagrams, models, and visualizations.

This release marks the beginning of a new era in enterprise transformation, where informed decision-making is effortlessly combined with the power of ServiceNow.

**Highlights**

* **Modern User Interface:** Elevates user experience with intuitive design.
* **High Performance:** Fully embedded within ServiceNow for optimal efficiency.
* **Effortless Administration:** Reduces administrative overhead with embedded nature.
* **Instant Setup and Updates:** One-click installation and effortless updates.
* **Infinite Boards:** Consolidate artifacts onto expansive, centralized boards.
* **Flexible Sharing:** Tailor accessibility of Teamspaces, Folders, and Boards.
* **Teamspaces:** Tailored for precise delivery of context to specific audiences.
* **Granular Data Visibility:** Control access to relevant information for data security.
* **Live Data Editing:** Access real-time data within ServiceNow for dynamic visualization.
* **Interactive Visualizations:** Derive insights and communicate concepts with clarity, including **Hierarchy Map**, **Kanban**, and more.

</details>


# Installation & Setup

> ### Installation and Setup
>
> You are the admin installing the YouDesign Models application on a ServiceNow instance for the first time. This takes six steps. All of them happen inside ServiceNow. Everything stays inside your ServiceNow instance, and you don't need any new infrastructure.

> Native ServiceNow application. All runtime, all data, all APIs stay inside your instance under the exclusive scope `x_inpi_yd`.

> #### Before you begin
>
> You need:
>
> * a **Now Support (HI) account** linked to your organization
>
> * the **admin** role on the target ServiceNow instance
>
> * network access to `store.servicenow.com` from your browser
>
> * a procured YouDesign Models license, with entitlement received from ServiceNow
>
> > If you do not have a Now Support account, ask your organization's **ServiceNow Administrator** to add your email address to the company's Now Support profile.

> **Always install on non-production first.** Run your initial install on a sandbox, development, test, training, or pre-production instance before promoting to production.

> #### Step 1: Find the app on the ServiceNow Store
>
> 1. Go to the [YouDesign Models product page](https://ins-pi.com/getyoudesign) on the ServiceNow Store
>
> 2. Or, from [store.servicenow.com](https://store.servicenow.com), search for **YouDesign Models** and open the listing
>
> > **Tip:** You can also filter the Store by provider, release version, category, or price using the left-side filter panel.
>
> #### Step 2: Complete entitlement
>
> On the YouDesign Models product page:
>
> 1. Log in with your **HI credentials**
> 2. Click **Complete Purchase**
> 3. Accept the Site Terms of Use by checking the box
> 4. Click **Complete Purchase** again to confirm
>
> YouDesign Models is now entitled for installation on your organization's ServiceNow instances.

> **Commercial on-premise customers:** If you run ServiceNow on-premise, follow the [ServiceNow Store on-premise installation instructions](https://store.servicenow.com/sn_appstore_store.do#!/store/help?article=KB0030222) instead of the standard flow.
>
> #### Step 3: Install on your ServiceNow instance
>
> 1. Log in to your target ServiceNow instance with **admin** credentials
> 2. Navigate to **System Applications > All Available Applications > All**
> 3. Search for **YouDesign Models**
> 4. Ensure the **Load demo data** checkbox is selected to install with sample boards, shapes, and indicators
> 5. Click **Install**
> 6. In the installation pop-up, click **Install** to confirm
>
> The app installs hands-free and typically completes in 10–15 minutes.
>
> > **Tip for newer instances (Vancouver+):** You can also use the **Application Manager** inside Admin Center for a consolidated view of all available and installed apps.
>
> #### Step 4: Verify the installation
>
> After installation, confirm that:
>
> * [ ] The application module is accessible under its scoped route
> * [ ] The scoped application tables are present under the `x_inpi_yd` scope (e.g. `x_inpi_yd_board`, `x_inpi_yd_shape`, `x_inpi_yd_realtime_indicator`)
> * [ ] Default board types, shape categories, and import mappings are populated (if you installed with demo data)
> * [ ] The Scripted REST API endpoints are active under `/api/x_inpi_yd/`
>
> #### Step 5: Assign roles to users
>
> YouDesign Models uses three scoped roles:
>
> The **Admin** role is pivotal: only admins can create Teamspaces, and Teamspaces are the container that gives Editors and Viewers access to boards.
>
> **Assign roles to a group (recommended)**
>
> Assigning roles to groups is more scalable and easier to audit than assigning to individual users.
>
> 1. Navigate to **User Administration > Groups**
> 2. Select the target group or create a new one
> 3. Open the group record
> 4. Scroll to the **Roles** related list tab
> 5. Click **Edit**
> 6. In the Collection list, search for `x_inpi_yd`
> 7. Select the appropriate role and move it to the Roles list using the arrow button
> 8. Click **Save**, then **Update** the group record
>
> Any user added to this group automatically inherits the assigned roles.
>
> **Assign a role to an individual user**
>
> 1. Navigate to **User Administration > Users**
> 2. Search for and open the user record
> 3. Scroll to the **Roles** related list tab
> 4. Click **Edit**
> 5. Search for roles starting with `x_inpi_yd`
> 6. Select the role and move it to the Roles list
> 7. Click **Save**, then **Update** the user record
>
> #### Step 6: Create your first Teamspace
>
> Boards live inside Teamspaces. Until at least one Teamspace exists, Editors and Viewers have nowhere to work.
>
> 1. Sign in as a user with the **YouDesign Models Admin** role
> 2. Open YouDesign Models from the application navigator
> 3. Create a Teamspace and add the relevant Editor and Viewer groups or users
>
> Editors assigned to the Teamspace can now create boards. Viewers assigned to the Teamspace can open them in read-only mode.
>
> #### Role assignment best practices
>
> > For a detailed breakdown of what each role can do, see Access Rights and Roles.
>
> #### Post-installation checklist
>
> Use this checklist to confirm a successful setup:
>
> * [ ] App is installed and accessible on the instance
> * [ ] At least one user has the **YouDesign Models Admin** role
> * [ ] At least one Teamspace exists for Editors and Viewers to work in
> * [ ] Editors can create and save a test board inside a Teamspace
> * [ ] Viewers can open shared boards in read-only mode
> * [ ] Default shapes and Realtime Indicators are visible on the canvas (if installed with demo data)
> * [ ] Import mappings work end-to-end on a sample dataset
>
> #### Updating the app
>
> When a new version of YouDesign Models is available:
>
> 1. You receive a notification email from the ServiceNow Store
>
> 2. Log in to your instance as admin
>
> 3. Navigate to **System Applications > All Available Applications > All**
>
> 4. Find YouDesign Models and click **Update**
>
> > **Tip:** Always test updates on a sub-production instance before applying them to production.
>
> The update behavior of every YouDesign Models table is documented in the Installation content reference below. Tables marked **New Install and Upgrades** are overwritten with each release.
>
> #### Troubleshooting
>
> #### Installation content reference
>
> YouDesign Models uses the exclusive scope `x_inpi_yd`, ensuring all tables remain distinct and do not conflict with existing ServiceNow or third-party tables.
>
> ServiceNow facilitates three installation options that determine how each table behaves on install and on upgrade:
>
> * **New Install and Upgrades** — installs new content and overwrites existing data with each upgrade, maintaining the latest version. Customer changes are not retained.
> * **New Install** — content installs only during initial setup. Subsequent upgrades do not modify pre-existing content. Customer changes are preserved.
> * **New Install with Demo Data** — content installs only when **Load demo data** is selected during installation.
>
> **Installation tables reference**
>
> For architecture and data handling details, see ServiceNow Administration and Security and Data Handling.

| Table Name                           | Display Label            | Installation Option      | Comments                                                            |
| ------------------------------------ | ------------------------ | ------------------------ | ------------------------------------------------------------------- |
| `x_inpi_yd_board`                    | Board                    | n/a                      | No content provided                                                 |
| `x_inpi_yd_board_content`            | Board Content            | n/a                      | No content provided                                                 |
| `x_inpi_yd_board_lifecycle`          | Board Lifecycle          | New Install              | Default board lifecycle phases                                      |
| `x_inpi_yd_board_realtime_indicator` | Board Realtime Indicator | n/a                      | No content provided                                                 |
| `x_inpi_yd_board_scope`              | Board Scope              | n/a                      | No content provided                                                 |
| `x_inpi_yd_board_stage`              | Board Stage              | New Install              | Introduced with May 2024 Release                                    |
| `x_inpi_yd_board_type`               | Board Type               | New Install              | Default board types provided                                        |
| `x_inpi_yd_board_version`            | Board Version            | n/a                      | No content provided                                                 |
| `x_inpi_yd_filter`                   | Filter                   | New Install              | Introduced with March 2024 Release                                  |
| `x_inpi_yd_folder`                   | Folder                   | n/a                      | No content provided                                                 |
| `x_inpi_yd_mapping`                  | Mapping                  | New Install              | Default import mappings provided                                    |
| `x_inpi_yd_realtime_indicator`       | Realtime Indicator       | New Install              | Example Realtime Indicators provided; contact ins-pi for latest set |
| `x_inpi_yd_realtime_indicator_shape` | Realtime Indicator Shape | New Install and Upgrades | YouDesign Models system table; customer changes not allowed         |
| `x_inpi_yd_realtime_indicator_value` | Realtime Indicator Value | n/a                      | No content provided                                                 |
| `x_inpi_yd_shape`                    | Shape                    | New Install              | Default shapes provided; contact ins-pi for latest set              |
| `x_inpi_yd_shape_category`           | Shape Category           | New Install              | Default shape categories provided; contact ins-pi for latest set    |
| `x_inpi_yd_shape_field`              | Shape Field              | n/a                      | No content provided                                                 |
| `x_inpi_yd_shape_relationship`       | Shape Relationship       | n/a                      | No content provided                                                 |
| `x_inpi_yd_visualization`            | Visualization            | New Install and Upgrades | YouDesign Models system table; customer changes not allowed         |

| Issue                                         | What to check                                                                           |
| --------------------------------------------- | --------------------------------------------------------------------------------------- |
| App not visible in All Available Applications | Confirm the entitlement was completed on the Store and that you are logged in as admin  |
| Users cannot see the app                      | Confirm at least one `x_inpi_yd` role is assigned to the user or their group            |
| Users see the app but cannot find any boards  | Confirm they have been added to a Teamspace by a YouDesign Models Admin                 |
| Install button is greyed out                  | Check that you have the admin role and that your instance is entitled                   |
| Default shapes or indicators are missing      | Reinstall with **Load demo data** selected, or contact ins-pi for the latest content    |
| Users see wrong actions                       | Review the role assignment. Missing or extra permissions usually explain UI differences |

| Practice                                    | Why it matters                                                                       |
| ------------------------------------------- | ------------------------------------------------------------------------------------ |
| **Assign roles to groups, not individuals** | Easier to manage, audit, and scale as your team grows                                |
| **Follow least-privilege**                  | Only give users the minimum role needed for their job                                |
| **Start with Viewer**                       | For users who only need to review boards, Viewer is the safest starting point        |
| **Limit the Admin role**                    | Admins can create and configure Teamspaces. Keep this role to a small, defined group |

| Role                        | Technical name     | Purpose                                                 |
| --------------------------- | ------------------ | ------------------------------------------------------- |
| **YouDesign Models Admin**  | `x_inpi_yd.admin`  | Create Teamspaces and manage global settings            |
| **YouDesign Models Editor** | `x_inpi_yd.editor` | Create and edit boards within Teamspaces they belong to |
| **YouDesign Models Viewer** | `x_inpi_yd.viewer` | Review shared boards in read-only mode                  |


# Updating

Keep your YouDesign Models application current with minimal effort. Updates are automatically queued and ready to be deployed by your ServiceNow administrator.

## Pre-Upgrade Review

> **Important:** Before proceeding with any upgrade, review the release notes for **all versions between your current version and the target version**. Some upgrades may require additional steps or manual actions. Skipping these may cause unexpected issues.

## Automatic Update Queuing

YouDesign Models updates are automatically queued in your ServiceNow instance, awaiting deployment by a ServiceNow admin. You will receive a notification when an update is available, and you can deploy it at your preferred time.

> **Trial Version Limitation:**
>
> ServiceNow does not support updates for trial installations of YouDesign Models.

## Update Procedure

Follow these step-by-step instructions to update YouDesign Models:

### Step 1: Navigate to All Available Applications

1. Go to **System Applications > All Available Applications > All**

### Step 2: Access the Updates Tab

1. Enter **YouDesign Models** in the search field
2. Click the **Updates** tab

### Step 3: Proceed to Update

1. Click on **YouDesign Models**
2. Click **Proceed to update**

### Step 4: Review Installation Details

1. Review the installation details
2. Choose either **Install now** or **Install later**
3. Confirm by clicking the **Install** button

### Step 5: Monitor Installation Progress

1. The installation progress will display during the update
2. Click **Run in background** to allow the update to continue in the background

### Step 6: Verification

Once the update is finished, the system will notify you. Note that during installation, YouDesign Models may not operate as intended. In some cases, clearing your browser cache may be required.

## Post-Update User Acceptance Testing

Although local configurations remain unaffected by updates, it is recommended to conduct a brief **User Acceptance Test (UAT)** to ensure everything works as expected. Verify the following:

* Custom shape libraries are in place
* Custom configurations are preserved
* All previously created boards and teamspaces are accessible
* Real-time indicators function correctly
* Sharing and access controls work as configured


# Migrating Configuration

> This task requires **ServiceNow System Administrator** privileges in both the source and target instances.

YouDesign Models uses a split migration model: **YouDesign configuration moves through XML files**, while **ServiceNow platform changes move through Update Sets**. Knowing which mechanism each change belongs to is the key to clean non-production → production promotions.

This page describes the recommended workflow and lists the tables involved.

## Recommended Workflow

1. **Do configuration work in a non-production instance** — typically development. Never touch production first.
2. **Stage and verify** in a UAT or test instance before promoting to production.
3. **Promote via XML export/import** for YouDesign Models data and configuration.
4. **Promote via Update Sets** for any ServiceNow platform changes (form views, ACLs, custom tables, `cmdb_rel_type`, `cmdb_rel_type_suggest`, etc.).

> **Rule of thumb:** If the change lives in a `x_inpi_yd_*` table, use XML. If it's a ServiceNow platform change that supports your YouDesign setup (e.g. suggested relationships, form layouts), use an Update Set.

## Why Two Mechanisms?

* **XML export/import** preserves the full record data, including GUIDs (sys\_ids). This is what YouDesign Models configuration needs so that shapes, RTIs, board types, and templates all retain the identities end users have referenced.
* **Update Sets** are the standard ServiceNow platform mechanism for moving customizations like form views, scripts, client code, ACLs, and platform tables.

Mixing the two is fine — and expected. A typical promotion includes both an XML bundle and an Update Set.

## Tables Relevant for Migration

Use this table to decide how to move each kind of content.

### YouDesign Data

These hold the board content and user state. Migrate when you need to move boards, versions, templates, or filter definitions between instances.

| Table Name               | Technical Name                       | Comment                                                                                                          |
| ------------------------ | ------------------------------------ | ---------------------------------------------------------------------------------------------------------------- |
| Board                    | `x_inpi_yd_board`                    | Board metadata — name, description, owner                                                                        |
| Board Content            | `x_inpi_yd_board_content`            | Versioned content of the board. Each shape, link, image is a separate entry with a reference to the Board table  |
| Board Content Element    | `x_inpi_yd_board_content_element`    | Fine-grained content elements                                                                                    |
| Board Realtime Indicator | `x_inpi_yd_board_realtime_indicator` | RTIs applied to a board version                                                                                  |
| Board Scope              | `x_inpi_yd_board_scope`              | Scope entries linking boards to arbitrary ServiceNow records (see [Scope](/models/work-in-the-app/editor/scope)) |
| Board Version            | `x_inpi_yd_board_version`            | Per-board version details (Stage, Approval Dates, RTI data)                                                      |
| Teamspaces & Folders     | `x_inpi_yd_folder`                   | Hierarchical structure of folders; the top-level (Level 0) represents the teamspace                              |
| Filters                  | `x_inpi_yd_filter`                   | Global, Teamspace, and Personal filters                                                                          |
| Templates                | `x_inpi_yd_template`                 | Global, Teamspace, and Personal templates                                                                        |
| Attachments              | `sys_attachment`                     | Filter by `table_name = x_inpi_yd_board` to export attachments linked to boards                                  |
| Attachment Documents     | `sys_attachment_doc`                 | Filter by `sys_attachment.table_name = x_inpi_yd_board`                                                          |

### YouDesign Configuration

These hold the admin-configured metadata that shapes the user experience: shapes, RTI definitions, relationship styles, etc. Migrate these when you've updated shapes, added RTIs, or changed sharing roles.

| Migration Of              | Table Name               | Technical Name                       | Comment                                |
| ------------------------- | ------------------------ | ------------------------------------ | -------------------------------------- |
| Board Types               | Board Types              | `x_inpi_yd_board_type`               | Board type hierarchy                   |
| Board Stages              | Board Stages             | `x_inpi_yd_board_stage`              | Configured stages of YouDesign Boards  |
| Shapes & Shape Categories | Shape                    | `x_inpi_yd_shape`                    | Customized shapes                      |
|                           | Shape Category           | `x_inpi_yd_shape_category`           | Shape category hierarchy               |
| Shape Relationship Styles | Shape Relationship       | `x_inpi_yd_shape_relationship`       | Customized relationship styles         |
| Shape Fields              | Shape Field              | `x_inpi_yd_shape_field`              | Customized field definitions on shapes |
| Realtime Indicators       | Realtime Indicator       | `x_inpi_yd_realtime_indicator`       | RTI definitions                        |
|                           | Realtime Indicator Shape | `x_inpi_yd_realtime_indicator_shape` | Per-shape RTI configuration            |
|                           | Realtime Indicator Value | `x_inpi_yd_realtime_indicator_value` | Per-RTI value mapping                  |

## Tables That Don't Migrate via YouDesign

Some content depends on ServiceNow platform configuration that must travel via an **Update Set** (or be re-configured in the target instance):

* `sys_db_object` changes (custom tables, table extensions)
* `cmdb_rel_type` (new relationship types)
* `cmdb_rel_type_suggest` (new suggested relationships)
* Form views, ACLs, Business Rules, Client Scripts
* The "YouDesign Board" related list addition to custom tables (see [Scope](/models/work-in-the-app/editor/scope))

See [Metamodel Prerequisites](/models/admin/metamodel) for what must be in place before YouDesign configuration is useful.

## Typical Promotion Checklist

When promoting from nonprod to prod, work in this order to avoid broken references:

1. **Metamodel first** — Update Set for `sys_db_object`, `cmdb_rel_type`, `cmdb_rel_type_suggest`
2. **Platform extras** — Update Set for form view changes, ACLs, related list additions
3. **YouDesign configuration** — XML export for shapes, shape categories, shape fields, shape relationships, RTI definitions, board types, board stages, templates
4. **YouDesign data (if needed)** — XML export for specific boards, versions, filters

Verify each step before moving to the next. A missing suggested relationship breaks every shape that depends on it.

## Version Control

Both XML exports and Update Sets produce text artifacts you can store in Git alongside your code. Many teams keep a `/yd-migrations` folder with numbered releases so each promotion is a reviewable artifact.

## Common Pitfalls

* **Forgetting the metamodel** — you migrate shapes that reference tables that don't exist in the target. Shapes appear but can't bind.
* **Forgetting the related list** — scope still works, but ServiceNow form users don't see linked boards until the YouDesign Board related list is added to the target form view.
* **Over-migrating** — don't migrate `x_inpi_yd.gl.*_last_updated` properties manually. They're maintained by the application. See [Global Settings](/models/admin/global-settings).
* **Under-migrating** — committing RTIs without also committing the Realtime Indicator Shape and Realtime Indicator Value tables produces empty RTIs in the target.

## Related

* [Metamodel Prerequisites](/models/admin/metamodel)
* [Installation](/models/get-the-app/installation)
* [Updating](/models/get-the-app/updating)
* [Support Process](/models/reference/support)


# Product Roadmap

YouDesign Models is designed to align seamlessly with the ServiceNow product roadmap, ensuring compatibility with all recent releases and supported versions of ServiceNow.

## Release Cadence

YouDesign Models follows a predictable release schedule so your team can plan upgrades with confidence:

* **One major release per year** — introduces significant new capabilities and structural changes (e.g., v26.0, v27.0)
* **Three minor releases per year** — deliver feature enhancements, improvements, and fixes (e.g., v26.1, v26.2, v26.3)

***

## YouDesign Models Release Timeline

### Current Release

**v26.0** is the current release, introducing the full AI Assistant, Data Panel, Layers panel, versioning, the Commit workflow, and a refreshed end-user experience.

### Planned Releases

Upcoming minors for the v26 line:

* **v26.1** – Next planned minor release
* **v26.2** – Follow-up minor release
* **v26.3** – Final minor of the v26 line
* **v27.0** – Next major release

> **Note:** Release content and timing are subject to change. Contact your ins-pi representative for the latest roadmap details.

***

## Support Policy

Supported releases receive security updates, bug fixes, and ServiceNow compatibility patches.

* **Active support** – the current major and its latest minor
* **Maintenance support** – the previous major for a limited window after the next major ships
* **End of support** – earlier majors are considered obsolete and should be upgraded

> **Important:** We recommend staying on the latest supported release so you always have access to new features, performance improvements, and critical fixes. If you're running an older version, plan an upgrade with your ServiceNow administrator.

For guidance on upgrading YouDesign Models, see [Updating YouDesign Models](/models/get-the-app/updating).

***

## ServiceNow Compatibility

Each YouDesign Models release is tested and certified against recent ServiceNow releases. Check the [YouDesign Models App Detail Page](https://ins-pi.com/getyoudesign) on the ServiceNow Store for the exact compatibility matrix for the version you are planning to install.

To verify your ServiceNow version compatibility:

1. Check your ServiceNow instance version
2. Find the corresponding YouDesign Models version on the Store page
3. Ensure you're running a supported combination

**Questions about your version?** Contact your YouDesign Models administrator or reach out to ins-pi support.


# Features Overview

YouDesign Models is a comprehensive enterprise transformation solution built natively on ServiceNow. It features three distinct interfaces designed to optimize the experience for different user roles and tasks.

## Overview of YouDesign Models Interfaces

YouDesign Models provides three powerful interfaces that work seamlessly together:

### Homepage

Your main landing page for browsing and managing content. The Homepage provides a comprehensive overview for searching teamspaces, folders, and boards while respecting access rights. Here you can:

* Browse through teamspaces and boards
* Manage board details and metadata
* Control sharing and access permissions
* Quickly navigate to editing or presentation modes

Learn more: [Homepage](/models/work-in-the-app/homepage)

### Editor

The collaborative interface for designing and modeling. The Editor is an infinite canvas with easy access to ServiceNow data, used for modeling current and future states. Features include:

* Infinite canvas for unlimited design space
* Direct integration with ServiceNow data
* Real-time collaboration capabilities
* Comprehensive keyboard shortcuts for efficiency
* Export capabilities for sharing your work

Learn more: [Editor Features](#editor)

### Presentation Mode

A professional, read-only interface for showcasing your work. Presentation Mode features real-time updates and interactive drill-down capabilities, perfect for:

* Team reviews and presentations
* Client meetings and stakeholder demos
* Sharing work professionally without editing access
* Interactive navigation through your designs

Learn more: [Presentation Mode](/models/work-in-the-app/presentation-mode)

### AI Assistant

A chat-based assistant that builds and modifies diagrams from plain-language prompts, recreates sketches from images, polishes text, and clusters nodes by keyword — all with a preview and staging flow so you stay in control.

Learn more: [AI Assistant](/models/work-in-the-app/ai)

## Quick Navigation

* [User Interface Overview](/models/work-in-the-app/user-interface) - Understand how to switch between the three interfaces
* [Keyboard Shortcuts](/models/reference/keyboard-shortcuts) - Boost your productivity with keyboard shortcuts
* [Export](/models/work-in-the-app/editor/export) - Learn how to export your designs
* [Homepage Features](/models/work-in-the-app/homepage) - Manage teamspaces, folders, and sharing
* [AI Assistant](/models/work-in-the-app/ai) - Natural-language diagram editing


# User Interface

YouDesign Models features three distinct user interfaces, each designed to optimize the experience for different user groups and use cases. Learn how to navigate between them seamlessly.

## The Three Interfaces

| Interface                                                          | Description                                                                                                      | Primary Users                                           |
| ------------------------------------------------------------------ | ---------------------------------------------------------------------------------------------------------------- | ------------------------------------------------------- |
| [**Homepage**](/models/work-in-the-app/homepage)                   | Comprehensive overview for searching teamspaces, folders, and boards while considering access rights.            | YouDesign Models Admin, Teamspace Admin, Editor, Viewer |
| [**Editor**](/models/work-in-the-app/editor)                       | Collaborative, infinite canvas with easy access to ServiceNow data, used for modeling current and future states. | Editor                                                  |
| [**Presentation Mode**](/models/work-in-the-app/presentation-mode) | Read-only presentation mode featuring real-time updates and interactive drill-down capabilities.                 | Viewer, Presenter                                       |

## Launching YouDesign Models

To launch the YouDesign Models application:

1. Search for **YouDesign Models** in ServiceNow.
2. Click the **YouDesign Models** text to open the application.
3. You'll land on the **Homepage**.

## Navigating Between Interfaces

### From Homepage to Editor or Presentation Mode

Once a board is selected from the **Homepage**:

* Click **Present** to open the board in **Presentation Mode**.
* Click **Edit** to open the board in **Editor Mode**.

### From Editor Mode to Presentation Mode

When in **Editor Mode**, click the **Present** icon in the toolbar to switch to **Presentation Mode**.

### From Presentation Mode to Editor Mode

While in **Presentation Mode**, click the **Edit** icon to switch back to **Editor Mode**.

### Returning to the Homepage

At any time, you can return to the **Homepage** by:

* Clicking the **YouDesign Models** logo in **Presentation Mode**, or
* Clicking the **YouDesign Models** icon in **Editor Mode**.

> **Tip:** The ability to switch between modes provides flexibility to move seamlessly between browsing, editing, and presenting your work.


# User Preferences

User preferences let you tailor YouDesign Models to how you personally work — language, editor defaults, accessibility, and maintenance actions. Your settings are saved to your user profile, so they follow you across sessions.

## Opening the Settings Drawer

All user preferences live in a single **settings drawer** that slides in from the left:

* **On the homepage** — click the logo/settings icon in the top-left corner (tooltip: *"Settings"*).
* **In the editor** — click the **hamburger menu** (☰) icon in the top-left bar.

The drawer is organized into collapsible sections. Click a section header to expand it.

> <img src="/files/jh6xfdfUk1Ge7rYgWD2J" alt="" data-size="original">

## Editor Preferences

Defaults for how the canvas behaves while you work:

| Setting             | Default | What It Does                                                                     |
| ------------------- | ------- | -------------------------------------------------------------------------------- |
| **Snap to grid**    | On      | Aligns shapes to the invisible grid when you drag or resize them                 |
| **Show grid**       | Off     | Displays the grid as a visible dotted/line pattern on the canvas                 |
| **Guided dragging** | On      | Shows alignment guides when you drag a shape near another shape's edge or center |

These settings apply as soon as you toggle them — no reload needed.

## Language

A dropdown with ten languages:

* English (US)
* English (GB)
* Deutsch (German)
* Français (French)
* Español (Spanish)
* Português (Portuguese)
* हिन्दी (Hindi)
* বাংলা (Bengali)
* Türkçe (Turkish)
* 日本語 (Japanese)

Your choice is saved both in your user preferences and in local storage (`yd-user-language`) so it sticks even before you log in.

## Accessibility

The Accessibility section has three toggles. See [Accessibility](/models/work-in-the-app/accessibility) for what each one does in detail:

* **Precise selection** (default on)
* **Reduce motion** (default off)
* **High contrast** (default off)

## Maintenance

Two buttons for resetting state when something's gone wrong:

| Button                | What It Does                                                                                                                            |
| --------------------- | --------------------------------------------------------------------------------------------------------------------------------------- |
| **Reset preferences** | Restores all of your user preferences to their defaults (panel widths, grid settings, palettes, language). Does not affect other users. |
| **Clear cache**       | Clears locally-cached data and reloads the page. Useful if the app is behaving inconsistently after a release.                          |

> **Note:** Neither action modifies data in ServiceNow. Your boards and teamspaces are untouched.

## Global Settings (Admin Only)

At the bottom of the drawer, users with the **YouDesign Models Admin** role see a **Global Settings** link. Clicking it opens the admin configuration area — see [Global Settings](/models/admin/global-settings) for admin-only settings.

Non-admins don't see this link.

## What's Saved Where

| Setting type          | Stored in                            | Visible to                   |
| --------------------- | ------------------------------------ | ---------------------------- |
| Language              | User profile + browser local storage | Only you                     |
| Editor defaults       | User profile                         | Only you                     |
| Accessibility toggles | User profile                         | Only you                     |
| Global settings       | ServiceNow application settings      | All users (applies org-wide) |

## Tips & Gotchas

* **Settings apply immediately** for most toggles; a handful (like Clear cache) trigger a reload.
* **Reset preferences is broad** — it will also reset panel widths, shape color palettes, and the grid setting, not just the single setting you're looking at. Use it when you want a clean slate.
* **Your preferences are yours alone** — admins configure *defaults* via Global Settings, but each user can override them here.

## Related

* [Accessibility](/models/work-in-the-app/accessibility) — dedicated page for the three accessibility toggles
* [User Interface](/models/work-in-the-app/user-interface) — overview of where the hamburger drawer fits in
* [Global Settings (admin)](/models/admin/global-settings) — the admin-side counterpart


# Accessibility

YouDesign Models includes three per-user accessibility toggles that change how the editor behaves — bigger selection targets, reduced motion, and a high-contrast canvas. They apply immediately without a page reload.

## Opening the Accessibility Section

Open the settings drawer (see [User Preferences](/models/work-in-the-app/user-preferences)) and expand the **Accessibility** section.

* **On the homepage** — click the settings icon in the top-left.
* **In the editor** — click the hamburger menu (☰) icon in the top-left bar.

<figure><img src="/files/PHbtQH8Mobzmv0v5U7e3" alt=""><figcaption></figcaption></figure>

## The Three Toggles

### Precise selection

**Default:** On

Increases the area around each element that registers as a click/drag target, so small or narrow elements are easier to select. Internally, the selection target grows from a 2×2 pixel sensitive area to 6×6 pixels.

Turn it **off** if:

* You want clicks to only register when you're directly on an element, not near it
* You find Precise selection accidentally picks up elements behind where you're actually aiming

### Reduce motion

**Default:** Off

When enabled, disables all diagram animations — shape transitions, panning easing, visualization motion effects. The canvas still functions normally; it just snaps instead of animating.

Turn it **on** if:

* You're sensitive to motion or have vestibular concerns
* Animations are making the editor feel sluggish on a lower-powered machine
* You're recording a screencast and don't want animation overhead in frames

### High contrast

**Default:** Off

When enabled, sets the canvas background color to pure white (`#ffffff`) for maximum contrast against dark-colored shapes and text.

Turn it **on** if:

* You have low-vision needs and want stronger figure/ground separation
* You're preparing to export or screenshot a board where the grey default background muddies the image

## Persistence

All three toggles are saved to your user preferences. They stick across sessions and apply on every board you open.

## Not Role-Gated

Accessibility toggles are available to every user — there's no admin gate.

## What They Don't Do

* **They don't change keyboard shortcuts or focus order.** Standard browser accessibility conventions apply as-is.
* **They don't translate the UI** — language is a separate setting (see [User Preferences](/models/work-in-the-app/user-preferences)).
* **They don't export with the board.** If you export a board as an image, the "High contrast" setting applies to your session only; the exported image uses the board's configured background color.

## Related

* [User Preferences](/models/work-in-the-app/user-preferences) — the broader settings drawer
* [Keyboard Shortcuts](/models/reference/keyboard-shortcuts) — full shortcut reference


# Homepage

The **Homepage** is your main landing page when accessing YouDesign Models. Here, you can seamlessly browse through your **Teamspaces** and **Boards**, quickly navigate between editing, sharing, and presenting content, and manage board details with ease.

## Homepage Overview

The Homepage is organized into several key areas that help you manage your content effectively:

### Navigation & Creation

* **Home Icon**: Clicking the YouDesign Models icon always brings you back to the Homepage. This is especially useful when you're in Presentation or Editor mode.
* **Create Teamspace**: Click the **"+"** icon to create a new Teamspace and rename it instantly. This section offers a quick view of all Teamspaces you have access to.

### Search & Discovery

* **Search & Filter**: Use the search bar to quickly locate Teamspaces, Folders, or Boards. The filter option helps narrow down search results based on specific criteria.
* **Teamspace Browser**: The Teamspace Browser provides a hierarchical view of all Teamspaces (top-level), multi-level Folders (optional), and Boards. Boards can either be associated with Folders or directly to Teamspaces.

### Board Management

* **Board Details**: Displays the Board name and path (Teamspace / Folder). Click the Board name to edit it. You'll also see who last updated the Board and when.
* **Board Metadata**: Displays editable Board metadata such as description, owner, type, organization, and notes.
* **Versioning & Stage**: Displays the version and stage of the selected Board. Click to manage or change the version settings.

### Content Navigation

* **Tabs**: Navigate through Board details using three key tabs:
  * **About**: Displays key metadata and the Board Preview.
  * **Members**: Shows users who have access to the Board, managed through the sharing feature.
  * **Explorer**: Displays the content of the Board in a list view and allows you to **commit** future-state items. See [Commit](/models/work-in-the-app/editor/commit).

### Content Controls

* **Core Controls**: Main controls for managing the Board:
  * **Share**: Invite users or groups as viewers or editors, or copy a direct link to a Teamspace or Board.
  * **Present**: Opens the Board in Presentation mode (requires YouDesign Models Viewer role).
  * **Edit**: Switches the Board to Edit mode (requires YouDesign Models Editor role).
* **More Options**: Additional options include:
  * **Duplicate**: Create a copy of the Board. The new Board will automatically be set to Draft stage.
  * **Delete**: Permanently delete the Board.

### Preview & Viewing

* **Board Preview**: A read-only view of the selected Board, providing a visual overview.
* **View Controls**: Adjust the zoom level of the Board Preview, switch to full-screen mode, or click the question mark to view the YouDesign Models version.

## Homepage Sections

Learn more about specific Homepage features:

* [Teamspaces](/models/work-in-the-app/homepage/teamspaces) - Create and manage teamspaces for team collaboration
* [Folders](/models/work-in-the-app/homepage/folders) - Organize your boards with folders and subfolders
* [Sharing and Members](/models/work-in-the-app/homepage/sharing-and-members) - Control access and share content with your team
* [Search & Filters](/models/work-in-the-app/homepage/search) - Find boards, folders, and teamspaces with keyword + attribute filters

> **Tip:** The Homepage provides a centralized hub for all your collaboration and project management needs. Familiarize yourself with each section to maximize your productivity.


# Teamspaces

Teamspaces consist of folders and boards for a closed group of users to collaborate. The intention of the teamspace is to restrict access to content at a higher level. The access rights of a teamspace are inherited through its folders and boards.

## Creating Teamspaces

To create a new Teamspace:

1. Click the **"+"** icon to create a new Teamspace.
2. Rename the Teamspace by using a good name that users will understand.
3. Now you can create folders and boards within the teamspace.

> **Tip:** Use clear, descriptive names for your teamspaces to help team members quickly identify the right space for their work.

## Teamspace Settings

Once a teamspace is created, you can access its settings by following these steps:

1. Click the **"…"** (More Options) menu on your teamspace.
2. Click **Settings** to access the configuration panel.
3. Here you can:
   * Change the description to provide context about the teamspace's purpose
   * See the members assigned to the teamspace
   * Adjust other relevant teamspace configurations

## Sharing Teamspaces

To share a teamspace with your team:

1. Go to the teamspace **Settings** or click the **Share** button.
2. Click the **Share** button to open the sharing dialog.
3. You can invite:
   * **Viewer** users (only users with Viewer roles will appear)
   * **Editor** users (only users with Editor roles will appear)
   * **Teamspace Admins** (only users with Editor role will appear)
4. Select the users or groups you want to share with.
5. Click the **Share** button to confirm.

> ⚠️ **Important:** Only users with a valid YouDesign Models license will be shown in the sharing dialog. Make sure group members have a valid YouDesign Models license, too. Otherwise, they can't access the solution.

> **Tip:** You can also invite entire groups of users at once. Just ensure all group members have the appropriate YouDesign Models license and role assigned.

## User Roles in Teamspaces

Different roles have different levels of access and permissions within a teamspace:

* **Viewer**: Can view boards and content within the teamspace but cannot make edits.
* **Editor**: Can create, edit, and manage boards and content within the teamspace.
* **Teamspace Admin**: Has full administrative control over the teamspace, including managing members, settings, and access permissions.


# Folders

Folders in YouDesign Models provide a hierarchical structure within Teamspaces, enabling logical grouping and organization of boards. This structure allows you to better manage content by creating, moving, or deleting folders as needed.

## Creating Folders

To create a folder:

1. Hover over a **Teamspace** or **Folder** and click the **+** button.
2. Select **Folder** from the menu.
3. To create a sub-folder, click the **+** button on the parent folder.
4. Rename the folder as required.

> **Tip:** Use a hierarchical folder structure to organize boards by department, project phase, or topic for easy navigation.

## Moving Folders

To move a folder to a different location:

1. Click the **…** (More Options) icon on the folder you want to move.
2. Select **Move to** from the menu.
3. Choose the new location for the folder.
4. Click **Move** to confirm the action.

> **Tip:** Moving folders helps you reorganize content as your projects evolve or structure changes.

## Deleting Folders

To delete a folder:

1. Hover over the folder to be deleted.
2. Click the **…** (More Options) icon.
3. Select **Delete** from the menu.
4. Confirm by clicking the **Delete** button in the confirmation dialog.

> ⚠️ **Important:** Deleting a folder will also delete all boards and sub-folders contained within it. Make sure you want to permanently remove this content before confirming deletion.

## Folder Organization Best Practices

* **Create a Logical Structure**: Organize folders by project, team, or timeline to make content easy to find.
* **Use Descriptive Names**: Name folders clearly so team members understand their purpose at a glance.
* **Maintain Consistency**: Keep folder naming and structure consistent across your teamspaces.
* **Limit Nesting Depth**: While sub-folders are supported, try to keep folder nesting to 2-3 levels for easier navigation.

> **Tip:** Regularly review your folder structure to ensure it remains aligned with your team's organizational needs.


# Sharing & Members

The Share feature in YouDesign Models allows you to easily share Teamspaces and Boards with individuals or groups, assigning roles such as Viewer, Editor, or Teamspace Admin. This functionality ensures efficient collaboration across teams and helps manage access permissions.

## Sharing Teamspaces and Boards

To share Teamspaces or Boards with others:

1. Click the **Share** button on the board or teamspace you want to share.
2. Invite individual users or groups as either:
   * **Viewer**: Only users with Viewer roles will appear in this option. Viewers can see content but cannot edit.
   * **Editor**: Only users with Editor roles will appear in this option. Editors can create and modify content.
3. Select the appropriate users or groups from the list.
4. Click the **Share** button to confirm and send invitations.

> ⚠️ **Important:** Ensure that the selected groups contain users with the necessary YouDesign Models roles. Only users with valid YouDesign Models licenses will appear in the sharing dialog.

## Adding Teamspace Admins

To define additional Teamspace Admins with full administrative privileges:

1. Click the **Share** button on the board or teamspace from the Homepage.
2. Select the **Teamspace Admin** option from the sharing dialog.
3. Choose the user from the list (only users with Editor role will appear).
4. Click the **Share** button to confirm the assignment.
5. You'll receive a confirmation message when the action is complete.

> **Tip:** Assign Teamspace Admins carefully as they have full control over the teamspace settings and member management.

> **Note:** Teamspace Admins are visible only to YouDesign Models Admins and other Teamspace Admins for security and privacy reasons.

## Managing Members

The **Members** tab provides an overview of all users with access to a Teamspace or Board.

### Viewing Members

1. Navigate to the **Members** tab on the YouDesign Models Homepage.
2. You'll see a complete list of all users and groups with access to the current Teamspace or Board.
3. The list shows each member's role and any relevant details.

### Removing Members

To remove a member or group from a Teamspace or Board:

1. Navigate to the **Members** tab.
2. Locate the user or group you want to remove.
3. Click the **Trash** icon next to their name.
4. Confirm the removal action.

> ⚠️ **Important:** Removing a member will revoke their access to the Teamspace or Board immediately. They will no longer be able to view or edit content in that space.

## Role Permissions Summary

| Role                       | View | Edit | Manage Members | Manage Settings |
| -------------------------- | ---- | ---- | -------------- | --------------- |
| **Viewer**                 | Yes  | No   | No             | No              |
| **Editor**                 | Yes  | Yes  | No             | No              |
| **Teamspace Admin**        | Yes  | Yes  | Yes            | Yes             |
| **YouDesign Models Admin** | Yes  | Yes  | Yes            | Yes             |

> **Tip:** Use the principle of least privilege when assigning roles. Only grant the minimum permissions necessary for users to perform their duties.


# Search & Filters

Homepage search finds boards, folders, and teamspaces across everything you have access to. It supports keyword search plus attribute filters so you can narrow quickly when the keyword alone isn't specific enough.

## Where to Search

The search box sits at the top of the YouDesign Models homepage. Next to it is a **filter icon** that opens a popover where you can build more specific queries.

<figure><img src="/files/if1oU4O4ZgpJJNJZb7mJ" alt=""><figcaption></figcaption></figure>

## Typing a Query

1. Click the search input and type your keyword.
2. As you type, results are searched with a **short debounce** (about 1 second) so the page doesn't flicker on every keystroke.
3. Matching boards, folders, and teamspaces appear in the results list.

## Filters

Click the filter icon to open the filter popover. You build a filter in three choices:

1. **Type** — scope the results:
   * Board
   * Folder
   * Teamspace
2. **Attribute** — the field you want to filter on:
   * **Type** (board type like Capability Map, Process Map, etc.)
   * **Organization**
   * **Owned by**
   * **Editor**
   * **Reader**
3. **Values** — the specific values for the chosen attribute (for example, specific owners or organization records).

When you pick **Organization** as the attribute, an extra **Organization Table** dropdown appears so you can tell the filter which organization table to draw values from.

Click **Apply** to add the filter.

## Active-Filter Pills

Every filter you apply shows up as a **pill** beneath the search box:

* Each pill describes the filter (e.g., *"Owned by: Kadir"*)
* Click the × on a pill to remove that filter
* Clearing all pills returns the full result list

## Combining Text + Filters

Search text and filters work together. A common pattern:

1. Type a keyword like *"capability"*
2. Apply a filter *Type = Board*
3. Apply a filter *Owned by = \[your name]*

The results now only show boards owned by you whose content matches *"capability."*

> **Tip:** Some filters require a search query to be effective. If you see the tooltip *"Some of the filters are not applied, because there is no search query,"* type a keyword in the search box to activate them.

## Roles & Visibility

Homepage search respects your access rights. Results never include boards, folders, or teamspaces you don't have permission to see.

## Limits & Gotchas

* **Debounced input.** Expect a \~1 second delay between typing and updated results.
* **Filter chain order matters.** Pick Type first, then Attribute, then Values — some Attribute options depend on Type.
* **Lifecycle filter is not available** in the current version. It may return in a later release.
* **Filter values are scoped to what you can see** — you won't be offered an owner or editor you don't have access to.

## Related

* [Teamspaces](/models/work-in-the-app/homepage/teamspaces)
* [Folders](/models/work-in-the-app/homepage/folders)
* [Sharing & Members](/models/work-in-the-app/homepage/sharing-and-members)
* [Canvas Search](/models/work-in-the-app/editor/search) — for searching *inside* a single board


# Editor

The YouDesign Models Editor is the core workspace for editors, equipped with a robust set of tools that allow you to craft dynamic content, integrating real-time ServiceNow data with various visual elements. From diagrams to models, the editor empowers users to create comprehensive, data-driven designs tailored to specific teamspace settings.

![YouDesign Models Editor overview](/files/BiqsDTm9D2psQQAK0oU5)

> **Tip:** Hover over any icon to see a tooltip displaying its name.

## Board Toolbar: Your Essential Controls

The **Board Toolbar** gives you access to fundamental tools and options for managing boards, from navigating to the homepage to exporting your work.

| Icon                      | Purpose                                       | Action                                                         | Tip                                                                                          |
| ------------------------- | --------------------------------------------- | -------------------------------------------------------------- | -------------------------------------------------------------------------------------------- |
| **YouDesign Models Icon** | Acts as the "Home" button.                    | Click to navigate back to the homepage.                        | Use this to quickly return to your teamspaces or switch boards.                              |
| **Board Name**            | Board identification and settings.            | Click to rename or adjust board settings.                      | Keep names clear for easy identification when working with multiple boards.                  |
| **Search**                | Quickly locate elements on the board.         | Activate an in-board search to find text, images, or elements. | Efficient for navigating large boards with many components.                                  |
| **Present**               | Transform your board into a presentation.     | Click to switch to Present Mode.                               | Organize frames beforehand for smooth presentations. Use full-screen mode for better impact. |
| **Export**                | Export boards or frames in different formats. | Click to access export options for sharing or printing.        | Ideal for sharing diagrams with non-users or preparing for external presentations.           |

![Board toolbar](/files/1jTsgEv3hjyYTK0KO39c)

## Widget Toolbar: Advanced Features at Your Fingertips

The **Widget Toolbar** offers access to advanced controls and insights, from real-time data integration to collaboration tools.

| Icon                    | Purpose                                    | Action                                   | Description                                                   |
| ----------------------- | ------------------------------------------ | ---------------------------------------- | ------------------------------------------------------------- |
| **Realtime Indicators** | Manage real-time data indicators.          | Opens the Realtime Indicators sidebar.   | View and toggle real-time data options applied to your board. |
| **Data Panel**          | Edit shape and relationship data.          | Opens the Data Panel sidebar.            | Modify data fields for shapes and their relationships.        |
| **Explorer**            | View board content overview.               | Opens the Explorer for quick navigation. | Summarizes all board elements for easy access.                |
| **Notifications**       | Track updates and comments.                | Opens the Notifications panel.           | Stay informed about comments and updates in real-time.        |
| **Collaborators**       | View collaborators on the board.           | Displays collaborator details.           | Shows who is working on the board with you.                   |
| **Share**               | Invite others to collaborate on the board. | Opens sharing options.                   | Add new collaborators, editors, or viewers to your board.     |

![Widget toolbar](/files/jEnK1U7YU1lnQnbTgoWs)

## Control Bar: Shape Your Canvas

The **Control Bar** allows you to access core design tools, such as adding text fields, creating frames, and navigating between panels.

| Icon            | Purpose                       | Action                                                                 |
| --------------- | ----------------------------- | ---------------------------------------------------------------------- |
| **Diagramming** | Access the Diagramming Panel. | Click to open the **Left Sidebar** and view the Diagramming Panel.     |
| **Data Hub**    | Access the Data Hub.          | Click to extend the Left Sidebar and view the Data Hub.                |
| **Text Field**  | Add text to your canvas.      | Click to place a Text Field on the canvas.                             |
| **Frame**       | Create a new frame.           | Click to select a format and add a new frame to the canvas.            |
| **Undo**        | Undo your last action.        | Use **CTRL/CMD + Z** or click the icon to reverse actions.             |
| **Redo**        | Redo your last undone action. | Use **CTRL/CMD + Y** or click to reapply the changes that were undone. |

![Control bar](/files/a43EzCOge5b8o9k3jH9H)

## Left Sidebar: Explore and Manage Your Work

The **Left Sidebar** dynamically extends based on your selection in the Control Bar, offering a comprehensive view of diagramming elements, data, and more. You can also switch between **List View** and **Tile View** for better organization of your resources.

| Feature        | Description                                                     |
| -------------- | --------------------------------------------------------------- |
| **Search Bar** | Quickly locate teamspaces, folders, or elements on the board.   |
| **List View**  | Displays items in a vertical list for easy browsing.            |
| **Tile View**  | Displays items as larger, clickable tiles for visual reference. |

![Diagramming Left Sidebar](/files/WobF0GfXyPwgEiM3Esaw)

## Right Sidebar: Data Panel for Quick Edits

The **Data Panel** allows you to edit elements directly within YouDesign Models, offering flexibility without needing to leave the board. You can modify:

* Visual elements (links, relationships)
* Frames (name, description, links)
* Board (copy board link)
* Attachments (view and edit)

Administrators can configure which fields are displayed for each element, ensuring that only relevant data is accessible for editing.

![Data Panel](/files/wKQz96LgKVXjYWQEkwdO)

> **🖼 Screenshot needed:** The image above is dated December 2023 and likely shows a pre-v26 Data Panel. Replace with a current screenshot showing the right-sidebar [Data Panel](/models/work-in-the-app/editor/data-inspector) / [Layers](/models/work-in-the-app/editor/layers) tabs in v26.

## View Toolbar: Navigate and Control Your Canvas

The **View Toolbar** offers tools for zooming, fitting your canvas to the screen, and toggling full-screen mode.

| Icon              | Purpose                                            | Action                                                             |
| ----------------- | -------------------------------------------------- | ------------------------------------------------------------------ |
| **Fullscreen**    | Toggle Fullscreen mode.                            | Click to extend the YouDesign Models interface to fill the screen. |
| **Fit to Screen** | Adjust the canvas to fit within the screen.        | Click to zoom and fit the current selection into view.             |
| **Minimap**       | Navigate the canvas easily with a bird's-eye view. | Click to open the minimap for broader canvas navigation.           |

![View Toolbar with minimap](/files/vQ9u9CMnbFLi9Pb7k6xw)

## Modeling Canvas: Where Your Ideas Come to Life

The **Modeling Canvas** is the space where you create and bring your designs to life. Use all available tools to build your models, then share or present them with different view options.


# Shapes

Shapes are the primary building blocks of a YouDesign Models board. Add them from the shape library, move and resize them, replace one for another while keeping connections intact, align and distribute multiple shapes at once, and lock any shape to prevent accidental changes.

## Adding Shapes

Two ways, both from the **Shapes library** in the Diagramming panel:

**Click & Add**

1. Click a shape in the library.
2. Move the mouse to the canvas.
3. Click again where you want the shape placed.

**Drag & Drop**

1. Click and hold the shape in the library.
2. Drag it onto the canvas.
3. Release to drop.

![Adding shapes](/files/RWUICtbwA3KVeojGr4I8)

## Moving Shapes

Click and drag to move a single shape. For multiple shapes at once:

* **Lasso** — press and hold left mouse button on the canvas for about 1 second, then drag to draw a selection box. Any shape the box touches is selected.
* **Shift-click** — hold **Shift** and click additional shapes to add them to the current selection.
* **Alt / Option click** — hold **Alt** (Windows) or **Option** (Mac) and click to add or remove individual shapes from a selection.

Once multi-selected, drag any shape in the set to move them all together.

## Removing Shapes

* Select and press **Backspace** or **Delete**.
* Or use the **Delete** option in the toolbar dropdown menu.

## Duplicate

To quickly copy a shape:

* **`Ctrl + D`** / **`Cmd + D`** — duplicate in place
* **Right-click → Duplicate** — same as above via menu
* **Copy/Paste** — `Ctrl/Cmd + C` then `Ctrl/Cmd + V`

### Duplicate in 4 Directions (Lane / Kanban pattern)

When working with lane-based visualizations (Kanban, Swimlanes), an **Add Lane** action duplicates the selected shape to one of four directions — **Right**, **Left**, **Top**, or **Bottom** — with appropriate spacing and connection-preservation. Use this for quickly extending lane structures.

## Replace Shape

You can swap one shape type for another while keeping the shape's connections, data binding, and position on the canvas:

1. Select a single shape on the canvas.
2. **Shift-click** the replacement shape in the Shapes library.

The new shape takes over the location, key, group membership, and — where compatible — the size of the original. Existing relationships stay attached. If you're replacing a group with a non-group shape, the group members are detached.

**Replace rules:**

* Only one shape at a time can be replaced.
* The shape must not be locked.
* Frames, table panels, and visualizations cannot be replaced this way.
* Table-bound shapes can only be replaced with shapes whose table binding is compatible.

> **Tip:** Use the toolbar's **Switch type** option as an alternative entry point for replacing shapes.

## Align & Distribute

When two or more shapes are selected, the **Align Shapes** tool appears in the toolbar with these actions:

**Align**

* **Align Left**
* **Align Horizontal Center**
* **Align Right**
* **Align Top**
* **Align Vertical Center**
* **Align Bottom**

**Distribute** (requires 3 or more shapes)

* **Distribute Vertically** — equal vertical spacing
* **Distribute Horizontally** — equal horizontal spacing

## Resizing

1. Select the shape.
2. Hover over an edge or corner until the resize indicator appears.
3. Click and drag to resize — corners resize diagonally, edges resize along one axis.

## Rotating

1. Select the shape.
2. Drag the **Rotation arrow** icon around the shape to set its angle.

## Fill, Border, and Font Color

With a shape selected, the toolbar exposes:

* **Background Options** — fill color picker + opacity slider
* **Border Style, Opacity, and Color** — stroke color, stroke opacity, and **Border Thickness** slider (1–10)
* **Font Color** — color picker for the shape's text

For full text styling (font family, size, alignment, highlight, clipping), see [Text Formatting](/models/work-in-the-app/editor/text-formatting).

## Locking

Locking prevents accidental changes to a shape's position or content.

1. Select the shape (or group of shapes).
2. Click **Lock** in the toolbar.

To unlock: select the locked shape and **hold** the **Unlock** button until the toolbar appears.

> **Tip:** Lock controls work on multiple selected shapes at once.

## Stacking Order

* **Bring to Front** — move the selection above all other shapes on the same layer
* **Send to Back** — move it below all other shapes on the same layer

For per-layer control, use the [Layers](/models/work-in-the-app/editor/layers) panel.

## Related

* [Text Formatting](/models/work-in-the-app/editor/text-formatting) — style the text inside shapes
* [Relationships](/models/work-in-the-app/editor/relationships) — connect shapes with dependencies
* [Favorites](/models/work-in-the-app/editor/favorites) — save styled shapes for quick reuse
* [Layers](/models/work-in-the-app/editor/layers) — organize shapes across layers
* [Grouping](/models/work-in-the-app/editor/grouping) — bundle shapes into a boundary
* [Keyboard Shortcuts](/models/reference/keyboard-shortcuts) — the full shortcut reference


# Shape Libraries

YouDesign Models ships with a broad set of **shape libraries** organized into categories. Each library is a curated set of shapes designed for a specific use case — architecture, cloud, process modeling, annotation, and more. New libraries are added with every release.

This page is a reference for what's bundled. For how to add a single shape to a board, see [Shapes](/models/work-in-the-app/editor/shapes).

## Where to Find the Libraries

Open the **Diagramming** panel in the left sidebar of the editor. Libraries are listed as expandable categories. Use the search box at the top of the panel to search across all libraries at once.

> <img src="/files/gh6giiiBF6fzx4q9UHqc" alt="" data-size="original">

## Core Libraries

| Library          | Description                                                                                                           |
| ---------------- | --------------------------------------------------------------------------------------------------------------------- |
| **Basic Shapes** | Fundamental geometric shapes — circles, squares, triangles, rectangles. Versatile for any diagramming or design task. |
| **Arrows**       | Arrow shapes for indicating direction, flow, or relationships — useful in flowcharts and process maps.                |
| **Notes**        | Annotation shapes (sticky notes, callouts) for comments or explanations alongside diagram content.                    |
| **Logos**        | Predefined logos for branding, presentations, or representing specific companies, technologies, or software.          |

## Architecture & Framework Libraries

| Library          | Description                                                                                                                 |
| ---------------- | --------------------------------------------------------------------------------------------------------------------------- |
| **Archimate**    | Official Opengroup Archimate shape library. Available on request — contact your ins-pi representative to have it installed. |
| **C4**           | Shapes based on the C4 model for software architecture (Person, System, Container, Component).                              |
| **Architecture** | Shapes and symbols used in enterprise architectural planning and design. Inspired by the ins-pi UPMX methodology.           |
| **Metamodel**    | Shapes for documenting data metamodels — entities, attributes, cardinalities.                                               |

## Cloud Platform Libraries

| Library   | Description                                                                       |
| --------- | --------------------------------------------------------------------------------- |
| **AWS**   | Official AWS Architecture icon set for building AWS architecture diagrams.        |
| **Azure** | Official Azure Public Services icon set for building Azure architecture diagrams. |
| **GCP**   | Google Cloud Platform official icons.                                             |

## ServiceNow & Infrastructure Libraries

| Library              | Description                                                                                                                 |
| -------------------- | --------------------------------------------------------------------------------------------------------------------------- |
| **ServiceNow**       | Specific to the ServiceNow platform — shapes for the Common Services Data Model (CSDM) and other modules (GRC, ITSM, etc.). |
| **Designer Network** | Network-diagramming shapes ported from the legacy ins-pi Designer application — servers, routers, switches, workstations.   |

## Requesting a Library

If your team needs a library that isn't bundled, contact your **ins-pi representative**. Custom and community libraries can be installed into your YouDesign Models instance without waiting for a platform release.

Custom shape development (entirely new shape sets with your brand or a proprietary methodology) is also available as a professional service — see the [Support Process](/models/reference/support).

## Admin Configuration

Administrators can extend or modify libraries directly. See:

* [Shape Administration](/models/admin/shapes) — adding and editing individual shapes
* [Shape Categories](/models/admin/shapes#shape-categories) — creating and reorganizing categories

Changes to libraries migrate via [XML export/import](/models/get-the-app/migrating-configuration), not via Update Sets.

## Related

* [Shapes](/models/work-in-the-app/editor/shapes) — adding, moving, and styling individual shapes
* [Text Formatting](/models/work-in-the-app/editor/text-formatting) — styling text within shapes
* [Favorites](/models/work-in-the-app/editor/favorites) — save your most-used shapes for one-click access
* [Shape Administration (admin)](/models/admin/shapes) — configuring shapes and categories


# Text Formatting

Every shape that contains text can be formatted independently — font, size, weight, color, alignment, and more — so your boards can reflect your organization's style and keep busy diagrams legible.

## Entering Text Edit Mode

Double-click a shape's text to enter edit mode. The text becomes editable and the **text formatting toolbar** expands in the top toolbar with formatting options.

Press **Escape** or click outside the shape to exit edit mode.

> <img src="/files/xb2CV52mNd5QLEG3EdAX" alt="" data-size="original">

## Available Formatting

### Font Style

Toggle buttons for:

* **Bold**
* **Italic**
* **Underline**
* **Strikethrough**

### Font Family & Size

* **Font** — dropdown of available font families (the default font is set by your admin in [Global Settings](/models/admin/global-settings))
* **Font Size** — dropdown of available sizes

### Text Color & Highlight

* **Text Color** — color picker for the text itself
* **Highlight Text** — color picker for the background behind the text

### Alignment

* **Horizontal** — Align **Left**, **Center**, or **Right**
* **Vertical** — Align **Top**, **Middle**, or **Bottom**

### Text Clipping

* **Enable Text Clipping** / **Disable Text Clipping** — controls what happens when text overflows the shape:
  * **Clipping enabled** — overflowing text is cut off at the shape boundary
  * **Clipping disabled** — text extends beyond the shape edges

## Formatting Multiple Shapes at Once

Select multiple shapes (click + drag a selection, or Shift-click multiple shapes), then use the text formatting controls to apply changes to all of them. Each shape keeps its own text content but shares the new formatting.

<figure><img src="/files/IXRXNVOaz5plwv3u99tn" alt=""><figcaption></figcaption></figure>

## Read-Only Mode

In presenter mode or when you're viewing a board without edit rights, the text formatting toolbar is hidden. You can still see the formatted text — you just can't change it.

## When the Font Color Is Disabled

If your admin has enabled **Improve Text Visibility** in Global Settings, the font color option is disabled for shapes so text colors stay high-contrast against their backgrounds. Ask your admin to turn the setting off if you need per-shape color control.

## Tips

* **Use the default font** for consistency across a board — mixing fonts often hurts readability.
* **Combine alignment and clipping** — if you're making compact cards, enable clipping with top-center alignment to keep titles from spilling over.
* **Style once, repeat with Favorites** — once a shape looks how you want, save it as a [Favorite](/models/work-in-the-app/editor/favorites) to reuse without reformatting.
* **For bulk text fixes across many shapes**, use the [AI Text Adjust toolbar](/models/work-in-the-app/ai/text-adjust) — it's faster than reformatting one shape at a time.

## Related

* [Shapes](/models/work-in-the-app/editor/shapes) — shape-level properties (fill, border, size) that sit alongside text formatting
* [Favorites](/models/work-in-the-app/editor/favorites) — save a formatted shape as a reusable favorite
* [AI Text Adjust](/models/work-in-the-app/ai/text-adjust) — grammar, shortening, tone, and translation
* [Global Settings](/models/admin/global-settings) — the admin-controlled default font and palette


# Favorites

My Favorites allows you to save and reuse your preferred shapes and visualizations, making your design process faster and more efficient. By organizing frequently used elements, you can maintain consistency across projects and create personalized graphics with ease.

## Why Use My Favorites?

* **Speed Up Your Workflow:** Quickly access your most-used shapes and elements, streamlining your design process.
* **Consistency Across Designs:** Reuse your favorite shapes to maintain a consistent and recognizable style across multiple projects.
* **Save Time & Stay Organized:** By using My Favorites, you can easily organize your favorite shapes and keep your workflow efficient.

## Creating Favorites

1. Open your YouDesign Models Board in **Editor Mode**.
2. In the **Left Sidebar**, open the **Diagramming View**.
3. Select a shape that you want to add to **My Favorites**.
4. Click and drag the desired shape – when you do this, a "Drop here to create a favorite" box will appear.
5. Drop the shape into the "Drop here to create a favorite" box.

<figure><img src="/files/DC4nC22dNxlELP2Na9Dr" alt=""><figcaption></figcaption></figure>

## Using Favorites

1. Open your YouDesign Models Board in **Editor Mode**.
2. In the **Left Sidebar**, go to the **Diagramming View**.
3. Click on **My Favorites** to expand the drop-down menu. This will display the names and thumbnails of your saved shapes and elements for easy access.
4. Drag & Drop the shapes from the My Favorites panel on the Board to use them.

<figure><img src="/files/8YZIS9V6M1AvvIsxTRSp" alt=""><figcaption></figcaption></figure>

## Removing Favorites

1. In the **Diagramming View** on the Left Sidebar, expand the **My Favorites** list.
2. Hover over the **My Favorites** section heading — a **pen (edit) icon** appears.
3. Click the pen icon to enter edit mode — a **"Drop here to remove from favorites"** box appears.
4. Drag the favorite you want to remove into the drop zone.

<figure><img src="/files/fKh6PiACEFnuNTbyKWVF" alt=""><figcaption></figcaption></figure>

## List View and Matrix View

My Favorites supports both **list view** (one shape per row with names visible) and **matrix view** (compact grid of thumbnails). Toggle between them using the view-switch buttons at the top of the Diagramming panel — same as other shape categories.

* **List view** is better when names matter or you have fewer favorites.
* **Matrix view** is better for scanning visually when you have many favorites.

## Tips

* **Drop zone appears only during drag.** The "Drop here to create a favorite" box shows up the moment you begin dragging any shape from the library — if you don't see it, make sure you've expanded the **My Favorites** section first.
* **Search includes Favorites.** The Diagramming search box (top of the panel) searches across all categories including My Favorites, so a search term is the fastest way to find a favorite with a unique name.
* **Favorites are per-user.** Your favorites don't affect other team members.
* **For reusable compositions, use Templates instead.** A single favorite shape is one shape; [Templates](/models/work-in-the-app/editor/templates) capture whole arrangements.

## Related

* [Shapes](/models/work-in-the-app/editor/shapes) — the source of favorites
* [Shape Libraries](/models/work-in-the-app/editor/shape-libraries) — the bundled libraries you pick favorites from
* [Templates](/models/work-in-the-app/editor/templates) — for reusing groups of shapes, not single shapes


# Templates

Templates let you capture a group of shapes, relationships, and text — with all their styling intact — so you can re-use the whole arrangement on future boards without rebuilding it from scratch. Think of them as stencils for entire composed pieces, not individual shapes.

Use templates for:

* Repeating diagram layouts (e.g. a standard capability-with-applications block)
* Branded title pages (logo + diagram name + author + version)
* Analysis frameworks (PESTLE, SWOT, stakeholder canvases)
* Team-standard patterns your organization applies often

## Template Scopes

Every template belongs to one of three scopes, controlling who can see and use it:

| Scope         | Who Can Use It                                  | Who Can Create / Promote It    |
| ------------- | ----------------------------------------------- | ------------------------------ |
| **Personal**  | Only you                                        | Anyone (Editor role is enough) |
| **Teamspace** | Everyone editing boards in the parent teamspace | Teamspace Admins               |
| **Global**    | Every user across every teamspace               | YouDesign Models Admins        |

New templates are **Personal by default**. Elevation to Teamspace or Global happens via the Move action (see below).

## Where Templates Live

Open the **Diagramming** panel in the left sidebar and expand the **Templates** section. Templates appear grouped by scope (Global, Teamspace, Personal), each with a preview tile.

> <img src="/files/sTG78Bd0NFSLLRIWP3Sa" alt="" data-size="original">

Click a template to place a copy on the canvas — same click/drag behavior as shapes.

## Creating a Template

Once you've built something you want to reuse:

1. **Select** the shapes, relationships, and text you want in the template. Use a lasso selection or Shift-click multiple shapes.
2. Click the **⋯ (More options)** menu on the selection toolbar.
3. Choose **Create template**.
4. In the dialog that opens:
   * Give the template a **Name**.
   * Add a **Description** (helps you and teammates recognize it later).
5. Click **Apply**.

The template is saved to your **Personal** scope and immediately appears in the Templates panel.

<figure><img src="/files/KzKc8CBmNyHjnTGOeZE1" alt=""><figcaption></figcaption></figure>

## Promoting to Teamspace or Global

A Personal template becomes a Teamspace or Global template through the **Move** action:

1. Expand the **Templates** section in the Diagramming panel.
2. Hover your Personal template — a **⋯ (more options)** button appears.
3. Click **Move** → pick the target scope:
   * **Teamspace** — requires **Teamspace Admin** role
   * **Global** — requires **YouDesign Admin** role
4. The template moves into the selected scope and is immediately visible to the new audience.

If you don't have the required role, the Move option for that scope is hidden.

## Using a Template

1. Expand **Templates** in the Diagramming panel.
2. Click or drag a template onto the canvas.
3. The grouped set of shapes, relationships, and text is added as a normal editable selection — you can move, resize, restyle, or break it apart just like manually-drawn content.

Template instances are **independent copies** — editing a template on the canvas doesn't affect the template definition, and updating the template later doesn't retroactively change existing boards.

## Editing or Deleting a Template

Hover a template in the Templates panel and click **⋯** to access:

* **Move** (to promote or re-scope)
* **Delete** — removes the template definition. Existing instances on boards are not affected.

Renaming is currently done via the same flow as creation — delete and re-create, or contact an admin if the template is Global/Teamspace and you need a rename.

## Working with Templates at Scale

* **Keep a naming convention.** Prefix by purpose: `Arch — …`, `Process — …`, `Title — …`. Makes the Templates panel easy to scan as the list grows.
* **Promote sparingly.** A Global template affects every user; check with stakeholders before promoting.
* **Version in the name.** If you update a template that downstream users might still be using, give the new one a `v2` suffix rather than replacing in place.
* **Don't over-template.** For a shape you'll reuse often with just a color variation, [Favorites](/models/work-in-the-app/editor/favorites) is a faster tool than Templates.

## Limits & Gotchas

* **Personal templates live with your user account.** Deleting your account removes them — migrate important templates to Teamspace scope first.
* **Moving a Personal template to Global is a one-way action in the UI.** To bring it back, an admin has to re-Move it (or delete and recreate).
* **Templates capture styling and content, not data bindings.** If a template includes a Data Hub shape, the copy placed on a new board will be an empty (unbound) shape of the same type, not bound to the same record.
* **Templates are migrated via XML**, like other configuration. See [Migrating Configuration](/models/get-the-app/migrating-configuration).

## Related

* [Favorites](/models/work-in-the-app/editor/favorites) — single-shape reuse instead of grouped templates
* [Shapes](/models/work-in-the-app/editor/shapes) — the building blocks inside a template
* [Access Rights and Roles](/models/admin/access-rights-and-roles) — role requirements for Move actions
* [Migrating Configuration](/models/get-the-app/migrating-configuration) — moving templates between instances


# Frames

**Frames** in YouDesign Models help you logically group content for your target audience. They are essential for exporting content and using in Presentation Mode, allowing you to navigate from one frame to the next, much like in PowerPoint.

## Adding Frames

To add a Frame to your board:

1. Click the **Frame** icon in the control bar to open the **Frame Templates** panel.

<figure><img src="/files/xioajCsy2cxMbnsT9fk9" alt=""><figcaption></figcaption></figure>

1. Pick a template (see below). The frame is placed on the board next to your last frame, pre-sized for the template you picked.

<figure><img src="/files/ybbiQ29dWBNiGsyknKw5" alt=""><figcaption></figcaption></figure>

## Frame Templates

Six pre-sized templates are available in the Frame Templates panel. Pick the one closest to where the frame's content will ultimately live (print page, slide, square card, etc.):

| Template         | Dimensions (pixels) | Use for                                      |
| ---------------- | ------------------- | -------------------------------------------- |
| **Custom**       | 700 × 500           | A generic starting size you'll resize freely |
| **Paper A4**     | 2100 × 2970         | A4 portrait print output                     |
| **Paper Letter** | 2159 × 2794         | US Letter portrait print output              |
| **16:9**         | 2320 × 1305         | Slide decks, widescreen displays             |
| **4:3**          | 1740 × 1305         | Classic slide decks, older projectors        |
| **1:1**          | 1450 × 1450         | Square social or dashboard tiles             |

Template dimensions are **fixed**, but the frame is fully resizable after creation — the template just gives you a sensible starting size. You can also add more frames of the same template; they're placed alongside the last one.

## Selecting Frames

To select a frame for renaming, resizing, or other actions:

1. Click on the frame label.
2. Drag the mouse from outside the frame to select it.
3. Click on its content area

## Renaming Frames

Click on the frame's label to rename it.

## Changing Frame Color

Once a frame is selected, use the toolbar to change its color by clicking the color icon.

## Positioning & Resizing Frames

To resize a frame:

1. Use the corner circles to adjust its size, or
2. Drag from the edges when the cursor changes to an arrow.

> **Note:** Frame sizes do not automatically adjust to content, ensuring consistency for presentations and exports.

## Deleting Frames

To delete a Frame:

* Select the Frame and press **Backspace** or **Delete**, or
* Use the **Delete** option in the toolbar under "... more".

> **Warning:** Deleting a Frame will also remove all its content.

## Locking Frames

Lock a frame to prevent accidental changes:

1. Select the frame or group of frames.
2. Use the **Lock/Unlock** option in the toolbar.

## Duplicating Frames

Duplicate a frame by:

* Selecting it and clicking **Duplicate** in the context menu, or
* Using the shortcut **Ctrl/Cmd + D**.

## Right-Click Menu

Right-click a selected frame for quick access to:

* **Settings** — frame properties
* **Rename**
* **Duplicate**
* **Delete**
* **Move To** — move the frame (and its content) into a different location or container
* **Move To Layer** — reassign the frame to a different layer (see [Layers](/models/work-in-the-app/editor/layers))
* **Bring to Front** / **Send to Back**

## Related

* [Export](/models/work-in-the-app/editor/export) — exports are scoped to frames
* [Presentation Mode](/models/work-in-the-app/presentation-mode) — navigates frames in order
* [Layers](/models/work-in-the-app/editor/layers) — manage which layer a frame lives on


# Images

YouDesign Models lets you drop images straight onto a board — screenshots, photos, icons, diagrams — and crop them in place. Images are first-class canvas elements: you can resize, delete, layer, and lock them like any other shape.

## Adding Images

Three ways to add an image:

### Upload from File

1. Click the **Upload** icon in the editor toolbar.
2. Pick a file from the system file browser.
3. The image appears on the canvas where you can drag it into position.

### Paste from Clipboard

Copy an image anywhere (screenshot, web page, email) and press **Ctrl+V** / **Cmd+V** while focused on the canvas. The image is pasted immediately.

### Drag & Drop from Finder / Explorer

Drag an image file from your operating system's file browser (macOS Finder, Windows Explorer) directly onto the canvas and drop it where you want it placed.

## Supported Formats

* **PNG**
* **JPG** / **JPEG**
* **SVG**

Other formats aren't supported in v26. Your administrator may further restrict the allowed types via a ServiceNow system property.

## Resizing

Images resize like any other shape:

1. Select the image.
2. Hover near its edge or corner for the resize indicator.
3. Drag to resize — corners resize proportionally, edges resize along one axis.

## Cropping

Cropping is done in place — no round-trip to an external editor:

1. Select the image.
2. Click the **Crop image** icon on the toolbar.
3. A cropping overlay appears with handles around the image. Visual guides help you align the crop.
4. Drag the handles to set the area you want to keep.
5. Click outside the image (or click elsewhere on the canvas) to finalize.

> **Tip:** Cropping produces a new version of the image. The original dimensions can't be recovered once you commit the crop — make a duplicate first if you think you'll want the uncropped version later.

## Replacing an Image

To change an image while keeping its canvas position, size, and links:

* **Crop to re-upload** — the cropping tool writes a new image URL into the existing shape. You can effectively swap content by cropping onto a fresh upload.
* **Manual swap** — delete the old image and paste or upload the new one in the same spot.

> **Note:** A single-click "Replace" button isn't available in v26 — replacement goes through upload + delete.

## Deleting an Image

Images are deleted the same way as any shape:

* Select and press **Delete** or **Backspace**
* Or use the **Delete** option from the toolbar menu

## Locking & Stacking

Images support the same lock and stacking controls as other shapes:

* **Lock** to prevent accidental moves or edits (toolbar → Lock).
* **Bring to Front** / **Send to Back** to control which elements cover which.

See [Shapes](/models/work-in-the-app/editor/shapes) for the full lock and stacking behavior.

## Limits & Gotchas

* **No URL import** — you can't link to an external image URL. The image has to be uploaded, pasted, or dragged from disk.
* **No ServiceNow attachment picker** — images aren't pulled from attachment tables; they're stored with the board.
* **No rotation / filters / effects beyond crop** — images are cropped and resized, but not color-adjusted or rotated from the image toolbar.
* **Large images can slow scrolling** — consider cropping before upload if the source is very large (e.g., a high-DPI screenshot of a full-screen design).

## Related

* [Shapes](/models/work-in-the-app/editor/shapes) — the base behavior images inherit (resize, lock, stack)
* [Export](/models/work-in-the-app/editor/export) — board exports include images at the current size
* [AI Assistant: Attaching Images](/models/work-in-the-app/ai/images) — use an image as AI input


# Grouping

Grouping elements keeps related items together, making it easier to move, edit, or duplicate them as a unit.

<figure><img src="/files/QN8dzNqFeyJJ2jlJaFbC" alt=""><figcaption></figcaption></figure>

## Grouping Elements

1. **Select the elements**:
   * Draw a selection frame around the elements with a click-and-drag, or hold **Shift** and click individual shapes to build a multi-selection.
2. **Group them**:
   * Click the **Group objects** button in the selection toolbar, **or** press **Ctrl + G** (**Cmd + G** on Mac), **or** right-click and choose **Group** from the context menu.

Once grouped, all formatting-related changes — fill, border, text color, alignment — apply to the group as a whole.

## Ungrouping Elements

1. **Select the group**:
   * Click any element that's part of the group — the whole group selects.
2. **Ungroup**:
   * Click the **Ungroup** button in the toolbar, press **Ctrl + Shift + G** (**Cmd + Shift + G** on Mac), or right-click → **Ungroup**. Elements return to their individual, freely-editable state.

## Additional Features

### Grouping Indicator

* When elements are grouped, YouDesign Models displays a visual indicator, such as a bounding box or highlight, to show their association.

### Saved Grouping State

* The grouping state is saved in YouDesign Models. If you save and reopen the diagram, the grouped elements will remain intact.

### Duplication of Grouped Elements

* You can duplicate grouped elements to replicate the entire structure, maintaining the organized relationship between elements.

By utilizing the grouping feature, you can efficiently manage and organize your diagrams, increasing productivity and clarity in your designs.

## Related

* [Shapes](/models/work-in-the-app/editor/shapes) — multi-select modifiers and alignment
* [Layers](/models/work-in-the-app/editor/layers) — organize groups across layers
* [Templates](/models/work-in-the-app/editor/templates) — save a group as a reusable template
* [Keyboard Shortcuts](/models/reference/keyboard-shortcuts) — Ctrl/Cmd + G and Ctrl/Cmd + Shift + G


# Layers

Layers let you organize a complex board into stackable, independently-controlled groups. Hide the layers you don't need, lock ones you don't want to edit by accident, and reorder them to bring content forward or send it behind other elements.

## Opening the Layers Panel

Click the **Layers** icon in the right-sidebar toolbar. The panel shows one row per layer with the following controls:

<figure><img src="/files/Bnq6jTBLxk82mKXoIq6r" alt=""><figcaption></figcaption></figure>

| Control          | What It Does                                                 |
| ---------------- | ------------------------------------------------------------ |
| Layer name       | Double-click or press **F2** to rename (max 250 characters)  |
| Eye icon         | Toggle layer visibility                                      |
| Lock icon        | Toggle layer lock (prevents edits to elements on that layer) |
| Row grip / drag  | Reorder — drag a row to move the layer up or down the stack  |
| Actions menu (⋮) | More actions: Rename, Set active, Duplicate, Delete          |

## Default Layer

Every new board starts with a pre-created **Default Layer**:

* It **cannot be deleted** — it is always present as a safety net.
* It **cannot be hidden or locked** if no other visible or unlocked layer exists
* It can be **renamed** like any other layer.

## Create a Layer

Click the **+ Add Layer** button in the **Layers Panel**. A new layer is created **above the currently active one** and automatically becomes active. Layers are auto-named sequentially ("Layer 1," "Layer 2," etc.).

<figure><img src="/files/Ln9OHXZuRzuLp8Uep6pT" alt=""><figcaption></figcaption></figure>

## Active Layer

Exactly one layer is **active** at a time. New elements you add to the canvas are placed on the active layer.

To set a layer as active:

* **Click the layer name** in the panel, or
* Open the **⋯ context menu** → *Set as Active Layer*

Only one layer can be active at a time. If no layer is explicitly selected, the **Default Layer** is active. A hidden layer cannot be set as active — make it visible first.

<figure><img src="/files/ptS6mRW5IejxR8EkQgfF" alt=""><figcaption></figcaption></figure>

## Show / Hide

Click the **eye icon** on a row to hide the layer. Hidden layers don't render on the canvas, and you can't select elements on them.

**You cannot hide the last visible layer.** There has to be at least one layer visible on the board.

**Connectors** are hidden automatically if either their owner layer or any endpoint layer is hidden.

<figure><img src="/files/iHd8aZUftQW6MSMKAApu" alt=""><figcaption></figcaption></figure>

## Lock / Unlock

Click the **lock icon** to lock a layer. Locked layers still render, but the elements on them can't be selected or edited until you unlock.

**You cannot lock the last visible unlocked layer.** At least one visible layer must remain editable.

A locked layer **cannot be set as active**.

### Key Behaviors & Rules <a href="#key-behaviors-and-rules" id="key-behaviors-and-rules"></a>

* **Active layer = placement target.** All new objects (drawn, pasted, or duplicated) are placed on the active layer.
* **Visibility gating.** Objects render only if their layer is visible. Hiding a layer hides its objects and any related connectors.
* **Connector visibility.** A connector is visible only if its **owner layer** and **both endpoint layers** are visible. It is editable only if its **owner layer and both endpoint layers** are unlocked.
* **Frames.** Frames belong to their layer and are hidden or locked with it. Adding a shape into a frame from a **different layer** does not make the shape part of the frame.
* **Grouping across layers is not allowed.** Objects must be on the same layer to form a group. Moving a group to another layer moves all of its members together.
* **Undo / Redo.** All layer actions (create, rename, reorder, delete, visibility toggle, lock toggle, move objects) are fully reversible as single steps.

<figure><img src="/files/iktb1jOF7p6MiiSr1prp" alt=""><figcaption></figcaption></figure>

## Reordering

Drag a row up or down to change stacking order. The top row in the panel is the top of the stack on the canvas (renders over the rows below it).

Canvas rendering order = **layer order first** (top of the list = front), then **element z-order within each layer**.

<figure><img src="/files/jWqV9osf04KRPHFw7t44" alt=""><figcaption></figcaption></figure>

## Rename

* Double-click the layer name, or
* Select the row and press **F2**, or
* Open the actions menu and pick **Rename**

Names are limited to **250 characters**.

Any layer can be renamed at any time, regardless of its visibility or lock state — including the Default Layer.

## Duplicate & Delete

From the actions menu:

* **Duplicate** — copies the layer and all its elements to a new layer above the original.
  * Is always created as **visible, unlocked, and active** — even if the original was hidden or locked.
* **Delete** — removes the layer. The active layer automatically switches to the next available one. **The Default Layer can never be deleted.**

## Move Objects to a Layer

Select one or more objects on the canvas, then open the **context menu → Move to Layer → \[Layer Name]**.

* The **selected objects are reassigned** to the chosen layer; their canvas position and z-order are preserved.
* The **target layer becomes active** after the move.
* **Locked layers** appear with a lock icon and are not selectable as targets
* **Hidden layers** can be chosen as targets — objects are assigned, but stay invisible until the layer is made visible.
* If only one layer exists, "Move to Layer" is disabled.

<figure><img src="/files/at6XK3TGRR4zlFsSKAj6" alt=""><figcaption></figcaption></figure>

## Presentation Mode

In Presentation Mode, the Layers Panel is **view-only**. You can open the panel and inspect layer names, order, and state, but all editing controls are disabled:

**Available:**

* View the layer list
* Change visibility
* See visibility and lock state indicators
* Collapse or expand the panel

**Disabled:**

* Add, delete, or rename layers
* Lock state
* Reorder layers
* Move objects between layers
* Open the ⋯ context menu

## Related

* [Grouping](/models/work-in-the-app/editor/grouping) — boundary-style grouping (unrelated to layers)
* [Frames](/models/work-in-the-app/editor/frames) — content frames that live on layers


# Relationships

In YouDesign Models, connections between elements are called **Dependencies**. Dependencies can represent visual guides, CMDB relationships, reference fields, hierarchies, or related lists — and each one carries real meaning back to the underlying ServiceNow data model.

[Watch: Relationships in YouDesign Models](https://www.youtube.com/watch?v=xhfQ04L8r_Q)

## Relationship Types

| Type             | Symbol | Description                                                                   |
| ---------------- | :----: | ----------------------------------------------------------------------------- |
| **Visual**       |   n/a  | Visual-only guides between shapes. No data or logic; not saved to ServiceNow. |
| **Relationship** |    ⇆   | CMDB CI-to-CI relationship (`cmdb_rel_ci`). Used for Configuration Items.     |
| **Reference**    |    ⟶   | One-to-many link via a Reference or Document ID field.                        |
| **Hierarchy**    |    ↳   | Parent/child relationship via a self-referencing field (e.g., `parent`).      |
| **Related List** |   𝍌   | Many-to-many relationship, navigable from both sides.                         |

## Creating Dependencies

### The Click-and-Drag Method

1. **Select a shape** — connectors appear on its edges.
2. **Click and drag** a connector outward to a target shape.
3. **Drop** on the target using one of two modes below.

**Floating connector** — drag near the center of the target until a **green outline** appears around the whole shape. The link will attach to whichever edge is nearest as the shape moves.

**Anchored connector** — drag onto a specific **diamond-shaped anchor** on the target's edge. The link stays pinned to that anchor even when the shape moves.

> **Not every shape accepts relationships.** If no connectors appear, the shape type doesn't support outbound links.

### Quickdrop

For the fastest creation: drag one Data Hub element directly onto another. A prompt lets you pick which type of relationship to create.

## The Relationship Toolbar

Selecting a dependency opens a toolbar dedicated to styling it:

<figure><img src="/files/aFIumcmrFzg6rQohxhr3" alt=""><figcaption></figcaption></figure>

### Line Type

The **Line Type Selection** tool gives you four routing styles:

* **Straight** — direct line between endpoints
* **Orthogonal** — 90° turns following the shortest grid path
* **Curved** — smooth arc
* **Avoids Nodes** — routes around other shapes on the canvas (recomputes when shapes move; can affect performance with many links)

<figure><img src="/files/FUYJMKaplHzHLHmtkWD8" alt=""><figcaption></figcaption></figure>

Plus three stroke patterns (selectable alongside line type):

* **Normal** (solid)
* **Dashed**
* **Dotted**

### Thickness

A slider labeled **Thickness** (range **1–10**, step 1) sets the line weight.

### Corner Radius

For **Orthogonal** and **Avoids Nodes** routes only, a **Corner Radius** slider (0–100, step 10) rounds the corners where the line changes direction.

### Color

* **Color** — extended color picker with palette + custom values (HEX, RGB, HSL)
* **Opacity** — slider from 0 to 1 (step 0.1) for transparency

### Arrow Endpoints

Two separate controls set the arrow/shape at each end of the line:

* **Line Start** — the arrow on the "from" end
* **Line End** — the arrow on the "to" end

Over 90 arrow variants are available, including: **Block**, **Circle**, **Diamond**, **Feather**, **Fork**, **Triangle** (open / filled / outlined), **Line**, **Boomerang**, **X**, **Slash**, **Kite**, and many compound shapes (e.g., **CircleFork**, **CircleLineFork**, **LineFork**). **None** / blank is also supported for either end.

### Flip Direction

The **Flip Direction** tool swaps the two endpoints in a single click:

* Swaps `from` ↔ `to` nodes
* Swaps the Line Start arrow with the Line End arrow (with auto-reversal mapping)
* Reverses any custom routing points

Use this when you realize a dependency is pointing the wrong way.

### Text on Relationships

Add a text label with the **Text** tool. Formatting options mirror shape text:

* **Font** — font family dropdown
* **Font Size** — preset sizes, custom value, or up/down arrows
* **Font Style** — Bold / Italic / Underline / Strikethrough
* **Text Color** — extended color picker
* **Text Background & Opacity** — highlight color behind the text, with opacity slider

### Text Position

The **Text Position** tool controls where on the line the label sits and how it's oriented:

**Horizontal**

* **Left** (placed at \~20% along the line)
* **Center** (50%)
* **Right** (80%)

**Vertical**

* **Top** (above the line, −15 px)
* **Middle** (on the line)
* **Bottom** (below the line, +15 px)

**Orientation**

* **On The Line** — text stays horizontal regardless of the line angle
* **Follow The Line** — text rotates to match the line's angle or curve

### Lock & More Options

* **Lock** — prevents accidental edits to the relationship
* **More Options** — copy link URL, bring to front / send to back, delete

## Current State vs. Future State

| State             | Meaning                                                                                               |
| ----------------- | ----------------------------------------------------------------------------------------------------- |
| **Current State** | Dependencies that already exist in ServiceNow.                                                        |
| **Future State**  | Proposed dependencies in YouDesign Models. They must be committed (or approved) before becoming live. |

Future-state relationships can be committed via the [Commit](/models/work-in-the-app/editor/commit) workflow.

## Related

* [Shapes](/models/work-in-the-app/editor/shapes) — the endpoints of every relationship
* [Text Formatting](/models/work-in-the-app/editor/text-formatting) — the parallel text-styling options for shape text
* [Load Dependencies](/models/work-in-the-app/editor/load-dependencies) — bulk-load relationships around a shape
* [Commit](/models/work-in-the-app/editor/commit) — committing future-state relationships to ServiceNow


# Shape Links

Shape Links turn static shapes into interactive hubs. Attach a link to a shape, and clicking it in presentation mode opens — in the same tab or a new one — a ServiceNow form, another YouDesign Models board, or any custom URL. It's how you build **drill-down navigation** across a set of boards, and how stakeholders jump from a high-level overview straight into the detail record.

## Default Links on Data Hub Shapes

Every shape bound to a ServiceNow record via the [Data Hub](/models/work-in-the-app/editor/data-hub) automatically has a link back to that record's **ServiceNow form**. No setup required — drop a Business Application onto the canvas, and clicking it in presentation mode opens the form. This is the baseline behavior.

You can add **more links** on top of this default, or add links to shapes that aren't Data Hub bound at all.

## Adding a Link to a Shape

1. Select the shape on the canvas.
2. Open the [Data Panel](/models/work-in-the-app/editor/data-inspector) (right-sidebar).
3. Switch to the **Links** tab.
4. Click the **+ Add Link** button.
5. In the **Create new Link** dialog:
   * Pick a **link type** (see below).
   * Fill in the destination.
   * Optionally check **Open in a new tab**.
6. Click **Save**.

<figure><img src="/files/rpbDjhQVlhmX8iCEcqFX" alt=""><figcaption></figcaption></figure>

## Link Types

Five link types are available:

| Type              | What It Links To                                                               | When to Use                                                                  |
| ----------------- | ------------------------------------------------------------------------------ | ---------------------------------------------------------------------------- |
| **Custom URL**    | Any external URL                                                               | Intranet pages, Jira tickets, Confluence articles, external tools            |
| **Board**         | Another YouDesign Models board                                                 | Drill-downs between boards (overview → detail)                               |
| **Diagram**       | A specific diagram from the legacy Designer application (where configured)     | Bridging to existing ins-pi Designer diagrams                                |
| **Hierarchy Map** | A Hierarchy Map visualization on another board                                 | Jumping to a pre-built hierarchy view of related data                        |
| **Form**          | The ServiceNow form for the underlying record (the default on Data Hub shapes) | Always available on data-bound shapes; the standard "open the record" action |

### Custom URL

Any web URL — an intranet page, a Jira ticket, a Confluence article, an external data source.

* Fill in the full URL (`https://...`).
* Use this when the target isn't inside ServiceNow or YouDesign Models.

### Board

A link to another YouDesign Models board you have access to.

* A **board selector dropdown** lists all boards visible to you.
* This is the mechanism that powers **drill-downs**: link a high-level overview shape to a more detailed board.

### Diagram

A link to a diagram from the legacy Designer application (ins-pi's pre-YouDesign modeling tool), useful in mixed environments where some content still lives in Designer.

* Appears only in organizations that have the Designer integration enabled.
* The destination opens in the same way Designer diagrams are usually rendered in your instance.

### Hierarchy Map

A link directly to a **Hierarchy Map** visualization on another board, bypassing the board wrapper and opening the visualization itself.

* Useful when the useful artifact is the Hierarchy Map view specifically, not the whole board it sits on.

### Form (default on Data Hub shapes)

Automatic on every data-bound shape — points at the underlying record's ServiceNow form. No configuration required.

* Shows up as a **Form** chip on the Links tab.
* You can hide it visually by pairing it with other links (the presentation-mode pop-over handles multiple links), but it cannot be removed from the shape's link set.

## Open in a New Tab

The **Open in a new tab** checkbox controls whether clicking the link replaces the current view or opens a new browser tab.

* **Off (default)** — the link opens in the same tab (for board links, in the same YouDesign window; for form links, in ServiceNow).
* **On** — link opens in a new tab so the current board stays open.

Use "new tab" when the link is a **reference** (supporting information you want users to read alongside the board) and same-tab when the link is a **navigation** (stakeholder should move to the destination).

## Following Links in Presentation Mode

Links are active when a board is viewed in **Presentation Mode** (see [Presentation Mode](/models/work-in-the-app/presentation-mode)):

* **One link** on the shape — clicking jumps straight to the destination.
* **Multiple links** on the shape — clicking opens a **pop-over** listing every available link; the user picks which to follow.

> <img src="/files/Y9zkKl03JlTuRHVGIz0R" alt="" data-size="original">

## Building Drill-Down Navigation

A common pattern: create an overview board that links to detail boards, and optionally link back from each detail board to the overview. Users navigate forward by clicking shapes, and back by clicking a shape labeled "Back to Overview."

**Tip:** *Creating a link to navigate to the board where the user came from can provide an easy way to navigate boards that are related.* Add a "back" shape to every detail board that links to the overview.

### Example: Capability → Application → Product

1. **Overview board** — Business Capability Hierarchy Map.
2. On each capability, add a **board link** to a detail board for that capability.
3. On the detail board, the Business Applications shown each have their default ServiceNow form link plus an optional **board link** to yet another drill-down (e.g., a Context Map).
4. A **"Back to Overview"** shape on every detail board links back to the hierarchy map.

In presentation mode, the whole set becomes navigable without the presenter ever opening a new window.

## Managing Existing Links

Each link on a shape shows up as a chip in the Data Panel's Links tab:

* **Click** a chip to edit the link.
* Click the small trash/× icon to delete it.
* Existing links survive board version changes and are exported with the board.

## Limits & Gotchas

* **Links fire in presentation mode only.** In edit mode, clicking the shape selects it (so you can keep editing without accidentally jumping away).
* **Board-link targets respect sharing.** If a user doesn't have access to the target board, the link still appears, but clicking it shows a permission error. Plan drill-down paths around shared board access.
* **Custom URL links aren't validated.** A typo in a URL just fails silently when the user clicks it. Test important links before a presentation.
* **The default ServiceNow form link can't be removed from a Data Hub shape's configuration** — it's a system link. You can hide it visually only if it's paired with other links, where the pop-over logic takes over.
* **No deep-link parameters.** Board links always open the board at its default view; you can't pass a "focus this shape" parameter via a link (use the board's own search or frames instead).

## Related

* [Data Panel](/models/work-in-the-app/editor/data-inspector) — where links are managed
* [Data Hub](/models/work-in-the-app/editor/data-hub) — data-bound shapes come with a default link
* [Presentation Mode](/models/work-in-the-app/presentation-mode) — where links are followed
* [Versioning](/models/work-in-the-app/editor/versioning) — links travel with board versions
* [Sharing](/models/work-in-the-app/editor/sharing) — governs whether a linked board is accessible


# HOP

The HOP feature in YouDesign Models allows users to explore and query related nodes (elements) in a structured way, visually expanding relationships through multiple levels of connections (up to five hops). This feature provides flexibility in navigating and analyzing dependencies within the system.

[Watch: HOP in YouDesign Models](https://www.youtube.com/watch?v=KV4J_tUQ3xs)

## Accessing the HOP Feature

### 1. Select a Node (Current State Element)

To begin using the HOP feature, select a current state element on your board.

### 2. HOP Icon in the Toolbar

Once a node is selected, the HOP icon, represented by a rabbit, will appear in the toolbar.

<figure><img src="/files/bIxFPuL9DHPJbjg1rTcn" alt=""><figcaption></figcaption></figure>

Click the rabbit icon to open the HOP settings window.

## Configuring the HOP Query

The HOP settings allow users to customize the depth of their queries by specifying the number of hops, as well as selecting tables and relationships to refine the results.

<figure><img src="/files/sVh25eOBCrWSszpGunAl" alt=""><figcaption></figcaption></figure>

## HOP Settings Window

* **HOP Levels (1 to 5):** Set the number of hops (or levels) to control the depth of the query. Each hop represents an additional level of relationships.
  * Default value: 1 Hop (directly related nodes).
  * Up to 5 Hops can be selected to traverse deeper relationships.
* **Table Selection:** Use the drop-down menu to select specific tables to constrain the query to certain datasets. You can search for tables or add multiple tables from the available list.
  * If no tables are selected, the query will consider all available tables.
* **Relationship Types:** Specify the relationship types you want the query to consider. By default, all relationship types are included unless specified.
  * You can search for specific relationship types and add multiple relationships to the query.
* **Unique Relationships Toggle:** Toggle to only show unique relationships. When enabled, this option ensures that only unique relationships between nodes are shown, preventing duplicate types of connections.

<figure><img src="/files/bUMd8gkpM8rqDATtez1y" alt=""><figcaption></figcaption></figure>

* **Complement Toggle:** Toggle to connect new data to existing elements on the board. When enabled, this option ensures that newly loaded data links to elements already present on the board, preventing duplicate elements and relationships from being created. When disabled, every load will generate new independent elements and relationships, regardless of what already exists on the board.

<figure><img src="/files/RhRGFfqjq9qSYExhDU3m" alt=""><figcaption></figcaption></figure>

## Execute the HOP Query

![HOP Loading](/files/PqNbFNULu2CroNtarGgv)

Once all settings are configured:

1. **Click the "LOAD" Button** - Press the **LOAD** button to execute the HOP query. The system will return the related nodes based on the number of hops, tables, and relationships selected.
2. **Loading Indicators** - As the query processes, real-time updates will appear as each hop completes — a per-hop "is loading" message followed by a "has been successfully loaded" confirmation.
3. **View Results on Canvas** - The queried results will be rendered in the canvas, visually expanding to show the nodes connected through the defined hops.
4. **Non-Blocking UI** - While the query is running, users can continue working within the application, as the system ensures that the UI remains responsive and non-blocking.

> **Note:** If no content is found based on the HOP query, a message will be displayed: "There is no content to be loaded."

> **Warning:** If an error occurs during the query, an error message will guide the user to recheck the settings or attempt the query again.


# Data Hub

The **Data Hub** in YouDesign Models enables users to search, filter, and add data from ServiceNow tables directly onto boards.

## Using the Data Hub

### Steps to Use the Data Hub

#### 1. Open Data Hub Panel

Click on the **Data Hub** icon in the Control Bar to open the panel on the left side of the screen.

<figure><img src="/files/lQX9RVvkAp1pFyY1I2a4" alt=""><figcaption></figcaption></figure>

#### 2. Select or Search for a Table

Click on **Select source table** to choose or search for a table. Tables are grouped by Shape Categories and only tables with the Data Hub option activated for a shape are displayed.

#### 3. View Data Results

Once you select a table (e.g., Business Capability), the data will be shown in the Results section.

## Adding Items to the Board

You can add items from the Data Hub to the board using two methods:

![Data Hub - Single Item](/files/ATtFzIoccbH47LMWRSTh)

### Drag & Drop

* Drag an item from the Results list and drop it on the board.

### Click & Click

* Click on the item in the Results list, move the mouse to the board, and click again to place the item.

### Adding Multiple Items or Hierarchies

#### Multiple Items

Drag & Drop the top item representing the table name to add all or multiple items from the search result.

![Data Hub - Multiple items](/files/cUFw71WmsbioMUF6yoJW)

#### Hierarchy of Items

Drag & Drop a parent hierarchy item, and YouDesign Models will load the full sub-hierarchy including child items.

![Data Hub - Hierarchy](/files/sjyMWFByVvgYrAk9WG4d)

## Data Hub Search

To search for specific data within the selected table, enter the search string, and YouDesign Models will return matching results.

## Data Hub Filter

YouDesign Models's filtering system offers three levels of filtering—Global, Teamspace, and Personal filters. These filters ensure only relevant data is shown based on user roles.

| Filter        | Description                                                                                                                                                     | Role                   |
| ------------- | --------------------------------------------------------------------------------------------------------------------------------------------------------------- | ---------------------- |
| **Global**    | Applied across all Teamspaces and Boards by YouDesign Models Admin. Cannot be changed by other users.                                                           | YouDesign Models Admin |
| **Teamspace** | Defined by the Teamspace Admin and applied across all Boards within the Teamspace. Only Teamspace Admins and YouDesign Models Admins can change these settings. | Teamspace Admin        |
| **Personal**  | Personal filters are specific to Editors. These are only visible to the user and are applied after Global and Teamspace filters.                                | Editor (login user)    |

### Applying Personal Filters

To apply **Personal Filters**, simply turn on the switch in the **Personal filter chip** for the selected table.

## Dropping Items into Frames or Groups

When you drag a Data Hub item onto a **frame**, **group**, or **visualization container**, YouDesign Models validates whether that container accepts the item as a member:

* **Valid** — the item is added inside the container.
* **Invalid** — the drop is silently rejected. The item is not added, and nothing appears on the canvas.

Most standard shapes drop into frames and groups without issue. Invalid combinations include dropping a frame into another frame, or dropping a shape onto a container on a different layer.

**Exception:** If the drop would create an invalid relationship in a **Hierarchy Map**, a notification appears explaining why. For other container types, the rejection is silent — if a drop seems to "do nothing," try dropping onto an empty area of the canvas instead and then moving it manually.

## Related

* [Data Panel](/models/work-in-the-app/editor/data-inspector) — inspect the record behind a Data Hub item once it's on the canvas
* [Load Dependencies](/models/work-in-the-app/editor/load-dependencies) — grow a diagram outward from an item you've dropped
* [HOP (Hover-Over Panel)](/models/work-in-the-app/editor/hop) — another way to explore neighbors of a record
* [Commit](/models/work-in-the-app/editor/commit) — commit future-state items created via Data Hub


# Data Panel

The Data Panel is the **right-sidebar panel** that shows the underlying ServiceNow record for whatever you have selected on the canvas. It's where you read and edit field values, manage a shape's table or element binding, and wire up links to related records — without leaving the board.

> **Don't confuse this with the Data Hub.** The **Data Hub** is on the **left** and is where you *find* records to drop onto the canvas. The **Data Panel** is on the **right** and is where you *inspect and edit* the record behind a selected shape. This page covers the Data Panel. For the source-picking panel, see [Data Hub](/models/work-in-the-app/editor/data-hub).

## Opening the Data Panel

Click the **Data** icon in the right-sidebar toolbar, or simply select any data-bound shape on the canvas — the panel opens automatically.

<figure><img src="/files/iW3aclu2dx8ZfJr0SDu8" alt=""><figcaption></figcaption></figure>

## Panel Tabs

The Data Panel has two tabs:

| Tab       | What It Shows                                                                       |
| --------- | ----------------------------------------------------------------------------------- |
| **Data**  | Field values for the selected element. Editable when fields and the board allow it. |
| **Links** | Linked documents and related-record relationships associated with the element.      |

See [Shape Links](/models/work-in-the-app/editor/shape-links) for a deep dive on the Links tab.

## What You Can Do

**With nothing selected** — The panel shows a board-level view (properties that apply to the whole board).

**With one element selected** — The panel shows the Data tab populated with that element's field values. You can:

* Change the linked **table** the shape represents (confirmation dialog warns about data loss).
* Change the linked **element** (the specific record).
* Edit individual field values in place.
* Apply filters (an indicator tells you when filters are currently applied).
* Manage links on the Links tab.

**With multiple elements selected** — The panel shows a message telling you to narrow to a single element. The Data Panel only inspects one record at a time.

## Roles & Read-Only Behavior

Edit access is determined per field and per board:

* Fields can be marked read-only individually (`isReadOnly`) — they still display but cannot be changed.
* Some fields have no read access and are hidden entirely.
* **Presenter mode** forces the whole panel read-only.
* Board-level permissions apply normally on top of the above.

There is no admin-only mode for the Data Panel — all editors see it.

## Limits & Gotchas

* **One element at a time** — selecting multiple shapes disables the inspection form.
* **Changing the table** of a bound shape is confirmed via a modal because it drops existing field mappings.
* **Some fields are locked from reassignment** — once bound, they can't be pointed at a different field without deleting and recreating the mapping.
* **Changes write through to ServiceNow.** There is no local-only "dry run" — saving a field commits the value.

## Related

* [Data Hub](/models/work-in-the-app/editor/data-hub) — the left-sidebar panel where you find and drop records
* [Shape Links](/models/work-in-the-app/editor/shape-links) — everything the Links tab does
* [Load Dependencies](/models/work-in-the-app/editor/load-dependencies) — pulling in related records around the element you're inspecting
* [Realtime Indicators](/models/work-in-the-app/editor/realtime-indicators) — live visual signals driven off Data Panel fields


# Load Dependencies

Load Dependencies pulls related records around a shape you've already placed on the canvas — hierarchies, relationships, references, and related lists — and drops them onto the board with the correct links already drawn. It's the fastest way to grow a diagram outwards from a known starting point.

## Opening the Dialog

1. Select a **data-bound shape** on the canvas (a shape tied to a ServiceNow record).
2. Click the **Load Dependencies** button in the editor toolbar.

<figure><img src="/files/86ukH9b5z7VFgvm9vAM1" alt=""><figcaption></figcaption></figure>

### When the Button Is Disabled

The button is disabled when the selected shape can't be used as a starting point. Common reasons:

* The selection is a **future-state item** (not yet committed)
* The selection is inside a **Hierarchy Map** group
* The selection is inside a **Kanban lane**
* The selection is inside a **Context Map**

Select a plain canvas shape bound to a ServiceNow record to re-enable the button.

## The Four Tabs

Each tab offers a different way to discover related records. You can select items across multiple tabs in one go — everything you tick is loaded when you press **Load**.

### Relationships

* **What it shows:** Parent-child relationship pairs, displayed as an expandable tree.
* **How you select:** Tick the parent checkbox to select the whole relationship group, or expand and tick individual child records.
* **Use when:** You know the relationship you want (e.g., *"Depends on"*) and want every record on the other side of it.

### Reference

* **What it shows:** Reference fields on the selected record, shown as a flat list.
* **How you select:** Tick a single checkbox per reference.
* **Use when:** You want to pull in the record referenced by a specific field (e.g., the **Owner** of an application).

### Hierarchy

* **What it shows:** Self-referential parent/child relationships — hierarchy lookups where records point up or down to the same table.
* **How you select:** Tick a single checkbox per hierarchy option.
* **Use when:** You're visualizing a structure like a capability tree or an org chart rooted at the selected element.

### Related Lists

* **What it shows:** Many-to-many (M2M) related lists with optional child records.
* **How you select:** Tick the parent checkbox, then optionally expand to pick specific child records.
* **Include related records toggle:** An **AirlineStops**-style toggle lets you choose between loading only the parent (the related list record itself) or also pulling in the child records attached to it.
* **Use when:** You want to walk across an M2M link (e.g., *"Business Applications consumed by Business Services"*).

## Shared Load Options

These toggles apply across all four tabs:

| Option                        | What It Does                                                                                                               |
| ----------------------------- | -------------------------------------------------------------------------------------------------------------------------- |
| **Autolayout**                | When enabled, runs autolayout on the loaded dependencies so they don't overlap existing content.                           |
| **Show Unique Relationships** | Visible when any relationships are selected. Deduplicates relationships of the same type between the same two elements.    |
| **Complement**                | Visible when items are selected. **On:** connect to existing elements if already on the board. **Off:** create duplicates. |

Click **Load** (disabled until you've ticked at least one item) to apply your selection.

## What Appears on the Canvas

* **Nodes** — one shape per selected record, positioned around your source element.
* **Links** — drawn between the source element and every loaded dependency, with the appropriate relationship type.
* **Selection** — the newly-loaded nodes and links are auto-selected so you can immediately style or move them.
* **Layout** — Autolayout repositions the whole connected graph if enabled; otherwise only the new nodes get placed.

## Limits & Gotchas

* **No explicit cap on items per load** — extremely broad selections (e.g., a reference field with thousands of values) can take a while. Start narrow and expand in follow-up loads.
* **Duplicates are avoided by default** thanks to the **Complement** toggle — turn it off intentionally if you want parallel copies of an already-loaded element.
* **Not available on future-state items.** If you want to pull dependencies around a shape you've created but not yet committed, [Commit](/models/work-in-the-app/editor/commit) it first.
* **Permissions** — no feature-level role gating. ServiceNow ACLs on the underlying records determine what you're allowed to see.

## Related

* [Data Hub](/models/work-in-the-app/editor/data-hub) — add the starting shape tied to a ServiceNow record
* [Data Panel](/models/work-in-the-app/editor/data-inspector) — inspect the records you've loaded
* [HOP (Hover-Over Panel)](/models/work-in-the-app/editor/hop) — another way to explore neighbors of a single record
* [Relationships](/models/work-in-the-app/editor/relationships) — style the links you've loaded


# Realtime Indicators

Realtime Indicators (**RTI**) provide a visual way to interpret field values in YouDesign Models, using colors and visual cues to enhance the readability of boards and diagrams. This feature makes it easy for users to identify important information at a glance, facilitating quicker decision-making.

[Watch: Realtime Indicators in YouDesign Models](http://www.youtube.com/watch?v=N9FNfjUjUb4)

<figure><img src="/files/xABNPf0wEFelCuQRNlPu" alt=""><figcaption></figcaption></figure>

*Realtime Indicators applied on Board content.*

## Applying Realtime Indicators

To apply Realtime Indicators to your board, follow these steps:

1. Open the board in **Edit Mode**.
2. Click the Realtime Indicator **Icon** in the **top right widget toolbar**.
3. The **Realtime Indicator Panel** will appear on the right side of the screen.

The RTI panel has two sections:

* The top section allows you to select a table, field, and style of the Realtime Indicator.
* The bottom section is the **Legend**, showing all the selected and applied Realtime Indicators.

4. Select the **table**, **field**, and **style** for the RTI. You can position the RTIs within or outside of the shape. After your selections, click the **Add** button to apply the RTI.

<figure><img src="/files/4JV9O21UGZ3nl1teTAKR" alt=""><figcaption></figcaption></figure>

## Interacting with Realtime Indicators

The RTI **Legend** is your main interface for managing, highlighting, and filtering RTI data.

* **Expand/Collapse** the Legend, which is organized by **Table > Field > Indicator Value**.
* You can toggle the **ON/OFF** switch to enable or disable the RTIs or remove them by clicking the **X** icon.

<figure><img src="/files/dIXlDv9Gzfc2OccXAFej" alt=""><figcaption></figcaption></figure>

* Clicking on an **Indicator Value** will highlight its associated shapes. You can select multiple values to apply an **AND/OR** logic to filter and analyze the data.

> **Note:** Once a Realtime Indicator is applied, it cannot be selected again.

<figure><img src="/files/Q0mtNeQ26n9pQHRWQDPK" alt=""><figcaption></figcaption></figure>

## Refreshing Realtime Indicators

Use the **Refresh** button at the top of the RTI panel to reload the latest backend data and ensure that your indicators reflect the most up-to-date information.

<figure><img src="/files/Zswrf44hpDzcXWvNWj7M" alt=""><figcaption></figcaption></figure>

## Using Realtime Indicators in Presentation Mode

In **Presentation Mode**, users can view but not modify or delete the Realtime Indicators.

<figure><img src="/files/OYG763LOEcNYvCLOtpmo" alt=""><figcaption></figcaption></figure>

## Realtime Indicators Configuration

Admins can configure Realtime Indicators within YouDesign Models. For more detailed configuration instructions, refer to the Realtime Indicators Configuration documentation.


# Search

Canvas search finds elements on the currently-open board — shapes, text, frames, relationships, hierarchies, and more — and lets you jump straight to them. It's the fastest way to locate something on a large or dense diagram.

## Opening Search

Two ways:

* Press **Ctrl+F** (Windows) or **Cmd+F** (Mac)
* Click the **Search** button in the editor toolbar

A search modal opens, centered over the canvas.

<figure><img src="/files/XswvrTVw3bf9AZonm3yy" alt=""><figcaption></figcaption></figure>

## Searching

1. Type your query in the **Search** field.
2. Results appear below, grouped by element type.
3. The count for each group is visible in the group header.

## Result Categories

Results are grouped by the kind of element they belong to. Categories include:

* **Shape** — shape elements on the board
* **Text** — text elements
* **Frame** — frame containers
* **Element** — bound ServiceNow elements
* **Hierarchy** — hierarchy-map items
* **Dependency** — dependency relationships
* **Image** — embedded images
* **References** — reference relationships
* **Related list** — related-list entries
* **Relationships** — standard relationships
* **Visualization** — visualization containers
* **Visual Relationship** — visual-only relationships (no data binding)

Each group can be **collapsed or expanded** independently so you can focus on the type you care about.

## Selecting & Jumping to Results

* Tick the checkbox next to a result to select it.
* Use the **Select All Visible** checkbox in a group header to select every visible result in that group.
* Click a result (or use the **Go To** action) to focus and pan the canvas to that element.

## Filtering by Type

A filter button lets you narrow which categories are searched. Toggle off categories you don't want to include. The **All** filter resets to search everything.

## Non-Selectable Elements

Some elements — roadmap objects in read-only visualizations, for example — can be found by search but not selected. Hovering shows the tooltip: *"Roadmap object is not selectable."* You can still Go To them to bring them into view.

## Limits & Gotchas

* **Search is scoped to the active board version** — switching versions runs a fresh search.
* **Hidden layers are not searched** — if a result seems "missing," check whether its layer is hidden via the [Layers](/models/work-in-the-app/editor/layers) panel.
* **Query matches are substring** — no regular expressions or exact-match flags.
* **No search history** — the query is cleared when you close the modal.

## Related

* [Layers](/models/work-in-the-app/editor/layers) — toggle visibility so searches include or exclude specific layers
* [Homepage Search](/models/work-in-the-app/homepage/search) — search across boards, folders, and teamspaces from the homepage
* [Keyboard Shortcuts](/models/reference/keyboard-shortcuts)


# Comments

Comments are conversation threads attached to committed elements. They let reviewers and collaborators capture context, questions, and decisions alongside the diagram data itself.

## Where You See Comments

Comments appear in the **Explorer Panel** (the Model Explorer tab in a board's preview) — in a dedicated **Comments** column next to each element row.

* If an element has no comments, the cell is empty.
* If it has comments, a chip shows the first comment's text with a badge indicating the total count.

<figure><img src="/files/Y4OIDx4t2cfwSJvhvkZi" alt=""><figcaption></figcaption></figure>

## Opening the Full Thread

Click the comment chip on any row to open the **Comments** dialog. The dialog lists all comments for that element:

* **Sorted newest first**
* Each entry shows who wrote it and when (*created by + created date*)
* Entries are scrollable for long histories

## What Comments Are Tied To

Comments are attached to individual **committed elements** — the ServiceNow records behind your shapes. They travel with the record, not with a specific version of the board, so commenters on a shared ServiceNow record see each other's entries regardless of which board they opened.

## Read-Only in the Explorer Panel

In v26, the Explorer Panel shows comments as **read-only**. Adding, editing, or deleting a comment from the Explorer Panel is not available — the dialog is for reading the thread.

Comments are typically added as part of the [Commit](/models/work-in-the-app/editor/commit) / Reject flow (where a rejection requires a reason, which becomes a comment on the element).

## Roles & Gating

* Any user who can open the Explorer Panel and see the row can read its comments.
* Adding/editing comments happens through related workflows (rejection, ServiceNow-native commenting on the underlying record).

## Limits & Gotchas

* **Comments column is only visible when at least one element in the grid has comments** — if the column is missing, nothing has been commented yet.
* **You're looking at comments on the underlying record**, not board-specific annotations. Changes made in ServiceNow show up here too.
* **Sort is fixed** — newest first. There's no way to flip to oldest-first in the current dialog.

## Related

* [Commit](/models/work-in-the-app/editor/commit) — rejection reasons are saved as comments
* [Data Panel](/models/work-in-the-app/editor/data-inspector) — inspect the underlying record
* [Notifications](/models/work-in-the-app/editor/notifications) — status updates from commit/reject that reference commented elements


# Sharing

The Share feature in YouDesign Models allows users to easily share Teamspaces and Boards with individuals or groups, assigning roles such as Viewer, Editor, or Teamspace Admin. This functionality ensures efficient collaboration across teams and helps manage access permissions.

## Share Teamspaces & Boards

To share Teamspaces or Boards with others, follow these steps:

1. Click the **Share** button.

![Share button in Teamspace and Board](/files/7UIJ5XKws89pKoMP02pM)

*Share button in Teamspace and Board*

2. Invite individual users or groups as either Viewer (only users with Viewer roles will appear) or Editor (only users with Editor roles will appear). Select the appropriate option, invite users or groups, and confirm by clicking **Share**.

![Adding an Editor Group](/files/tvOV454YGNRj6M8d5YDC)

*Adding an Editor Group*

> **Note:** Ensure that the selected groups contain users with the necessary YouDesign Models roles.

## Adding Teamspace Admins

To define additional Teamspace Admins:

1. Click the **Share** button on the Homepage.
2. Select the **Teamspace Admin** option and choose the user from the list (only users with Editor role will appear).

![Adding a new Teamspace Admin](/files/Ho9v9fsC2dmhdqGib28S)

*Adding a new Teamspace Admin*

3. Confirm by clicking the **Share** button. You'll receive a confirmation message.

![Success confirmation message.](/files/vphlgQiTyVzMb8jGEDj3)

*Success confirmation message.*

> **Note:** Teamspace Admins are visible only to YouDesign Models Admins and other Teamspace Admins.

## Deleting Members

The Members tab provides an overview of all users with access to a Teamspace or Board. To remove members:

1. Navigate to the Members tab on the YouDesign Models Homepage.
2. Use the Trash icon to delete users or groups.

<figure><img src="/files/xkx4kOSWY3oKVrDY2BJ1" alt=""><figcaption></figcaption></figure>


# Scope & Related Lists

The **Scope** feature connects a YouDesign Models board to any record in any ServiceNow table. Once a board is in the scope of a record, it shows up on that record's related list in ServiceNow — so stakeholders who live in ServiceNow-native forms can discover and open the relevant YouDesign Models board without knowing where to look.

This is how you make a diagram part of a record's context instead of a separate artifact hiding in a teamspace.

## Why Scope Matters

* A Business Application owner opens their record in ServiceNow and sees a linked architecture diagram in the related list.
* A Change Request reviewer finds the target architecture for the change without leaving the form.
* An auditor on a compliance record follows the related list straight to the governance board.

The scope is a lightweight reference — **one board can be scoped to many records**, and **one record can have many boards in scope**.

## Adding a Scope

Scope is managed from the board's metadata on the YouDesign Models homepage.

1. Open the YouDesign Models homepage.
2. Select the board you want to scope.
3. In the **About** tab, find the **Scope** field.
4. Click the **+** icon to add a new scope.
5. In the dialog, select the **table** you want to scope against.
6. Select the **record** from that table.
7. Click **ADD**.

The scope appears in the Scope section of the board's metadata as a clickable chip.

<figure><img src="/files/1i7LI2Q78eyIhBF4JrP0" alt=""><figcaption></figcaption></figure>

## Removing a Scope

Click the **×** on the scope chip to remove it. This does not delete the board or the scoped record — it only disconnects them.

<figure><img src="/files/BQ4plvczvPAWSp2BpEpJ" alt=""><figcaption></figcaption></figure>

## Seeing the Board on a ServiceNow Record

Once scoped, the board appears in the **YouDesign Board** related list on the scoped record's ServiceNow form.

### Out-of-the-Box Coverage

The **YouDesign Board** related list comes pre-configured on key tables such as:

* Business Application
* CMDB Configuration Items (common variants)

### Adding the Related List to Other Tables

If the related list isn't showing on a table you care about, an administrator with **ServiceNow System Administrator** privileges can add it:

1. Open the form view for the target table.
2. Right-click the form header → **Configure → Related Lists**.
3. In the "Available" list, find **YouDesign Board** and move it to the "Selected" list.
4. Save.

The list will now show every board that has that record in scope, plus every board that *uses* that record on its canvas.

> **The related list shows all boards where the element has been selected as scope, or where the element has been used on the board.** Either relationship puts the board in the list.

## What Appears in the Related List

For each matching board, the list shows:

* Board Name (links to the board)
* Description
* Type
* Folder (breadcrumb to the teamspace)
* Owner
* Updated / Updated by

From the related list, users can open the board directly — no search, no navigation.

## Limits & Gotchas

* **Scope is one-way metadata** — scoping a board to a record doesn't give users access to that record, and doesn't give users of that record access to the board. Access is governed by the record's ServiceNow ACLs and the board's sharing independently.
* **Orphaned scopes** — if the scoped record is deleted in ServiceNow, the scope entry remains. Clean up stale entries periodically if tidiness matters.
* **The related list only appears where it's configured.** Tables without the YouDesign Board related list on their form view won't surface the scope, even if it's set.

## Related

* [Teamspaces](/models/work-in-the-app/homepage/teamspaces)
* [Sharing & Members](/models/work-in-the-app/homepage/sharing-and-members)
* [Access Rights and Roles](/models/admin/access-rights-and-roles)


# Versioning

Versioning lets you capture snapshots of a board, move them through a review lifecycle, and jump between them as needed. It's how you track "what the board looked like for the October review" separately from "what we're actively editing today."

## The Version Toolbar Button

The versioning control sits in the top editor toolbar. It shows:

* The **name of the active version**
* A **stage badge** (color-coded)
* A **dropdown arrow** that opens the version list

<figure><img src="/files/HuIgTL0zjhsvL6ZWhahJ" alt=""><figcaption></figcaption></figure>

## Stages

Every version has a stage. Badge colors follow the stage lifecycle:

| Stage        | Meaning                                           |
| ------------ | ------------------------------------------------- |
| **Draft**    | Work in progress; default stage for a new version |
| **Review**   | Submitted for review; changes should be minimized |
| **Approved** | Sign-off received                                 |
| **Rejected** | Review rejected; typically precedes a new Draft   |
| **Archived** | Kept for reference but no longer actively used    |

Stages flow in the order: Draft → Review → Approved **or** Rejected → Archived. You change stage from the actions menu on any version row.

## The Version List

Click the version button to open the version list popover. Each row shows:

* Version name
* Last-edited timestamp
* Last-updated-by user
* Fork source (if the version was forked from another)
* A row of action buttons

## Actions

| Action              | What It Does                                                                          |
| ------------------- | ------------------------------------------------------------------------------------- |
| **Add / Create**    | Creates a new version (tooltip: *"Create new version"*). New versions start in Draft. |
| **Restore / Open**  | Click a version row to switch the editor to that version.                             |
| **Change stage**    | Move the version between Draft, Review, Approved, Rejected, Archived.                 |
| **Pin / Unpin**     | Pins a version to the top of the list for easy access.                                |
| **Open in new tab** | Opens the version in a fresh editor tab so you can compare side-by-side.              |
| **Duplicate**       | Makes a copy of the version.                                                          |
| **Delete**          | Removes the version. You cannot delete the active version.                            |

## Permissions

Each action is gated by a board-level policy:

* **Create version** — users with `BoardCreateVersion`
* **Pin version** — `BoardPinVersion`
* **Change stage** — `BoardUpdate`
* **Duplicate version** — `BoardDuplicateVersion`
* **Delete version** — `BoardDeleteVersion`
* **Open in new tab** — `BoardOpenVersionInNewTab`

If you don't have the corresponding permission, the action is hidden or disabled.

## Presenter Mode

In presenter mode (and read-only shared views), the version create, pin, stage-change, and more-menu actions are hidden. You can still switch between existing versions.

## Limits & Gotchas

* **Version names are immutable.** Once created, you can't rename a version — duplicate it with a new name if you need to change it.
* **You can't delete the active version.** Switch to another version first.
* **Stage transitions are constrained to the lifecycle order** — you can't jump straight from Draft to Archived, for example.
* **Fork lineage is visible** — if you duplicated from another version, the source is shown in the list for traceability.

## Related

* [Commit](/models/work-in-the-app/editor/commit) — committing changes to a version's data
* [Sharing](/models/work-in-the-app/editor/sharing) — sharing specific versions with reviewers


# Commit

Commit is the workflow that moves data changes from a proposed state into the live ServiceNow record. You or a reviewer **commit** a change to accept it, or **reject** it (with a required reason) to send it back.

> **Note on naming:** If you see the word "Publish" or "Publishing" anywhere in the interface or in a notification, it refers to the same Commit workflow described here. The terminology will be aligned to "Commit" across every surface in an upcoming release.

## Where You Commit

Commit lives in the **Explorer Panel** — the model explorer view in a board's preview. You open the Explorer, select one or more rows with pending data, and act on them from the buttons at the bottom of the grid.

<figure><img src="/files/jB1HgqgvNudTad1ykZ6D" alt=""><figcaption></figcaption></figure>

## Row Statuses

Every row has a status that reflects where it is in the commit flow:

| Status            | What It Means                                                 |
| ----------------- | ------------------------------------------------------------- |
| **New**           | The row was added but has not been committed yet              |
| **Committed**     | The change is live in ServiceNow                              |
| **Rejected**      | The change was rejected and needs to be reworked              |
| **Scheduled**     | Queued for commit                                             |
| **To be deleted** | The row reflects a pending deletion state                     |
| **Deleted**       | The row reflects a deleted state                              |
| **Error**         | The commit failed — see the notification for the error detail |

## Committing Rows

1. Open the **Model Explorer** tab in board preview.
2. Use the grid checkboxes to select one or more rows.
3. Click **Commit** (green, checkmark icon) at the bottom of the grid.
4. A notification appears to tell you the commit is in progress.
5. A success or partial-success notification reports the outcome; the grid refreshes.

If the commit partially fails, the notification lists the specific errors so you know which rows to retry.

## Rejecting Rows

Rejecting lets a reviewer send a proposed change back with a reason.

1. In the same grid, select the row(s) you want to reject.
2. Click **Reject** (red, cancel icon).
3. A dialog opens titled **Reject** with:
   * For a single row: *"Please specify why you are rejecting this item."*
   * For multiple rows: *"Multiple items selected for rejection. Please provide a reason."*
4. Fill in the required **Comment** field. The comment must be non-empty and has a maximum length.
5. Click **Confirm**.

Rejection sends the rows back to **Rejected** status and a notification reports the result.

## Roles & Gating

Commit and Reject availability depends on:

* **Whether the selected rows have committable data.** The buttons are disabled when nothing actionable is selected.
* **Your board access and ServiceNow ACLs.** YouDesign follows ServiceNow ACL rules when deciding whether Commit or Reject is available.
* **The status of the rows.** Already-committed rows can't be re-committed.

## Notifications

Commit and Reject both produce in-app toast notifications:

* **Commit** — an in-progress toast while the request runs, then a success or failure toast with the result
* **Reject** — an in-progress toast, then a success or failure toast

On partial failures, the notification includes the per-row error list so you can see exactly what went wrong. See [Notifications](/models/work-in-the-app/editor/notifications).

## Limits & Gotchas

* **Rejection requires a comment.** You can't reject without one.
* **Comments have a maximum length.** The dialog shows the limit when you hit it.
* **The grid refreshes after a commit or reject.** Cached node data is cleared so everything stays in sync.
* **Commit writes directly to ServiceNow.** There's no staging server — the target system sees the change as soon as Commit succeeds.
* **Only committed elements can be dropped on certain visualizations** (like [Context Map](/models/work-in-the-app/editor/visualizations/context-map)). Plan your commit sequence before assembling those visualizations.

## Related

* [Data Panel](/models/work-in-the-app/editor/data-inspector) — inspect and edit the data before you commit
* [Notifications](/models/work-in-the-app/editor/notifications) — where commit status surfaces
* [Versioning](/models/work-in-the-app/editor/versioning) — capture a version alongside a commit milestone
* [Comments](/models/work-in-the-app/editor/comments) — view conversation threads on committed elements


# Notifications

Notifications tell you what YouDesign Models is doing in the background — whether a commit is in progress, a data refresh succeeded, or a board save hit an error. They appear as small toast messages that don't block your work.

## Where Notifications Appear

Toasts slide in at the **bottom-right** of the editor window and stack vertically if multiple arrive close together. Each toast contains:

* An icon indicating the notification type (info, success, warning, error)
* A short header
* A message describing what happened
* A close (✕) button

<figure><img src="/files/oEeg4l0svkpBVOaaFTF4" alt=""><figcaption></figcaption></figure>

## When Notifications Fire

Notifications are system-triggered — you don't send them, but you'll see them in response to your actions or background events. Common sources:

* [**Commit**](/models/work-in-the-app/editor/commit) **workflow** — in-progress, successful, and failed messages for both Commit and Reject actions
* **Data loads** — e.g. *"Loading Context Map"* → *"Context Map loaded successfully"* or an error with details
* **Board saves** — on successful save or on error
* **Explorer data refresh** — after a commit or when you re-open a board

## Dismissing a Notification

* **Click the close (✕)** button on any toast to dismiss it immediately.
* **Wait** — toasts dismiss themselves after about **4 seconds** (some may stay longer when the message is critical).

## Types of Notifications

| Type        | Visual       | When You See It                                              |
| ----------- | ------------ | ------------------------------------------------------------ |
| **Info**    | Blue         | A background task has started (e.g. a commit is in progress) |
| **Success** | Green        | An action completed                                          |
| **Warning** | Amber/orange | Partial success — e.g. some rows committed, some failed      |
| **Error**   | Red          | An action failed                                             |

Warning notifications for partial failures include the per-row error list so you know exactly what went wrong.

## Scope & Persistence

* Toasts are **per-browser-session and per-user** — another user editing the same board doesn't see your toasts.
* Toasts **don't persist** — once dismissed or timed out, they're gone. There's no in-app notification history log.
* For durable alerts that show across sessions, YouDesign Models relies on **ServiceNow's own notification mechanisms** on the underlying records.

## Gotchas

* **A single action can produce multiple notifications** — for example, a commit fires both an "in progress" and a "successful/failed" toast. This is expected.
* **No read-receipt tracking** — dismissing a toast doesn't notify anyone; it's purely local.
* **Critical errors may linger** — some error toasts stay visible longer so you don't miss them. You can still dismiss manually.

## Related

* [Commit](/models/work-in-the-app/editor/commit) — the primary source of commit/reject notifications
* [Realtime Indicators](/models/work-in-the-app/editor/realtime-indicators) — a separate, durable visual status system driven by data


# Export

Export turns your board (or specific frames within it) into image files you can share, embed in presentations, or print. Exports are always image-based and always scoped to frames — if you want to export something, it has to be inside a frame.

## Opening the Export Dialog

In **Edit** or **Presentation** mode, click the **Export** button in the **Board Toolbar**. The export dialog opens with a header labeled **Export**.

<figure><img src="/files/XsQhdbrsN4F13vUew45M" alt=""><figcaption></figcaption></figure>

## Export Options

### Selection

Choose what to export:

* **Entire Board** — exports every frame on the board, one file per frame.
* **Individual frames** — pick one or more frames by name from a multi-select dropdown. Up to 3 frame names show as tags; additional ones are collapsed.

### Filetype

* **PNG** (default) — lossless, supports transparency, best for diagrams
* **JPG** — smaller files, lossy, good for photo-style content or when file size is critical

### Size

Three preset resolutions:

* **Small**
* **Medium** (default)
* **Large**

Larger sizes produce sharper images but bigger files. Use Medium for most day-to-day sharing; Large for print.

### Include Indicators Legend

When enabled (default), the export includes a legend for any [Realtime Indicators](/models/work-in-the-app/editor/realtime-indicators) applied to the board. Turn it off to produce a cleaner image without the legend block.

## What Happens When You Export

* **Single frame** — you get a single image file.
* **Multiple frames (or Entire Board with multiple frames)** — files are bundled into a **zip archive** and downloaded as one file.

A progress toast appears (*"Export in progress"*) while YouDesign Models prepares the file.

## Limits & Gotchas

* **Exports are always image-based.** PDF, SVG, and HTML are not supported in v26.
* **Only frame content is included.** Anything outside your frames is skipped — organize your content inside frames before exporting a frame
* **DPI, margins, transparency, and page-layout options are not user-exposed** in v26. The image size is controlled via the Size preset only.

## Tips

* **Export visualizations directly** using the export icon in the visualization toolbar when available — no need to open the full Export dialog.
* **PNG if you'll edit the image afterwards** (Keynote, Figma, etc.) — it preserves transparency.
* **JPG for email attachments** where you need a small file size.

## Related

* [Frames](/models/work-in-the-app/editor/frames) — frames are a prerequisite for exporting
* [Presentation Mode](/models/work-in-the-app/presentation-mode) — also available in presentation
* [Realtime Indicators](/models/work-in-the-app/editor/realtime-indicators) — drives the optional legend


# Visualizations

YouDesign Models offers dynamic **visualizations** that transform your boards into interactive dashboards, providing real-time insights and an enhanced user experience.

## Available Visualization Types

You can add the following types of visualizations to your board:

![Visualization types](/files/UryGgl3589McOGSHfQpW)

| Visualization Type                                                               | Description                                                                                                                  |
| -------------------------------------------------------------------------------- | ---------------------------------------------------------------------------------------------------------------------------- |
| [**Context Map**](/models/work-in-the-app/editor/visualizations/context-map)     | Offers a visual representation of the context and connections between various elements within your board.                    |
| [**Hierarchy Map**](/models/work-in-the-app/editor/visualizations/hierarchy-map) | Displays hierarchical relationships between items, ideal for visualizing parent-child structures within a system.            |
| [**Kanban Board**](/models/work-in-the-app/editor/visualizations/kanban-board)   | Organizes tasks or items into columns for workflow visualization, enabling you to manage project statuses easily.            |
| [**List View**](/models/work-in-the-app/editor/visualizations/list-view)         | Embeds a live, auto-refreshing ServiceNow data table into the board, perfect for showing record details alongside a diagram. |

## Adding Visualizations

You can add visualizations to your board in the same way you add shapes:

### Click & Click Method

1. Select the desired visualization from the **Shapes library** in the Diagramming panel.
2. Single-click on the visualization.
3. Move your mouse over the canvas and click to place the visualization at the desired location.

### Drag & Drop Method

1. Select the desired visualization from the **Shapes library**.
2. Click and hold the visualization, then drag it to the desired location on the canvas.
3. Release the mouse button to drop the visualization.

## Enhancing Visualizations with the Data Hub

After adding visualizations, you can populate them using the **Data Hub**:

* **Current State Items**: Use the Data Hub to add real-time items and reflect the current state of your data.
* **Future State Items**: Add shapes or other elements to visualize future states and planning within your board.


# Context Map

A Context Map is an interactive visualization that fans out from a single element across configurable levels of related data. Each level is color-coded, and the map loads its contents live from ServiceNow — so what you see is always the current state of your records.

Use a Context Map when you want to visualize:

* Everything that touches a business capability (applications, services, owners)
* A data flow expanded by hops
* Related records around a single source element, categorized by level

## Creating a Context Map

1. Add the **Context Map** visualization to your board from the shapes library.
2. Drop a **committed** element from the [Data Hub](/models/work-in-the-app/editor/data-hub) onto the Context Map shape — this sets the source element the map fans out from.
3. The **Configure Levels** dialog opens automatically.

<figure><img src="/files/wSSGsUqH1NsessCQBY3p" alt=""><figcaption></figcaption></figure>

## Configuring Levels

For each level in the dialog:

* **Table / Element** — pick the related table or specific element to include at this level.
* **Color** — pick a color for this level (the last level has no color picker; it uses its source color).

You can add and remove levels to control how deep the map fans out. **Level 1** is closest to the source; each subsequent level extends outward through related records.

Click **Load** to fetch the related records and populate the map.

## What You See After Loading

The Context Map renders as a radial or layered layout with the source element at the center and each level extending outward, color-coded per your configuration. You can:

* Select individual nodes to inspect them in the [Data Panel](/models/work-in-the-app/editor/data-inspector)
* Traverse relationships by hovering
* Add more levels by re-opening **Configure Levels** (pencil icon on the visualization's toolbar)

## Editing & Resetting

The Context Map toolbar includes:

* **Edit** (pencil icon) — re-opens the Configure Levels dialog
* **Reset** — clears the current configuration so you can start over

Both buttons are **hidden when the visualization is locked** or when the board is opened in read-only / presenter mode.

## Notifications

You'll see in-app toasts as the map loads:

* *"Loading Context Map"* (in progress)
* *"Context Map loaded successfully"*
* *"Error loading Context Map"* (with error details)

See [Notifications](/models/work-in-the-app/editor/notifications) for how these toasts behave.

## Limits & Gotchas

* **Only committed elements can be dropped on a Context Map.** Dropping an uncommitted element produces an error — commit the element first via the [Commit](/models/work-in-the-app/editor/commit) workflow.
* **You cannot drop multiple elements.** The error *"It is impossible to add multiple elements"* appears if you try — a Context Map has exactly one source.
* **Parent tables are not supported as a drop target** for a level. Drop individual tables instead.
* **The map loads asynchronously.** Expect a brief loading state for large related sets.
* **Configure Levels is modal.** You cannot edit the canvas while the dialog is open.

## Related

* [Data Hub](/models/work-in-the-app/editor/data-hub) — source of the committed element you drop onto the map
* [Hierarchy Map](/models/work-in-the-app/editor/visualizations/hierarchy-map) — a related visualization for parent/child trees
* [Commit](/models/work-in-the-app/editor/commit) — required before an element can be dropped on the Context Map


# Hierarchy Map

The Hierarchy Map provides a clear, structured view of records arranged in parent-child relationships. Instead of working with flat lists, it presents data in a tree-like format that highlights how elements are grouped, related, and dependent on one another. This visualization works with any table and adapts to the chosen dataset with configuration options, allowing you to tailor the results to your needs—focusing on high-level categories for an overview or drilling down into detailed records for deeper analysis.

## Key Features

1. **Relationship Visualization**: Easily understand parent-child structures through a clear, tree-based view.
2. **Simple Drag-and-Drop**: Add records from the Data Hub or Canvas with a quick drag-and-drop.
3. **Configurable Structure**: Select tables, apply filters, and tailor how your hierarchy is built.
4. **Customizable Layout**: Adjust alignment, style, and layout to match your preferred viewing experience.

## Getting Started with Hierarchy Map

This video will get you started with key aspects of **Hierarchy Map** in YouDesign Models:

[Watch: Hierarchy Map Introduction](https://www.youtube.com/watch?v=ZxTSZT2gXn0)

## How to Use

### Add the Hierarchy Map to the Canvas

Like any other visualization, you can add it from Diagramming Panel > Visualization Section > Hierarchy Map. Simply drag and drop it onto the canvas.

<figure><img src="/files/1unDtUW9UF95LMakIb4M" alt=""><figcaption></figcaption></figure>

### Load Data

To begin, you need to define a **primary table** (starting table). There are two ways to do this:

**From Configuration**: Select the Hierarchy Map, open the configuration panel from the toolbar, and choose your primary table.

![Load data - from Configuration](/files/nOrqA9ozlsJ5MSqB9lab)

**From Data Hub**: Drag elements from your Data Hub into the Hierarchy Map. This will add the selected elements **along with their children** (based on parent/child relationships).

<figure><img src="/files/4otd6x7IogqgJau17XQH" alt=""><figcaption></figcaption></figure>

**From the Canvas**: Dragging elements from the canvas will add them as records, but **without parent/child relationships.**

<figure><img src="/files/tAvvlSH9YHgs9JTu3NCO" alt=""><figcaption></figcaption></figure>

### Extend Your Data

After setting your **primary table**, you may want to see how it connects to other tables. To extend the hierarchy:

1. Open the **Configuration** window.
2. Select an additional table to include.
3. The selected table will appear under your primary table in the **Included Tables** list.
4. Click **Apply** to save your changes and regenerate the results.

![Extending Data in Configuration Dialog](/files/N44rhENmuAviH6AWJDyh)

> **Tip:** You can also click **Load Related Tables** when hovering over a table. This will automatically include all existing classes related to the target table, saving you from manually adding them one by one.

### Filter Your Data as Needed

Open the **Configuration** window and click the **Filter** icon next to the table selector. This will display a filter interface similar to the one available in the **Data Hub**.

Filter Capabilities within the Hierarchy Map are separated from the Data Hub ones and are specific to each Hierarchy Map instance on your canvas.

When finished, apply the filters and then click Apply in your **Configuration** window to refresh and regenerate your results.

## Interface Overview

### Toolbar Options

<figure><img src="/files/r8Xgvv3xJLnZ95DGdvMq" alt=""><figcaption></figcaption></figure>

**Configuration Button**: Appears always when selecting the Hierarchy Map with or without data.

### Toolbar Options with Content

![Hierarchy Map - Toolbar Setting with content](/files/iTW0pdtpCJihQdfgM200)

1. **Refresh** – Rebuilds the Hierarchy Map based on the current configuration bringing in the latest updates from the repository.
2. **Type, Alignment Options and Autolayout** – Provides options to change how the content is aligned and choose the type of nodes

   The Type defines the *visual presentation* of nodes and labels.

   1. **Traditional** — Show icon and table name label.
   2. **Compact** — Show icon only, hide table name label.
   3. **Text Only** — Show text label only, hide icon.

<figure><img src="/files/YyvHhhA5Df2E5I1GawtU" alt=""><figcaption></figcaption></figure>

1. **Level Slider** – Filters the content by hierarchy level.
2. **Style Options** – Allows you to change background and border colors.
3. **Reset** – Clears all configuration and content, restoring the Hierarchy Map to its initial state.
4. **Export** – Exports the map as an image.
5. **Lock** – Locks the Hierarchy Map, treating it like any other fixed shape on the canvas.

### Setting Dialog

![Hierarchy Map - Setting Dialog](/files/DPprPguxsQO3u8AJoxU9)

1. **Table Selector** – Allows you to add tables to the list. If no tables are added, the first one will automatically become the primary table.
2. **Lock Table** – Prevents new tables from being automatically added to the list when dropping them into the Hierarchy Map.
3. **Filter** – Opens filter options, similar to those available in the Data Hub Filters.
4. **Load CI Relationships** – Loads CI relationships for the selected primary table when enabled.
5. **Primary Table Indicator** – Marks the selected table as the primary table. Only one table can be set as primary at a time. Changing it will remove previously dropped elements.
6. **Load Related Tables** – Loads all tables associated with the selected table based on existing relationships.
7. **Delete Table** – Removes the selected table entry from the configuration.
8. **Apply** – Saves your settings and regenerates the Hierarchy Map with the updated configuration.

### Level Slider

Control Hierarchy Levels with Ease. The Level Slider in the context toolbar lets you choose the depth of detail you want to see in the Hierarchy Map.

**How it works:**

* The Level Slider in the context toolbar lets you choose the depth of detail you want to see in the Hierarchy Map.
* Simply drag the slider to hide complex nested levels and focus on the information that matters most to you. This feature ensures a clearer and more tailored view of your project's structure, enhancing your overall experience with YouDesign Models.
* Dynamic Display: Adjusting the slider hides items with higher levels of nesting. Groups without children, due to hidden items, are converted into simple data hub items for clarity.

![Hierarchy Map Level Slider](/files/mbt2vKSKktBFYRF7EGkc)

> **Note:** When you drop elements into the Hierarchy Map, the maximum level of nesting is automatically preselected based on the data.

### Alignment Options and Autolayout

**Auto Layout**

* When auto-layout is ON, Hierarchy Map will automatically adjust its borders according to the content inside.

**Customize Layout**

* Available only when Auto Layout is toggled OFF.
* Change the number of stacked rows and columns of elements in the hierarchy map, customizing the layout to suit your preferences.

## Tips for Effective Use

* **Start with the Basics**: Begin by dragging key elements onto the Hierarchy Map to establish the core structure.
* **Add Details**: Expand on each element by adding more data to provide a comprehensive overview.
* **Experiment with Layouts**: Play around with the orientation and arrangement of elements to find the most effective visual representation.
* **Use Frames** to easily organize and quickly find what you need on your YouDesign Models Board.

The YouDesign Models **Hierarchy Map** is a versatile tool that empowers you to visualize and manipulate the structure of your content with ease. Whether you're planning projects, organizing data, or analyzing relationships, the Hierarchy Map is here to enhance your workflow and provide a clear, visual understanding of your content.

Start mapping your ideas today with **YouDesign Models**!


# Kanban Board

## What is Kanban?

* A Kanban board is a visual management tool used to represent and manage the workflow of tasks or work items within a project or process.
* Each task is represented by a card, containing information about the task. The board allows team members to visualize the flow of work, track progress, identify bottlenecks, and maintain a steady pace of work.
* Kanban boards promote transparency, collaboration, and continuous improvement by providing a clear overview of the work in progress and facilitating efficient task management.

## Access Kanban Board

1. Open your YouDesign Models Board in Editor mode.
2. In the Left Sidebar open the Diagramming view.
3. By clicking "Visualizations" the drop-down menu will expand offering you the selection of Visualizations where you can find Kanban Board.
4. Drag-and-drop or click-and-place Kanban Board Visualization on canvas.

<figure><img src="/files/5HfvPzm11iX3JKGGLppH" alt=""><figcaption></figcaption></figure>

## Kanban Components

![Kanban Board](/files/XlXH5XCFI56slch8IaOR)

| Feature                                  | Description                                                                                                                                                                                                    |
| ---------------------------------------- | -------------------------------------------------------------------------------------------------------------------------------------------------------------------------------------------------------------- |
| **Kanban Board Name**                    | Double-click to change Kanban Board Name                                                                                                                                                                       |
| **Lane**                                 | Horizontal sections on the board that represent different stages of the workflow. Each lane/column typically corresponds to a specific step in the process, such as "Idea", "Plan", "In Progress", "Done" etc. |
| **Toggle Lane View**                     | Click to toggle between condensed and expanded Lane View.                                                                                                                                                      |
| **Card**                                 | A visual representation of a work item. You can use any Diagramming Shape or Data Hub element as a card within Kanban Board.                                                                                   |
| **Lane Name (#Number of Cards in Lane)** | Double-click to change Lane name. #Number indicates the number of current cards in that Lane.                                                                                                                  |

> **Note:** Lanes and cards are managed manually — add new lanes with the **Add Lane** toolbar action, and duplicate or drag existing cards to populate them. Native lane/card elements are not available as standalone library shapes in v26.

## Kanban Board Toolbar

Click on Kanban Board to open the following Toolbar:

![Kanban Toolbar](/files/wBmxOyXhyR0YnZdoUjTv)

| Feature        | Description                                                                                                                                                       |
| -------------- | ----------------------------------------------------------------------------------------------------------------------------------------------------------------- |
| **Add Lane**   | Click to add one lane on the most right position of your Kanban Board                                                                                             |
| **Lock**       | Locking an item is a safeguarding measure. It ensures that once an item is specifically positioned or edited, it won't be accidentally deleted, moved, or edited. |
| **Export PNG** | Click to download PNG image of your Kanban Board in current state.                                                                                                |
| **Reset**      | Resets Kanban Board to the beginning state, same as when it was created.                                                                                          |

## Tips for Effective Use

* **Prioritize Tasks**: Ensure that tasks are prioritized effectively to focus on delivering the most valuable work first.
* **Regularly Review and Improve**: Hold regular meetings or checkpoints to review the Kanban board with the team. Identify bottlenecks, blockers, and areas for improvement, and collaboratively brainstorm solutions to address them.
* **Encourage Collaboration and Communication**: Kanban promotes transparency and collaboration among team members. Encourage open communication and collaboration to ensure that everyone is aligned on goals, priorities, and progress.
* **Respond to Changes Quickly**: Kanban is flexible and allows for changes to be made easily. Be prepared to adapt the board and workflow as needed to respond to changing priorities, new requirements, or unexpected challenges.
* **Provide Training and Support**: Ensure that team members understand how to use the Kanban system effectively. Provide training, guidance, and support as needed to help team members adopt best practices and maximize the benefits of Kanban.

## Related

* [Visualizations Overview](/models/work-in-the-app/editor/visualizations) — other visualization types
* [Shapes](/models/work-in-the-app/editor/shapes) — used as cards on the Kanban board
* [Data Hub](/models/work-in-the-app/editor/data-hub) — drop records as cards from ServiceNow tables


# List View

List View embeds **live ServiceNow data** directly into your board as a tabular view. Instead of drawing a shape per record, you drop a table into a List View container and every matching record appears as a row — automatically refreshed when the underlying ServiceNow data changes.

Use List View when:

* You want to show a **dataset alongside a diagram** (e.g. a capability map on the left, a list of supporting applications on the right).
* The records are too many for a useful node-and-link view.
* Stakeholders need to see **specific field values** like steward, user base, lifecycle status in a scannable grid.
* The data will change frequently and you want the visualization to track ServiceNow without manual updates.

## Adding a List View

1. Open the left sidebar and click **Visualizations**.
2. Drag the **List View** tile onto the canvas (or click-then-click to place).
3. An empty List View container appears with the prompt *"Open the Data Hub and place your items here…"*

<figure><img src="/files/R68jMAVmv37nqyzPj2Gn" alt=""><figcaption></figcaption></figure>

## Populating the List View

1. Click the **Data Hub** icon in the control bar to open the Data Hub.
2. Select the **table** you want to list (e.g. Business Application).
3. Drag either:
   * The **table name** — shows every record of that type (subject to filters)
   * A **specific record** — narrows the list to that single item's details
4. Drop onto the List View container.

The list populates with rows from ServiceNow.

## What Appears in the List

Each row shows the ServiceNow record's field values, laid out in columns. The columns default to the fields configured for the shape (see [Shape Fields](/models/admin/shape-fields) on the admin side). Sample columns for a Business Application table might include:

* Data Currentness
* Steward
* User base
* Internal Lifecycle
* Data Completeness
* Name
* Description

## Pagination

Large result sets are paginated inside the List View container:

* **Rows per page** — adjustable at the bottom of the list
* **Page navigation** — `<` and `>` arrows with a "1–10 of 80"-style range indicator
* Users inside the board (edit or presentation mode) can flip pages without leaving the board.

## Live Updates

Data in the List View reflects the current state of the ServiceNow records at load time and refreshes when the board is reopened or a record-watcher update fires. Edits to records in ServiceNow appear automatically — no manual diagram refresh.

This makes List View a useful companion to dashboards that need to stay accurate even when the diagram author isn't actively editing.

## List View vs. Other Visualizations

| Situation                                            | Use                                                                          |
| ---------------------------------------------------- | ---------------------------------------------------------------------------- |
| Record-level detail, many rows, changes over time    | **List View**                                                                |
| Parent/child hierarchy                               | [Hierarchy Map](/models/work-in-the-app/editor/visualizations/hierarchy-map) |
| Central element with multiple levels of related data | [Context Map](/models/work-in-the-app/editor/visualizations/context-map)     |
| Task-flow with status lanes                          | [Kanban Board](/models/work-in-the-app/editor/visualizations/kanban-board)   |

List View is intentionally minimal. If you need to highlight anomalies, pair it with [Realtime Indicators](/models/work-in-the-app/editor/realtime-indicators) on the individual records, or embed it alongside a relationship-based visualization.

## Tips

* **Use filters to scope the list.** Apply a Data Hub filter before dropping the table to limit what shows up.
* **Combine with a hierarchy or context map** — one side shows structure, the other shows the data detail.
* **Keep the List View reasonably sized.** Very large lists slow board loads; use filters or use pagination deliberately.
* **Check which fields are configured.** If the columns aren't what you expected, the fields shown come from the [Shape Fields](/models/admin/shape-fields) configured for the underlying shape — an admin can expose more.

## Limits & Gotchas

* **List View doesn't support drawing relationships from/to rows.** Each row is a live data record, not a draggable shape.
* **Sorting and column customization are limited** in v26 — the list shows the fields configured in Shape Fields, in that order.
* **Locked List Views can't be edited** — lock state hides edit controls; remove the lock to re-target the view.
* **List View respects user ACLs.** Users only see rows they're permitted to read in ServiceNow — if a user's list looks sparse, check their role access to the underlying records.
* **The list is read-only on the board.** Editing a record's fields is done through the [Data Panel](/models/work-in-the-app/editor/data-inspector) on a separate shape, or through the ServiceNow form.

## Related

* [Visualizations Overview](/models/work-in-the-app/editor/visualizations)
* [Data Hub](/models/work-in-the-app/editor/data-hub) — the source of the records displayed
* [Shape Fields](/models/admin/shape-fields) — controls which columns appear
* [Hierarchy Map](/models/work-in-the-app/editor/visualizations/hierarchy-map)
* [Context Map](/models/work-in-the-app/editor/visualizations/context-map)
* [Realtime Indicators](/models/work-in-the-app/editor/realtime-indicators)


---

[Next Page](/llms-full.txt/1)